Process Viewer: a Case Study
This case study is to be read and applied with reference to Ivor Horton's Beginning Visual C++6, published by Wrox Press, and chapter numbers in the text refer to the said publication. The goal of this case study is to put together the programming principles covered in the book to transform a set of ideas into real and appealing applications using Visual C++. We will present each step from the specification of features up to the user interface choices without the algorithm architecture and application architecture.
As you progress through this case study, you will define and implement an application to list and view processes running under Windows NT. For each process we will present its description, and include any unusual or interesting pieces of information.
We will rely on concepts which have been presented throughout the book such as:
Basic and advanced programming techniques, such as loops and recursion
C++ features like class inheritance and data encapsulation
Most of the Visual C++ Wizards
The MFC document/view architecture to build robust and flexible relationships between each class
Collection classes, such as maps
In this case study, you will learn:
How to use list view and tree view Windows controls in an efficient way
How to make your views communicate using their corresponding document’s
How to get low level system information from Windows NT using
PSAPI and NTDLLHow to use some hidden Visual C++ features to ease your development
How to work with splitters
How to send data to the clipboard
Some golden rules to keep in mind when you develop applications
You will also get, for free, some reusable classes:
Font wrappers to let you work easily with fonts
Window position manager to let your application remember where its windows are
Windows NT low level system information such as process and module lists
Understanding What to Do
Defining the Problem
In the first part of this case study, we will be developing a Process Viewer application, which we will call the Advanced Process List. However, our first task is to define precisely what we want this process list to be able to do.
Take a look at the existing tools
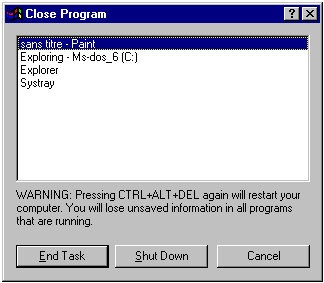
As we start to plan our strategy, it is always a good idea to take a look at what has already been implemented by other people. Under the Win32 operating system, there are different ways of seeing which processes are running at any one time. Pressing the
Ctrl+Alt+Del key combination, Windows 95 offers a list of the running applications but only those with a window:
On the other hand, Window NT provides an enhanced native process viewer named
Window NT Task Manager, which displays, among many other things, memory consumption per running process, but not the process’s main window title: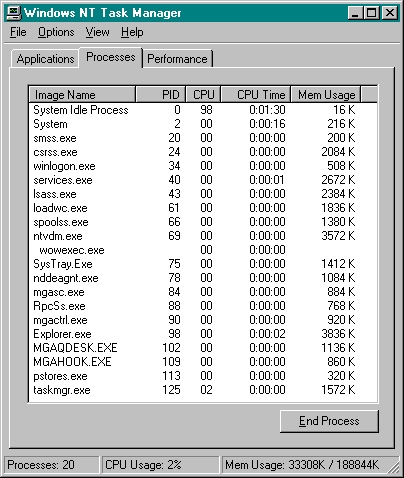
Visual C++ includes two other tools which may help you. In addition to enumerating the windows and watching the messages ballet,
Spy++ displays the running processes and their windows: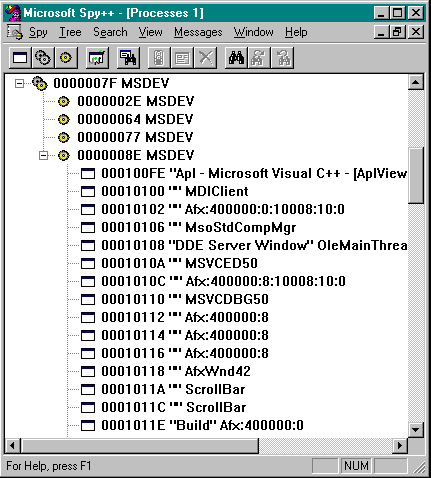
Spy++
provides this kind of hierarchical display when you select the Spy/Processes menu or by typing Ctrl+P. The meaning of each of the icons is as follows:
![]()
![]()
![]()
A variant of
Spy++ and the process viewer tools are also available in the Microsoft Platform SDK, and can be downloaded free of charge from the Microsoft Website.However the best tool to see the running processes is called
Process Viewer. The installed executable file and location depend on the version of Windows you are using. For Windows 95, Microsoft Visual Studio\common\tools\win95\Pview95.exe has the following icon:![]()
This displays the following process list description:
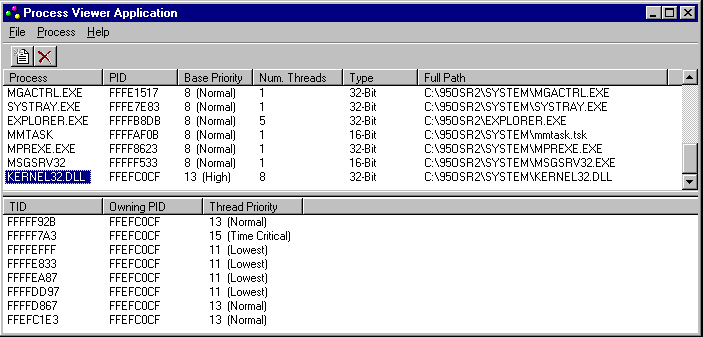
The corresponding Windows NT file
Pview.exe has this icon:![]()
This displays the following user interface:
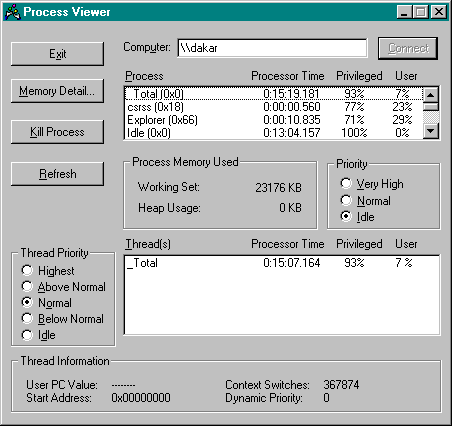
This powerful tool allows you to connect to another machine and get the same process-oriented information. In addition to the thread list, you can also get memory details:
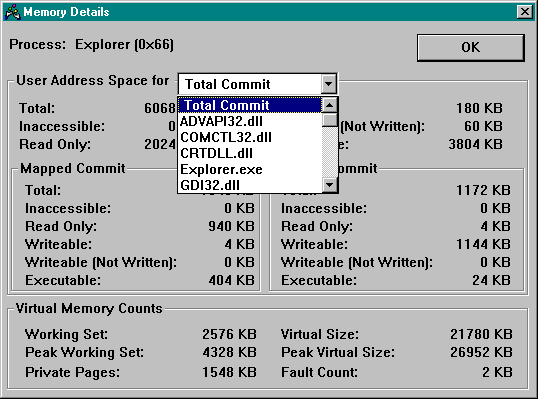
The combo box can be used to list the loaded modules (the executable itself as well as the DLLs it needs).
The source code of this process viewer can be found in MSDN under SDK Windows NT Samples "Pviewer: Process Viewer". After reading this source code, you’ll see that Windows NT provides access to running processes and threads through another interface which is the Registry!
Another nice tool that has disappeared with Win32 operating system is WPS which was brought by the 16 bit VC++ compiler and has this icon:
![]()
It displays each and every loaded 16 bit DLL and its application:
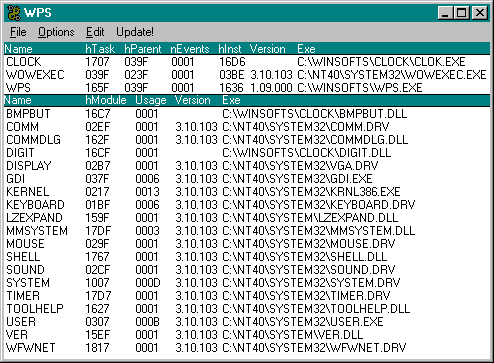
It would be nice to have the same kind of information for the 32 bit world. This will be one of the supported features of our Advanced Process List.
For Your Information
Visual C++ installs a console mode application called
pstat.exe in the Program Files\Microsoft Visual Studio\Vc98\Bin\Winnt directory. This tool provides the list of running processes and their threads:User Time Kernel Time Ws Faults Commit Pri Hnd Thd Pid Name
20016 23186 File Cache
0:00:00.000 0:11:08.130 16 1 0 0 0 1 0 Idle Process
0:00:00.000 0:00:18.015 200 1375 36 8 178 24 2 System
0:00:00.140 0:00:00.110 36 2751 164 11 30 6 20 smss.exe
0:00:00.210 0:00:00.731 1080 1350 1528 13 219 8 24 csrss.exe
0:00:00.100 0:00:00.680 1080 1440 1120 13 50 3 34 winlogon.exe
0:00:00.310 0:00:01.642 2684 887 1084 9 193 16 40 services.exe
0:00:00.030 0:00:00.090 200 640 892 9 76 12 43 lsass.exe
...
It also supplies details of each thread's running or waiting state for each process:
pid: 2 pri: 8 Hnd: 178 Pf: 1375 Ws: 200K System
tid pri Ctx Swtch StrtAddr User Time Kernel Time State
1 0 700 801c3b82 0:00:00.000 0:00:15.071 Wait:FreePage
3 16 1 8010aec6 0:00:00.000 0:00:00.000 Wait:EventPairLow
4 16 1 8010aec6 0:00:00.000 0:00:00.000 Wait:EventPairLow
5 16 986 8010aec6 0:00:00.000 0:00:00.050 Wait:EventPairLow
6 16 347 8010aec6 0:00:00.000 0:00:00.000 Wait:EventPairLow
7 16 1632 8010aec6 0:00:00.000 0:00:00.030 Wait:EventPairLow
8 12 232 8010aec6 0:00:00.000 0:00:00.060 Wait:EventPairLow
9 12 2663 8010aec6 0:00:00.000 0:00:00.170 Wait:EventPairLow
a 12 276 8010aec6 0:00:00.000 0:00:01.111 Wait:EventPairLow
b 15 133 8010aec6 0:00:00.000 0:00:00.010 Wait:EventPairLow
c 18 422 8011f9ba 0:00:00.000 0:00:00.020 Wait:VirtualMemory
d 17 718 80178b5c 0:00:00.000 0:00:00.070 Wait:FreePage
e 16 1149 8013b7e8 0:00:00.000 0:00:00.010 Wait:Executive
f 23 2518 8013b8ba 0:00:00.000 0:00:00.020 Wait:Executive
10 16 1 80110c04 0:00:00.000 0:00:00.000 Wait:EventPairLow
11 17 1 80110c04 0:00:00.000 0:00:00.000 Wait:EventPairLow
12 15 7 8019fb74 0:00:00.000 0:00:00.000 Wait:LpcReceive
1b 17 1 801223a4 0:00:00.000 0:00:00.000 Wait:VirtualMemory
...
pstat.exe
is very useful when you want to find out why an application or one of its threads is blocked. Lastly, you can also discover the list of kernel mode components of Windows NT:ModuleName Load Addr Code Data Paged LinkDate
----------------------------------------------------------------------
ntoskrnl.exe 80100000 270272 40064 434816 Sun May 11 06:10:39 1997
hal.dll 80010000 20384 2720 9344 Mon Mar 10 22:39:20 1997
atapi.sys 80001000 20736 1088 0 Thu Apr 10 21:06:59 1997
SCSIPORT.SYS 80007000 9824 32 15552 Mon Mar 10 22:42:27 1997
ppa3nt.sys 801d7000 22560 352 0 Mon Apr 07 23:58:15 1997
Disk.sys 801de000 3328 0 7072 Fri Apr 25 04:27:46 1997
CLASS2.SYS 801e2000 7040 0 1632 Fri Apr 25 04:23:43 1997
Fastfat.sys 801e6000 6720 672 114368 Mon Apr 21 22:50:22 1997
Advanced Process List features
After this general survey of the process viewers that exist, it is now time to decide what features will be implemented by our Advanced Process List:
#1: It will display the list of running processes with the following description for each process:
Process ID
Internal name
Corresponding executable filename
Main window handle and title
Memory consumption
Handle consumption
ID and name of the parent process which has spawned it (such as Explorer for a double-click application )
List of loaded modules such as DLLs and their loading address
#2: It will display the process hierarchy to show which process has spawned the others. A spawned process will appear under its parent process which will be under its own parent and so on. Even if you can get the same description in Linux with
We should not forget some additional features which are available in most Windows applications:
#3: Allow the user to copy our process information onto the clipboard
#4: Allow the user to select a font
#5: Allow the user to refresh the screen, in the case of a static display which has to be updated manually
#6: Let the application remember the position and size of its main window
Choosing the User Interface
The next important step is to choose which kind of visual interface will be available to the user. Almost every existing tool we have found displays a list with one line per process. Another pane displays additional information associated to the highlighted process, such as the thread part of the Windows 95 Process Viewer.
Each line contains information of varying sizes, for example the window title, the filename, the number of running threads. A better way to represent such a list is to use the Windows list view control. With the same ease of use in mind, and since we want to display the tree of parent and spawned processes, it would be nice to use the Windows tree view control. Finally, a splitter will be useful to allow the user to resize each pane as required. These three controls will be presented as we develop our project. The overall result will look like the following screenshot:
Analyzing the Problem
We want to build a robust and extensible application architecture using the MFC document/view set of classes. It is not difficult to map the required classes on top of this graphical representation of the application user interface:
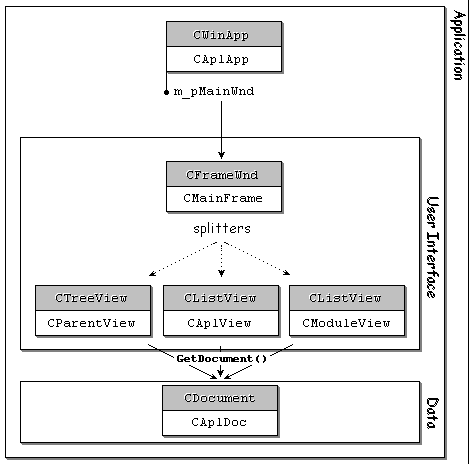
Through the document template, a
CAplDoc document is created and bound to a CMainFrame window which wraps the three views within two nested splitters:
CAplView
for the process listCModuleView
for the loaded module listCParentView
for the spawned processes tree
Creating the Application Skeleton with AppWizard
Building the Application with an empty User Interface
Before explaining how to get the low level system description of the processes and modules, we will use Visual Studio to build our application with nested splitter windows.
Using the MFC Document/View Framework
First, you should keep in mind the relationship between the classes and instances of the document/view framework which will be generated by AppWizard:
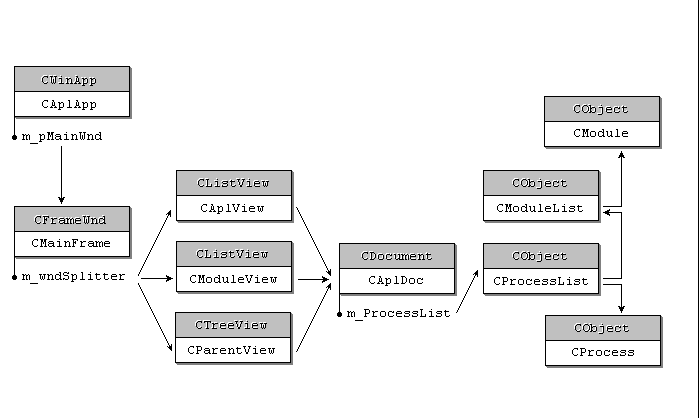
As you have already seen in Chapter 13,the application keeps a pointer to its main window. Our
CMainFrame object will contain splitters with views inside. As usual, each view can access its document using its GetDocument() method. We will see later how the document is used to give a high level access to process and module description.AppWizard: Step by Step Construction
It’s time to invoke AppWizard and choose the options to create the application skeleton which will match our user interface design. Create a new project workspace by selecting
MFC AppWizard (exe) as the project type and defining Apl (Advanced Process List) as the project name: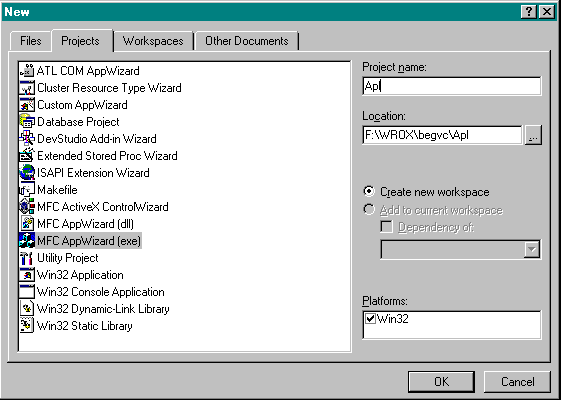
Step 1
Select
SDI as application type with Document/View architecture support.
Step 2
Don’t change anything since we need no database support.
Step 3
Remove
ActiveX Controls support.
If we want to use ActiveX controls later on, all we will need to do is call
Step 4
As we will not be supporting printing, remove
Printing and Print Preview, and set to zero the number of files stored in the recent file list. Click the Advanced... button and set the Main frame caption as Advanced Process List. Notice that we won't check the Use split window checkbox in the Window Styles tab. Although we want a splitter, this does not specify the kind of splitter you get when you check this option: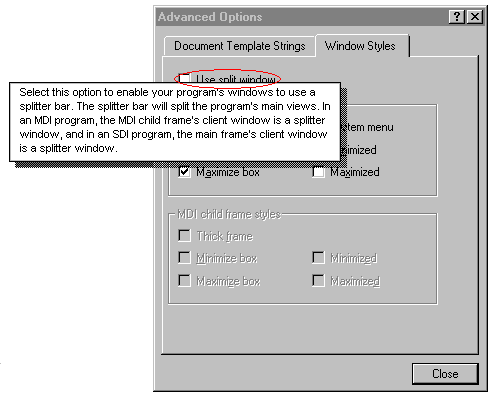
As a matter of fact, we will define a static splitter with two different views in each pane and not the same duplicated view within the frame window.
Step 5
Choose the
Windows Explorer project style. With this style selected, AppWizard will generate a skeleton application with a main window split vertically: a tree view in its left pane and a list view in its right pane. The next step will allow us to choose the name of the classes corresponding to each pane.
Step 6
This final step is dedicated to changing the name of the classes generated by AppWizard. We keep the right pane view as
Resulting application
You can now compile the project typing
F7 and execute the empty application with Ctrl+F5: Alternatively you can select the Build option from the Build menu to compile and link the project and then Build | Execute Apl.exe to run.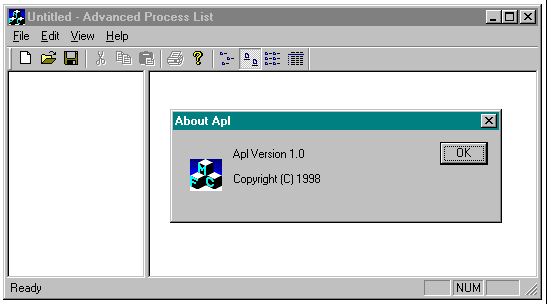
Modify the generated Skeleton Application
The resulting skeleton application has some features we don’t need while others need to be added. We will see how to do the housekeeping on the AppWizard generated skeleton before adding complexity with new source code.
General Advice
In term of housekeeping, Visual C++ provides some help which will be introduced first.
Whitespace or tab
The code generated by AppWizard does not take into account some of the layout options you might have chosen in Visual C++, for example the
Tab size and Indent size options in the Tools | Options | Tabs menu: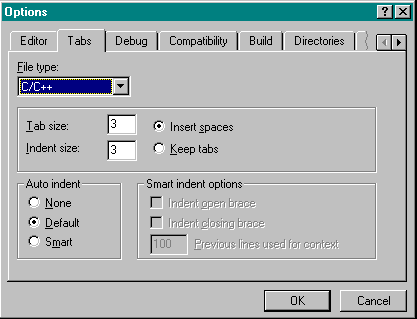
If you prefer to use whitespace characters instead of Tab characters when indenting code, this is not taken into account by AppWizard – it sets tabs as the default when it inserts code. However, you can easily convert the tabs into whitespace. Just select the
Untabify Selection option from the Edit | Advanced menu (or type Alt+E followed by A and N), having selected a section of text to be converted..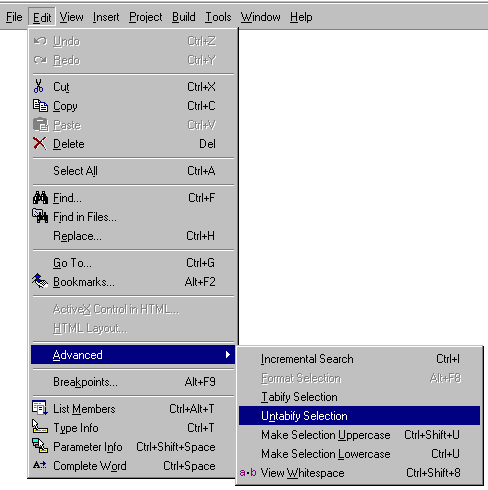
You can also select
Edit | Advanced | View Whitespace or type Ctrl+Shift+8 and to see the tab and whitespace characters (just like in Microsoft Word when you checkCustomizing the
ClassView windowFor the moment, our project does not have many classes. However, as you add new classes this alphabetically sorted list will prove difficult for you to make sense of them. It is a good idea to create folders and place your classes inside them with a simple drag and drop. For this particular project, we will need four new folders. Visual C++ allows you to create folders in the
ClassView window and move your classes inside. These are the folders that you will need:
Application & Frame:
About box, application and main window classes are stored here.Document & Views:
Document and its associated views will be in this folder.Helpers:
We will put our toolbox classes here.Process & Module:
All process and module descriptions will be managed by the classes stored here.Right-click on
AplClass and select New Folder… before changing the name of the folder to "Application & Frame". Do the same for the other three folders.Updating the Resources
It is now time to update the resources generated by AppWizard.
About box and application icon
First of all choose your own application icon and, if you so wish, redesign the
About box. To achieve these two tasks, click on the ResourceView tab and change the IDR_MAINFRAME icon and the IDD_ABOUTBOX dialog resources:
Define the right version
You should always think about versioning your application:
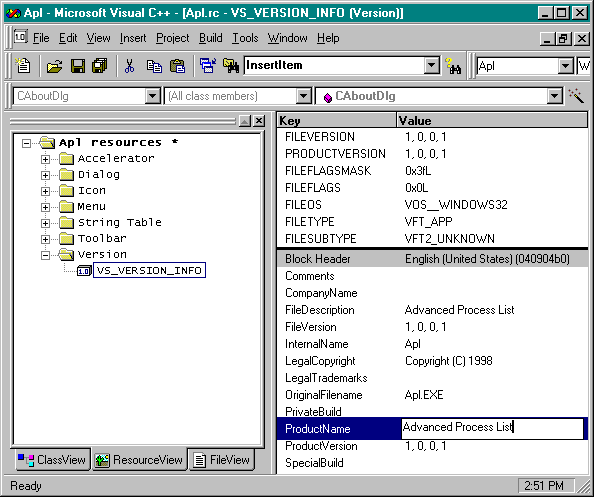
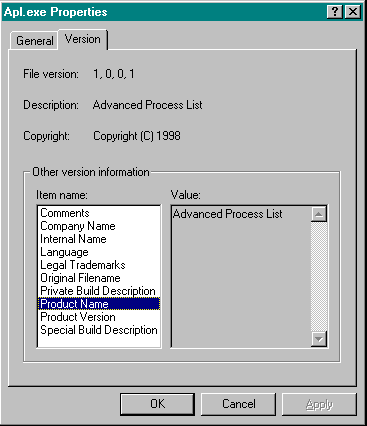
The interesting fields to update are the
FileVersion and ProductVersion during the development of your application. You should also change the ProductName, FileDescription and LegalCopyright.This description may be used by an installer to ensure that a more recent file is not erased. After recompiling the resource file, you can immediately check the description using Windows Explorer by right-clicking on the executable file to see the properties:
Dealing with Unwanted Resources
Once we have updated the default resources to fit our user interface preferences, it is time to remove the unwanted resources generated by AppWizard:
Accelerators
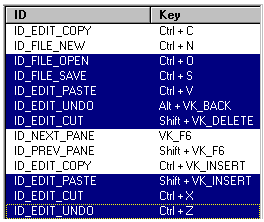
Select and delete every accelerator we don't need anymore. Keep "copy", "next/prev pane" (to jump from one splitter pane to the other) and "file new" which will trigger the refresh of the lists.
Menus
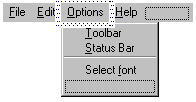
Remove the following menus:
File | Open
, File | Save, File | Save As, Edit | Undo, Edit | Cut, Edit | Paste.Change to following:
File | New
to File | RefreshView
to OptionsAfter renaming
File | Refresh, you should also change the shortcut into F5 and the associated text which appears in status bar and tooltips, as shown in the following dialog box: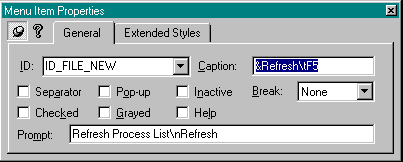
Also, add the following menu option:
Options | Select Font
This has the following prompt string: "Select the font to be used\nSelect Font"
Strings
We only need to keep the following strings:
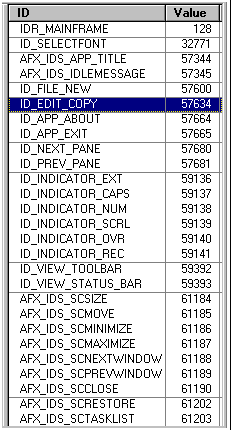
Modifying the toolbar
The application toolbar also needs to be updated by removing unwanted buttons, in adding access to new features such as the font selection and in changing the
File/New buttonSince we don't want to allow the user to change the type of display for the list views, you have to remove the corresponding toolbar buttons by dragging out the following row of buttons:
![]()
And after having suppressed the clipboard buttons too, you should end up with:
![]()
Dealing with Unwanted Source Code
In addition to the resources, AppWizard has also generated some source code which is not needed for our Advanced Process List and it is a good habit to remove it. If you are not interested in this housekeeping work, you can skip this section since it won't change the application's behavior.
Remove the list view style helpers
AppWizard has generated source code which is responsible for the list view options we have just removed from the resources. This code has been added to the frame window and so open
MainFrm.h and MainFrm.cpp to start editing.First, in the header file, remove the declaration of
GetRightPane(), a helper method giving access to the CAplView right pane of the splitter:// Implementation
public:
virtual ~CMainFrame();
CAplView* GetRightPane();
Still in
MainFrm.h, remove the declaration of the handlers which were called to update the user interface of the toolbar according to the style of the list view in the right pane and to change that style:afx_msg void OnUpdateViewStyles(CCmdUI* pCmdUI);
afx_msg void OnViewStyle(UINT nCommandID);
Next, remove the implementation code for these three methods at the bottom of
MainFrm.cpp without forgetting their association inside the message map macros at the top of the same file.BEGIN_MESSAGE_MAP(CMainFrame, CFrameWnd)
//{{AFX_MSG_MAP(CMainFrame)
// NOTE - the ClassWizard will add and remove mapping macros here.
// DO NOT EDIT what you see in these blocks of generated code !
ON_WM_CREATE()
//}}AFX_MSG_MAP
ON_UPDATE_COMMAND_UI_RANGE(AFX_ID_VIEW_MINIMUM, AFX_ID_VIEW_MAXIMUM,
OnUpdateViewStyles)
ON_COMMAND_RANGE(AFX_ID_VIEW_MINIMUM, AFX_ID_VIEW_MAXIMUM, OnViewStyle)
END_MESSAGE_MAP()
Finally, AppWizard has added a method to
CAplView which is triggered when the style of the view is changed. Since we only support the LVS_REPORT style, you can delete its declaration in AplView.h://{{AFX_MSG(CAplView)
// NOTE - the ClassWizard will add and remove member functions here.
// DO NOT EDIT what you see in these blocks of generated code !
//}}AFX_MSG
afx_msg void OnStyleChanged(int nStyleType, LPSTYLESTRUCT lpStyleStruct);
DECLARE_MESSAGE_MAP()
Delete its implementation in
AplView.cpp://///////////////////////////////////////////////////////////////////////////
// CAplView message handlers
void CAplView::OnStyleChanged(int nStyleType, LPSTYLESTRUCT lpStyleStruct)
{
//TODO: add code to react to the user changing the view style of your window
}
Remove
CAplView and CParentView default methodsAppWizard generates
OnDraw() methods for CAplView and CParentView to allow you to insert drawing code for these views, but as they are derived from CListView and CTreeView respectively, you will not need to implement the drawing code since it has already been done by the Windows control. Remove the OnDraw() declarations from the header files and their implementations in the corresponding .cpp files.Remove
CAplDoc default methodsAfter the main frame window and its views, you have to remove some code for the document. Since we don't want to save the content of our document, we don't need to implement its
Serialize() method, so delete this method declaration from AplDoc.h:// Overrides
// ClassWizard generated virtual function overrides
//{{AFX_VIRTUAL(CAplDoc)
public:
virtual BOOL OnNewDocument();
virtual void Serialize(CArchive& ar);
//}}AFX_VIRTUAL
Do the same in
AplDoc.cpp for its implementation:void CAplDoc::Serialize(CArchive& ar)
{
if (ar.IsStoring())
{
// TODO: add storing code here
}
else
{
// TODO: add loading code here
}
}
Main Frame Title: Removing "Untitled"
The default behavior of a SDI main frame is to construct its title by appending the application name (given to AppWizard in the Advanced dialog
Main frame caption during Step 4) to the name of the document (usually the name of the loaded file). Since our application does not load any file, the string "Untitled" is used as document name and we get the following title string:![]()
The easiest way to prevent the document name from appearing in the main window title is to remove the MFC frame style
FWS_ADDTOTITLE from the main frame before its creation. The CMainFrame method PreCreateWindow() is the right place to do this since it is virtual and called by the framework just before the window is created:Delete the existing implementation in
MainFrm.cpp:BOOL CMainFrame::PreCreateWindow(CREATESTRUCT& cs)
{
if( !CFrameWnd::PreCreateWindow(cs) )
return FALSE;
// TODO: Modify the Window class or styles here by modifying
// the CREATESTRUCT cs
return TRUE;
}
Replace with the following code:
BOOL CMainFrame::PreCreateWindow(CREATESTRUCT& cs)
{
// change the default style to remove the document name from the title
cs.style &= ~FWS_ADDTOTITLE;
// default MFC processing
return CFrameWnd::PreCreateWindow(cs);
}
The result is what we expect:
![]()
For Your Information
MFC defines by default
FWS_PREFIXTITLE as another frame window style which only has a meaning if FWS_ADDTOTITLE is set. In this case, you keep the document name but instead of beginning the title with it, you get the opposite: the application name followed by the document name. This is the default style for MDI applications such as Microsoft Word.![]()
If you should want to implement this, here is the code to write:
BOOL CMainFrame::PreCreateWindow(CREATESTRUCT& cs)
{
// default MFC processing
// --> add FWS_PREFIXTITLE to cs.style
if( !CFrameWnd::PreCreateWindow(cs) )
return FALSE;
// change the default style to invert the application name and the document name
cs.style &= ~FWS_PREFIXTITLE;
return TRUE;
}
You may be wondering why, unlike our previous sample,
cs.style is set after having called CFrameWnd::PreCreateWindow(). The reason is simple. Since it adds FWS_PREFIXTITLE, it would have been useless to remove FWS_PREFIXTITLE before calling it.User Interface Features
It is time to get down to the nitty-gritty of our project. From now on, we will write new code and create new architectures. Before digging into the low level system wrappers for processes and modules, let's continue with the user interfaces features.
Implementing Nested Splitters
AppWizard has already done a part of the job to implement a splitter oriented user interface for us. A
CSplitterWnd member has been added as a protected member of CMainFrame, as declared in MainFrm.h:// Attributes
protected:
CSplitterWnd m_wndSplitter;
The splitter is initialized using the
OnCreateClient() method in MainFrm.cpp. This virtual method is called by MFC (by the CFrameWnd::OnCreate() message handler) when the frame window is created. Its aim is to create the view which will be contained by the frame within its client area, that is the frame window without its title, menu and borders. Both the toolbar and status bar are created in OnCreate() and after OnCreateClient() returns and they will share the client area of the frame with the splitter.The default MFC
CFrameWnd implementation is to create an instance of the view class given to the CDocTemplate creation in the application InitInstance(). Let's see what has been implemented by AppWizard in order to get a splitter with two vertical panes:BOOL CMainFrame::OnCreateClient(LPCREATESTRUCT /*lpcs*/,
CCreateContext* pContext)
{
// create splitter window
if (!m_wndSplitter.CreateStatic(this, 1, 2))
return FALSE;
if (!m_wndSplitter.CreateView(0, 0, RUNTIME_CLASS(CParentView), CSize(100, 100),
pContext) || !m_wndSplitter.CreateView(0, 1, RUNTIME_CLASS(CAplView),
CSize(100, 100), pContext))
{
m_wndSplitter.DestroyWindow();
return FALSE;
}
return TRUE;
}
First,
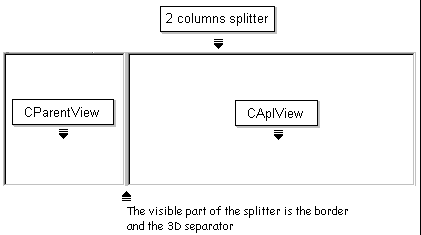
m_wndSplitter is initialized as a static splitter using its CreateStatic() method. The first parameter specifies the window parent of the splitter. Next, the last two parameters state that the splitter will have 1 row and 2 columns. In fact, a splitter is a window which contains other windows (views most of the time) separated by a 3D line — this is close to a dialog box with no title. The screen shot below shows you the result of the previous code: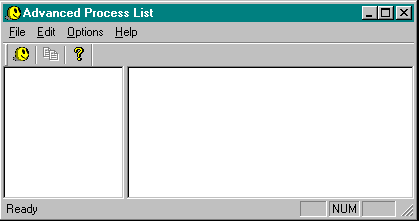
Once the splitter exists, each associated view may be created using
CreateView(). The first two parameters indicate which splitter pane the view will be held in, using a row and column position. As CDocTemplate, a run time class description is needed as the third parameter in order to be able to create dynamically an object of the class in question. Therefore, the left pane, at row 0 and column 0, will be a CParentView instance and the right pane at row 0 and column 1, will be a CAplView object.The fourth parameter gives the desired size for each pane. In fact, it is only useful for the first pane since the other will use the left over free space. The last parameter
pContext is used by the view to bind itself to its document which is stored in pContext.m_pCurrentDoc.It is not difficult to change this piece of code to insert an inner splitter with two rows and one column in the right pane of the outer splitter
m_wndSplitter: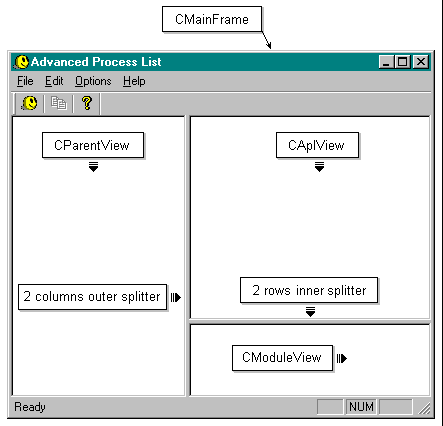
First, you add another protected
CSplitterWnd member m_wndSubSplitter to CMainFrame in MainFrm.h:// Attributes
protected:
CSplitterWnd m_wndSplitter;
CSplitterWnd m_wndSubSplitter;
Next, you should define a new class named
CModuleView derived from CListView which will be used as the lower pane of the inner splitter and insert it inside the Document & Views folder within Visual C++ ClassView pane. To do this, right click on the Apl Classes root and select New Class.... Choose the name of the class and its base class before accepting your choices by pressing the OK button: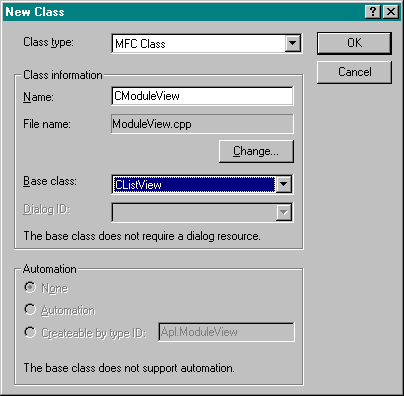
As with AppWizard, and for the same reason, you can remove some source code automatically generated by ClassWizard for the
OnDraw() method. Open ModuleView.h and remove its declaration:// Overrides
// ClassWizard generated virtual function overrides
//{{AFX_VIRTUAL(CModuleView)
protected:
virtual void OnDraw(CDC* pDC); // overridden to draw this view
//}}AFX_VIRTUAL
Delete its implementation from
ModuleView.cpp://///////////////////////////////////////////////////////////////////////////
// CModuleView drawing
void CModuleView::OnDraw(CDC* pDC)
{
CDocument* pDoc = GetDocument();
// TODO: add draw code here
}
However, ClassWizard did not implement default support for the
GetDocument() method. We will follow the same mechanism used by CParentView and CAplView with an inline version for the release version and a more "verified" implementation for debug builds. First, declare CAplDoc by including the document header file at the top of ModuleView.h:#include "AplDoc.h"
Second, declare the method as public:
public:
CAplDoc* GetDocument ();
Add the following code at the end of the header file:
#ifndef _DEBUG // release version of ModuleView.cpp
inline CAplDoc* CModuleView::GetDocument()
{ return (CAplDoc*)m_pDocument; }
#endif
Write the debug implementation in
ModuleView.cpp, after AssertValid() and Dump():#ifdef _DEBUG // debug version of ModuleView.cpp
void CModuleView::AssertValid() const
{
CListView::AssertValid();
}
void CModuleView::Dump(CDumpContext& dc) const
{
CListView::Dump(dc);
}
CAplDoc* CModuleView::GetDocument() // release version is inline
{
ASSERT(m_pDocument->IsKindOf(RUNTIME_CLASS(CAplDoc)));
return (CAplDoc*)m_pDocument;
}
#endif //_DEBUG
Then, add
#include "ModuleView.h" at the beginning of MainFrm.cpp to allow you to use the class during the splitter initialization.Finally, in
OnCreateClient(), instead of creating a view for the second pane, define m_wndSubSplitter as the left pane. You just have to create its upper and lower panes the same way as AppWizard has done:BOOL CMainFrame::OnCreateClient(LPCREATESTRUCT /*lpcs*/,
CCreateContext* pContext)
{
//
// this is the desired views layout
//
// |-----------------|---------------------------------|
// | Parent View | Process View (CAplView) |
// | (CParentView) |---------------------------------|
// | | Module View (CModuleView) |
// |-----------------|---------------------------------|
//
// create a splitter with 1 row, 2 columns
if (!m_wndSplitter.CreateStatic(this, 1, 2))
{
TRACE("Failed to CreateStaticSplitter");
return FALSE;
}
// in fact, it is not possible to know the exact dimensions of the client area
// for the splitter since the toolbar/status bar are created AFTERWARDS
CRect FrameRect;
GetClientRect(FrameRect);
// add the left tree view pane
if (!m_wndSplitter.CreateView(
0, 0,
RUNTIME_CLASS(CParentView),
CSize(FrameRect.Width() / 3, 0),
pContext
)
)
{
TRACE("Failed to create left pane");
return FALSE;
}
This part of the code is almost the same as that generated by AppWizard except for the arithmetic used to calculate the frame client area size. As explained earlier, the outer splitter
m_wndSplitter will share the frame client area with the toolbar and status bar. Since both are created after OnCreateClient() is executed, we can only guess the space which will be needed by the bars when assessing the amount of the space needed for the splitter.The following code does the tricky part — it inserts a second splitter inside the first one.
// add the second splitter pane — which is a nested splitter with 2 rows
if (!m_wndSubSplitter.CreateStatic(
&m_wndSplitter, // our parent window is the first splitter
2, 1, // the new splitter has 2 rows, 1 column
WS_CHILD | WS_VISIBLE | WS_BORDER, // style, WS_BORDER is needed
m_wndSplitter.IdFromRowCol(0, 1)
// inner splitter is in the first row, second column of outer splitter
)
)
{
TRACE("Failed to create nested splitter");
return FALSE;
}
As you can see, the parent is the outer splitter
&m_wndSplitter and m_wndSubSplitter is inserted in the parent’s right pane, corresponding to the parent’s first row and second column. You may have noticed that the row and column values are zero-based.The main difference between this call to
CreateStatic() and the previous one lies in the last two parameters. They indicate that m_wndSubSplitter is a child window of m_wndSplitter and is embedded into the pane specified by m_wndSplitter, corresponding to IdFromRowCol(0, 1), i.e. the right pane.The rest of the code is almost the same as the code generated by AppWizard except for the view classes used to fill up the sub-splitter and the fact that views are now defined as (0,0) for the upper one and (1,0) for the lower one:
// now create the two views inside the nested splitter
//
// add the upper splitter pane which is supposed to take 1/2 of the client area
if (!m_wndSubSplitter.CreateView(
0, 0,
RUNTIME_CLASS(CAplView),
CSize(0, FrameRect.Height() / 2),
pContext
)
)
{
TRACE("Failed to create upper pane\n");
return FALSE;
}
// add the lower splitter pane which will use the remaining client area
if (!m_wndSubSplitter.CreateView(
1, 0,
RUNTIME_CLASS(CModuleView),
CSize(0, 0),
pContext
)
)
{
TRACE("Failed to create lower pane\n");
return FALSE;
}
// don't call the default MFC processing since the views are already created
// return CFrameWnd::OnCreateClient(lpcs, pContext);
return TRUE;
}
We set the upper pane with half of the height using the client area rectangle. If you execute APL now, you will find the frame/views layout we want as shown a few pages back.
If you need additional information about splitter oriented user interfacse, you should take a look at the
A frame window with a good memory
You may have noticed that even if you launch Advanced Process List twice in succession, the size and position of the main window will not be the same. This is natural since the default behavior is left to Windows which does not keep track of the main frame’s location and size.
Further Development of the UI
How to reuse code: Take a look at the Visual C++ samples
As usual, when you want to write some code to implement a new feature, try to find out if anyone else has already done it. Even if you think it is a waste of time to browse the samples given with Visual C++, you'll learn quickly it is worth the effort. If you don't want to get lost among the hundreds of samples provided by Visual C++, you should begin by searching "
MFC Samples Index" in the online help.Indeed, the
SUPERPAD sample implements the following feature:Persistent window placement by storing window position information in a private INI file, which is mapped to the Registry.
This is exactly what we need!
Here is the sample code we are interested in:
static TCHAR BASED_CODE szSection[] = _T("Settings");
static TCHAR BASED_CODE szWindowPos[] = _T("WindowPos");
static TCHAR szFormat[] = _T("%u,%u,%d,%d,%d,%d,%d,%d,%d,%d");
static BOOL PASCAL NEAR ReadWindowPlacement(LPWINDOWPLACEMENT pwp)
{
CString strBuffer = AfxGetApp()->GetProfileString(szSection, szWindowPos);
if (strBuffer.IsEmpty())
return FALSE;
WINDOWPLACEMENT wp;
int nRead = _stscanf (strBuffer, szFormat,
&wp.flags, &wp.showCmd,
&wp.ptMinPosition.x, &wp.ptMinPosition.y,
&wp.ptMaxPosition.x, &wp.ptMaxPosition.y,
&wp.rcNormalPosition.left, &wp.rcNormalPosition.top,
&wp.rcNormalPosition.right, &wp.rcNormalPosition.bottom);
if (nRead != 10)
return FALSE;
wp.length = sizeof wp;
*pwp = wp;
return TRUE;
}
static void PASCAL NEAR WriteWindowPlacement(LPWINDOWPLACEMENT pwp)
// write a window placement to the settings section of application's INI file
{
TCHAR szBuffer[sizeof("-32767")*8 + sizeof("65535")*2];
wsprintf(szBuffer, szFormat,
pwp->flags, pwp->showCmd,
pwp->ptMinPosition.x, pwp->ptMinPosition.y,
pwp->ptMaxPosition.x, pwp->ptMaxPosition.y,
pwp->rcNormalPosition.left, pwp->rcNormalPosition.top,
pwp->rcNormalPosition.right, pwp->rcNormalPosition.bottom);
AfxGetApp()->WriteProfileString(szSection, szWindowPos, szBuffer);
}
As you can see, these two helper functions rely essentially on two functions which allow you to store/retrieve information to and from the application INI file or Registry.
CWinApp provides GetProfileString() to get the string associated to a given section and entry, while WriteProfileString() does the opposite by overwriting the entry value of the section with the given string.You have seen in Chapter 13 how
SetRegistryKey() can be used to choose where the Get/WriteProfileString() methods will store/retrieve their data. AppWizard has generated the following code for us, at the beginning of application InitInstance():// change the registry key under which our settings are stored.
// you should modify this string to something appropriate
// such as the name of your company or organization.
SetRegistryKey(_T("Local AppWizard-Generated Applications"));
If you comment out this line, the Registry will not be used, and an INI file will be created instead. This file has the name of the application (in our case APL),
.ini as extension and is stored in the Windows directory. Otherwise, if you keep on calling SetRegistryKey(), you should provide your own string such as your company name:// change the registry key under which our settings are stored.
// you should modify this string to something appropriate
// such as the name of your company or organization.
SetRegistryKey(_T("WROX VC++ 6.0 Samples"));
The
WINDOWPLACEMENT structure, which is saved and restored in a string format, contains information about the placement of a window on the screen:typedef struct tagWINDOWPLACEMENT {
UINT length; // to be set with sizeof(WINDOWPLACEMENT)
UINT flags; // flags that control minimized/restored state
UINT showCmd; // SW_xxx values to set the visible/max/min state
POINT ptMinPosition; // top-left corner when the window is minimized
POINT ptMaxPosition; // top-left corner when the window is maximized
RECT rcNormalPosition; // co-ordinates when the window is in the normal position
} WINDOWPLACEMENT;
In addition,
CMainFrame class gets two additional methods that call these two window placement helpers:void CMainFrame::InitialShowWindow(UINT nCmdShow)
{
WINDOWPLACEMENT wp;
if (!ReadWindowPlacement(&wp))
{
ShowWindow(nCmdShow);
return;
}
if (nCmdShow != SW_SHOWNORMAL)
wp.showCmd = nCmdShow;
SetWindowPlacement(&wp);
ShowWindow(wp.showCmd);
}
This method will be called in the
InitInstance()method, after the frame window has been created.In order to remember the frame’s size and position, its
OnClose() message handler for WM_CLOSE retrieves its placement and saves it using the WriteWindowPlacement() helper.void CMainFrame::OnClose()
{
// before it is destroyed, save the position of the window
WINDOWPLACEMENT wp;
wp.length = sizeof wp;
if (GetWindowPlacement(&wp))
{
wp.flags = 0;
if (IsZoomed())
wp.flags |= WPF_RESTORETOMAXIMIZED;
// and write it to the .INI file
WriteWindowPlacement(&wp);
}
CFrameWnd::OnClose();
}
To end this sample code description, you should know that in order to change or retrieve the placement state of a window, the Win32 API provides two functions,
SetWindowPlacement() and GetWindowPlacement(), which both take a window handle as the first parameter and a pointer to a WINDOWPLACEMENT structure as the second parameter.
Easy solution: inheritance to reuse the code
In order to reuse the sample code from
SUPERPAD, the first idea which comes to mind (after having read Chapter 10) is to define an inheritance relationship:First, define a class
CFrameWndEx, derived from CFrameWnd that stores its size and position upon closure and restores itself upon creation. Next, derive CMainFrame from CFrameWndEx instead of CFrameWnd. That way, next time you need to have a main window to position itself in another project, you just have to derive from CFrameWndEx.Let's follow the steps needed to implement this solution before discovering why another solution would be much better for later reuse.
Add
Change the
CFrameWnd base class into CFrameWndEx in MainFrm.h and #include "FrameWndEx.h"Change every occurrence of
CFrameWnd into CFrameWndEx using Ctrl+H to speed up the procedureSame search/replace in
MainFrm.cppAdd three new virtual methods to
CFrameWndEx, as follows:virtual BOOL LoadWindowPlacement(LPWINDOWPLACEMENT pwp);
This is called when the frame is created in order to position itself according to the saved description from the Registry or INI file.
virtual void SaveWindowPlacement(LPWINDOWPLACEMENT pwp);
This is called when the frame is about to be closed, in order to save its position into Registry or INI file.
virtual void GetSectionName(CString& szSection, CString& szEntry);
This is called by the two previous members in order to know under which section the position should be saved into the Registry/INI file. In the
SUPERPAD sample, these parameters were defined in static variables szSection and szWindowPos. If we want to allow different frames to store their placement, they should be stored in different places. This method is supposed to have been overridden by the derived classes. It is a good habit to declare such a methods as pure virtual in order to detect the guilty derived class which does not override it at compile time.
Intercept the
Override the
GetSectionName() in CMainFrame to define under which entry saving the window placement description:void CMainFrame::GetSectionName(CString& szSection, CString& szEntry)
{
szSection = _T("Settings");
szEntry = _T("MainFramePosition");
}
We should take the time to think about the pros and cons of this solution. First, it relies heavily on C++ inheritance which means that only classes derived from our
CFrameWndEx could benefit from this auto-save behavior. If you want to provide the same feature for a dialog box, you are forced to copy and paste your code into a new CDialogEx class, derived from CDialog. And what to say if we want to add this auto-save feature to a property sheet? Perhaps, you begin to discover the flaw in this inheritance-oriented reuse solution.
Neat solution: containment relationship for a better code reuse
If the solution does not lie in an inheritance relationship between classes perhaps it will be better to use a containment relationship. We define another class which implements the Load/Save feature independently from
CDialog or CFrameWnd or every other window-based class. The idea is to add a member of this new helper into classes which need its Load/Save feature.In fact, if we know the window handle corresponding to the frame or the dialog, plus where to store the placement description, the class no longer needs to derive from a special frame or dialog class. You can therefore declare a new class derived only from
CObject with the required Load/Save methods. Then add one instance of that class as a member of any window which needs to save and restore its position. To create such a new class, right click on Apl Classes root in ClassView pane of Visual Studio and select New Class.... Insert the name of the class and its base class before validating with the OK button: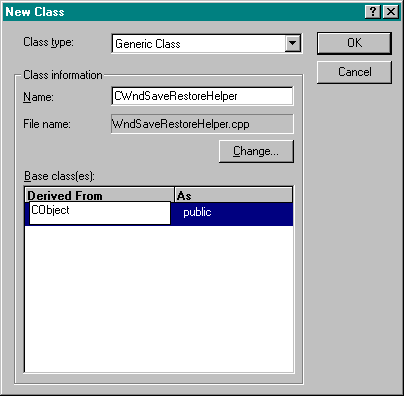
Don't be afraid by the notification box which follows. It informs you that, you, the user, will have to include the appropriate header files for the
CObject class as the Wizard cannot do this. However, as CObject is defined in stdafx.h, we won't have to add any new header files, but since we want to reuse the class in applications other than APL, you should remove the following line from WndSaveRestoreHelper.cpp:#include "Apl.h"
The only parameters the new class requires are the window handle plus the storage area — it will do the rest. Here is the declaration of the
CWndSaveRestoreHelper class :class CWndSaveRestoreHelper : public CObject
{
public:
CWndSaveRestoreHelper(HWND hWnd, LPCTSTR szSectionName, LPCTSTR szEntry);
CWndSaveRestoreHelper();
~CWndSaveRestoreHelper();
// public methods
public:
BOOL AttachToWindow(HWND hWnd);
BOOL Restore();
BOOL Save();
void SetSectionName(LPCTSTR szSection, LPCTSTR szEntry);
// internal members
protected:
CString m_szSection;
CString m_szEntry;
HWND m_hAttachedWindow;
};
The protected members are used to store the parameters needed to save and restore a window position, that is the section and entry where the position description will be saved in addition to the window handle. Next, we provide two ways to pass the parameters: either by constructor which needs all parameters or by dedicated methods for each parameter. We have changed
GetSectionName into SetSectionName since we won't override the method, as in the CFrameWndEx idea above. Instead, we call it to set the values. It is always a good habit to choose a name which means what the method is supposed to do, since it is always difficult to predict how such an helper class will be used.Before digging into this helper class implementation, let's see how to use
CWndSaveRestoreHelper with the application frame window. First, just add a protected instance to the CMainFrame class in MainFrm.h:// Attributes
protected:
CWndSaveRestoreHelper* m_pPositionHelper;
Do not forget to include the helper class header file:
#include "WndSaveRestoreHelper.h"
Next, take care of the object's lifetime:
CMainFrame::CMainFrame()
{
m_pPositionHelper = NULL;
}
You should always remember to set pointer members to
NULL in the constructor and don't forget to delete them if needed in the destructor:CMainFrame::~CMainFrame()
{
delete m_pPositionHelper;
}
It is a smart programming practice to follow each pointer member by initialization and cleanup code and the constructors/destructor are good place to do it. Uninitialized pointers are the source of many bugs.
The
m_pPositionHelper can only be created once the window handle is known: the frame's OnCreate() message handler seems to be a good place for that:int CMainFrame::OnCreate(LPCREATESTRUCT lpCreateStruct)
{
...
// create the save/restore position helper
m_pPositionHelper =
new CWndSaveRestoreHelper(m_hWnd, _T("Settings"), _T("MainWindowPosition"));
if (m_pPositionHelper == NULL)
return -1;
// if creation is successful
return 0;
}
It is also possible to allocate
m_pPositionHelper in the CMainFrame constructor combined with with SetSectionName() and only call the AttachToWindow() method here. It is up to you — the helper class is flexible enough to support different programming styles.The tricky part of the job is finding out when to ask the helper member to restore the frame position and state without conflicting with the default MFC processing. Indeed, using the document/view architecture, it is not possible to call
Restore() within the OnCreate() method. The reason lies in the fact that the creation of the frame is totally managed by the MFC framework in general (and by the document template in particular) which keeps on monitoring the frame state (visible, maximized or minimized) after its OnCreate() has been executed.Therefore, we need to use ClassWizard to define a new
CMainFrame public method called RestoreFramePosition() which will be called at the end of CAplApp::InitInstance(), once MFC has done its job. Right-click on CMainFrame and choose Add Member Function… from the menu. Type in the new function’s type (void) and its name, press Add and Edit and once the Wizard has finished its work, add this code to MainFrm.cpp:void CMainFrame::RestoreFramePosition()
{
if (m_pPositionHelper != NULL)
{
if (!m_pPositionHelper->Restore())
CenterWindow();
if (!IsWindowVisible())
ShowWindow(SW_SHOW);
}
}
Notice the call to
CWnd::CenterWindow(). When it is not possible to retrieve any saved position or size, the window will be placed centrally on the screen.On the application side, the code generated by AppWizard has to be deleted:
BOOL CAplApp::InitInstance()
{
...
// dispatch commands specified on the command line
if (!ProcessShellCommand(cmdInfo))
return FALSE;
// the one and only window has been initialized, so show and update it.
m_pMainWnd->ShowWindow(SW_SHOW);
m_pMainWnd->UpdateWindow();
return TRUE;
}
The following code must be added instead:
BOOL CAplApp::InitInstance()
{
...
// set the main frame display mode for later
// if you don't do this, ProcessShellCommand() will begin to mess about
// with the frame
// --> see SUPERPAD sample code for more info
m_nCmdShow = SW_HIDE;
// dispatch commands specified on the command line
if (!ProcessShellCommand(cmdInfo))
return FALSE;
// take care of minimized/maximized states
((CMainFrame*)m_pMainWnd)->RestoreFramePosition();
return TRUE;
}
MFC uses
m_nCmdShow to display the application’s main window. Since we set it to SW_HIDE, it will be set to invisible. After ProcessShellCommand(), when MFC has created everything from the document to the frame, we can then ask the main window to restore its position.Next, call
SaveWindowPlacement() when it is time for the frame to save its position in its OnDestroy() message handler. Right click on CMainFrame in Visual Studio ClassView pane and select Add Windows Message Handler...: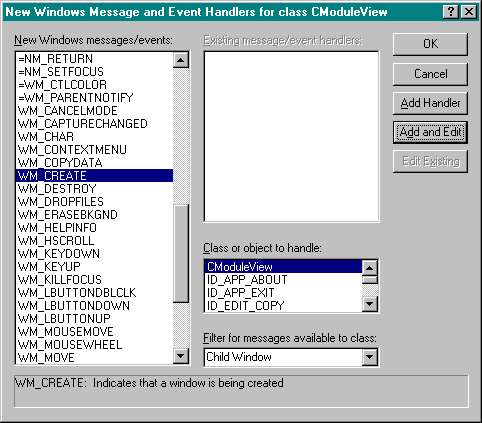
Finally, add the code below to
MainFrm.cpp:// don't forget to save the position and size of the frame
// before it is destroyed
void CMainFrame::OnDestroy()
{
// save the frame position
if (m_pPositionHelper != NULL)
m_pPositionHelper->Save();
// default processing
CFrameWnd::OnDestroy();
}
The moral of this story is simple. Each time you find a way to reuse some code using inheritance, take time to find out which input and output parameters are needed by the common code in the base class. Once you have done that, try to deduce whether it would not be better to extract that code and put it into a stand-alone class. This feature should, at that time, be reusable by any class and not only by those derived from the former base class.
The drawback of such a stand-alone helper class might appear at the parameter level. If they are too tightly coupled, you will bind classes together and it will be very difficult to reuse one without the others — you might want to reuse one class and end up having to reuse additional classes just to make the first one work.
As you have seen with our frame sample, it may be difficult to find the right moment to call the helper methods in the user class. Don't worry, it would have been just as difficult with the former solution. It is not easy to understand the internals of a class library such as MFC J
Finally, let’s see our implementation for state saving and restoring methods. The ideas behind the source code for the helpers have been taken directly from the
SUPERPAD Visual C++ sample which has been presented earlier. First, it is possible to set the section and entry under which the window position will be saved thanks to a enhanced constructor:CWndSaveRestoreHelper::CWndSaveRestoreHelper(HWND hWnd, LPCTSTR szSection, LPCTSTR szEntry)
{
ASSERT((szSection != NULL) && (_tcslen(szSection) > 0));
m_szSection = szSection;
ASSERT((szEntry != NULL) && (_tcslen(szEntry) > 0));
m_szEntry = szEntry;
ASSERT(::IsWindow(hWnd));
m_hAttachedWindow = hWnd;
}
Every parameter is given to the object at construction time. The default constructor obviously sets default values to its members:
CWndSaveRestoreHelper::CWndSaveRestoreHelper()
{
m_szSection = _T("");
m_szEntry = _T("");
m_hAttachedWindow = NULL;
}
If an empty object is created, its parameters may be given through two methods:
void CWndSaveRestoreHelper::SetSectionName(LPCTSTR szSection, LPCTSTR szEntry)
{
// defensive programming
ASSERT((szSection != NULL) && (_tcslen(szSection) > 0));
ASSERT((szEntry != NULL) && (_tcslen(szEntry) > 0));
m_szSection = szSection;
m_szEntry = szEntry;
}
This stores where the description should be saved to and restored from. In order to get the window, the following method is used:
BOOL CWndSaveRestoreHelper::AttachToWindow(HWND hWnd)
{
if (::IsWindow(hWnd))
{
m_hAttachedWindow = hWnd;
return TRUE;
}
else
{
return FALSE;
}
}
This function returns
TRUE, if the given window is valid and FALSE otherwise.When it is time to save the associated window position the
CwndSaveRestoreHelper member function Save() is called:// save the window position into the INI file/Registry
BOOL CWndSaveRestoreHelper::Save()
{
// save the current window placement
WINDOWPLACEMENT wp;
// AttachToWindow() must be called before this method is used
if (::IsWindow(m_hAttachedWindow))
{
wp.length = sizeof(WINDOWPLACEMENT);
if (::GetWindowPlacement(m_hAttachedWindow, &wp))
{
wp.flags = 0;
if (::IsZoomed(m_hAttachedWindow))
wp.flags |= WPF_RESTORETOMAXIMIZED;
// save the window placement
CString strBuffer;
strBuffer.Format(
"%u:%u:%d:%d:%d:%d:%d:%d:%d:%d",
wp.flags, wp.showCmd,
wp.ptMinPosition.x, wp.ptMinPosition.y,
wp.ptMaxPosition.x, wp.ptMaxPosition.y,
wp.rcNormalPosition.left, wp.rcNormalPosition.top,
wp.rcNormalPosition.right, wp.rcNormalPosition.bottom
);
AfxGetApp()->WriteProfileString (m_szSection, m_szEntry, strBuffer);
return TRUE;
}
else
// this should never occur...
TRACE("SaveWindowPlacement(): GetWindowPlacement() has failed\n");
}
else
TRACE("SaveWindowPlacement(): AttachToWindow() must be called before\n");
return FALSE;
}
If the helper object has been initialized and the window is valid, its placement is translated into a string and stored using
WriteProfileString().// load the window position from the INI file/Registry
BOOL CWndSaveRestoreHelper::Restore()
{
// SetSectionName() must be called before this method is used
// SetEntryName() must be called before this method is used
ASSERT(m_szSection.GetLength() > 0);
ASSERT(m_szEntry.GetLength() > 0);
// AttachToWindow() must be called before this method is used
if (::IsWindow(m_hAttachedWindow))
{
// restore window placement
WINDOWPLACEMENT wp;
wp.length = sizeof(WINDOWPLACEMENT);
CString strBuffer = AfxGetApp()->GetProfileString(m_szSection, m_szEntry);
// nothing is saved
if (strBuffer.IsEmpty())
return FALSE;
int cRead =
_stscanf (
strBuffer,
"%u:%u:%d:%d:%d:%d:%d:%d:%d:%d",
&wp.flags, &wp.showCmd,
&wp.ptMinPosition.x, &wp.ptMinPosition.y,
&wp.ptMaxPosition.x, &wp.ptMaxPosition.y,
&wp.rcNormalPosition.left, &wp.rcNormalPosition.top,
&wp.rcNormalPosition.right, &wp.rcNormalPosition.bottom
);
if (cRead != 10)
{
TRACE("LoadWindowPlacement(): Invalid Registry/INI file entry\n");
return FALSE;
}
// take into account the saved position
::SetWindowPlacement(m_hAttachedWindow, &wp);
::ShowWindow(m_hAttachedWindow, wp.showCmd);
return TRUE;
}
else
{
TRACE("LoadWindowPlacement(): AttachToWindow() must be called before\n");
return FALSE;
}
}
If the helper class has been initialized, the saved window position and state are retrieved in string format using
GetProfileString() and transformed into a WINDOWPLACEMENT structure. Then, the window placement is updated using SetWindowPlacement() and ShowWindow().The class destructor does nothing since there are no resources to free.
Effciently using a List View Control
In our application, we will need to display the process and module descriptions as a
CListView object. Let's describe roughly how to use the CListView class in a superficial way. In order to get a deeper explanation of CListView, you should read Chapter 8 of Professional MFC with Visual C++ by Mike Blaszczak published by Wrox Press. In addition to this book, you should take a look at CMNCTRLS, ROWLIST and LISTHDR samples provided with Visual C++.The aim of a list view is to represent a list of items and subitems in different ways. An item has an icon and may have a list of subitems associated with it. In Windows Explorer, the list view embedded in the right pane displays files where the file name is the item and each of the additional descriptions ( e.g. Size, Type, Modified, Attributes) is a subitem.
Unlike Windows Explorer, we will associate no image to an item in any of our
CListView derived views. You will be taught soon how to do it for a tree view. Since the mechanisms are the same for a list view and a tree view, you will easily be able to apply this knowledge if you want to extend your list views with images for each item.
A question of style
A list view control supports four different ways to display their content, defined as:
LVS_ICON
: only item icon (in 32 ´ 32 pixels size) and text are displayedLVS_LIST
: only item icon (in 16 ´ 16 pixels size) and text are presented in matrix formatLVS_REPORT
: a vertical list with columns is presented — the item icon and text in the first column and the subitems’ text in the following columnsLVS_SMALLICON
: only item icon (in 16 ´ 16 pixels size) and text are presented in a vertical list format.For our Advanced Process List application, we only need to display the process and module lists in report mode. Therefore, our first task we have to achieve is to enforce the
LVS_REPORT style in the PreCreateWindow() method of each view. The following AppWizard generated code has to be removed:BOOL CAplView::PreCreateWindow(CREATESTRUCT& cs)
{
// TODO: Modify the Window class or styles here by modifying
// the CREATESTRUCT cs
return CListView::PreCreateWindow(cs);
}
This is the replacement code:
BOOL CAplView::PreCreateWindow(CREATESTRUCT& cs)
{
// default processing
BOOL bReturn = CListView::PreCreateWindow(cs);
// the list is in report mode by default
cs.style |= LVS_REPORT;
// the list is single selection only
cs.style |= LVS_SINGLESEL;
// the selected item stays in the selected color even
// if the list view loses focus
cs.style |= LVS_SHOWSELALWAYS;
return bReturn;
}
In addition to setting the
LVS_REPORT style, we restrict the list to single selection with LVS_SINGLESEL. If LVS_SHOWSELALWAYS is also included, the selected item will stay in the selection color even if the list view loses focus.For the
CModuleView class, you need to add the PreCreateWindow() virtual method yourself in right-clicking on the CModuleView line in the ClassView pane of Visual C++. Choose Add Virtual Function... in the menu and select PreCreateWindow in the left pane of the dialog which appears next: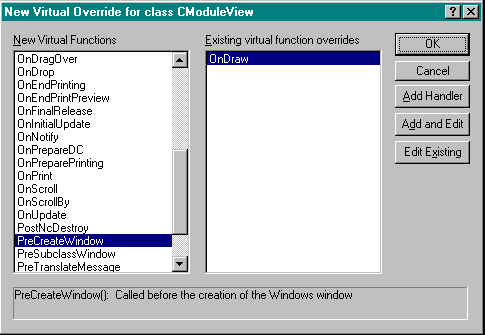
After clicking the
Add and Edit buttons, you just have to copy exactly the same source code as for CAplView.
Adding columns to a list view
Once the list view is created, we define the column names and fill the list with subitems. The
CListView class does not provide a lot of functions to play with. It is just a C++ trick to manipulate a Windows "list view" control as a CView, in order to fit in the MFC document/view framework. In fact, CListView is just a wrapper around CListCtrl which really exposes the Windows control features. Once we have a CListView object, we get access to the corresponding CListCtrl implementation using GetListCtrl().Add a
OnCreate() message handler for both CAplView and CModuleView by right-clicking on the classes in ClassView pane of Visual C++ and select Add Windows Message Handler... before choosing WM_CREATE in the left New Windows messages/events list:
Then, once you have clicked the
Add and Edit buttons, to define the columns, write the needed code for each method. We will take a closer look at the CModuleView source code in ModuleView.h:First, each column is given an ordering numeric ID:
#define COLUMN_MODULENAME 0
#define COLUMN_ADDRESS 1
Next, each column is defined in the
OnCreate()method in ModuleView.cpp// handler for WM_CREATE message which is used to define the columns of the list
int CModuleView::OnCreate(LPCREATESTRUCT lpCreateStruct)
{
// default MFC processing
if (CListView::OnCreate(lpCreateStruct) == -1)
return -1;
// get a reference to the mapped CListCtrl
CListCtrl& Itself = GetListCtrl();
// set the columns for the header
LVCOLUMN Column;
Column.mask = LVCF_FMT | LVCF_WIDTH | LVCF_TEXT | LVCF_SUBITEM;
// add the columns.
Column.cx = 250;
Column.iSubItem = COLUMN_MODULENAME;
Column.pszText = _T("Name");
Column.fmt = LVCFMT_LEFT;
Itself.InsertColumn(Column.iSubItem, &Column);
Column.cx = 100;
Column.iSubItem = COLUMN_ADDRESS;
Column.pszText = _T("Address");
Column.fmt = LVCFMT_RIGHT;
Itself.InsertColumn(Column.iSubItem, &Column);
// if creation is successful
return 0;
}
The base class implementation is called first and a reference to the
CListCtrl object is brought to life using GetListCtrl(). Then, each column is defined in a LVCOLUMN structure whose description is as follows:typedef struct _LVCOLUMN {
UINT mask; //
int fmt; // column title indentation among LVCMT_CENTER, LVCMT_LEFT or LVCMT_RIGHT
int cx; // width of the column in pixels
LPTSTR pszText; // column title text
int cchTextMax; // size of pszText used in a Get…() operation
int iSubItem; // index of subitem associated to this column
#if (_WIN32_IE >= 0x0300)
int iImage;
int iOrder;
#endif
} LVCOLUMN, FAR *LPLVCOLUMN;
You should notice that an
iSubItem is associated with each column. We have chosen to match the position of a column with its subitem value: 0 for the first column, 1 for the second and so on.Remember:
an item ~ a line
a subitem ~ a column.
The number of data members in this structure depends on which version of Internet Explorer is installed (hence
_WIN32_IE). We will not be using these newer members iImage and iOrder in our application, so we can safely ignore them. The mask field sets which other fields are relevant using LVCS_xxx constants. In our example, every field will be filled. Finally, InsertColumn() is called to define each column.Add the same kind of code for
CAplView but define each column the same way with the following subitem values defined in AplView.h:// content of each column
#define COLUMN_NAME 0
#define COLUMN_PID 1
#define COLUMN_FILENAME 2
#define COLUMN_WINDOW 3
#define COLUMN_WORKINGSET 4
#define COLUMN_HANDLECOUNT 5
#define COLUMN_PARENTPROCESS 6
Estimate widths for each field (
Column.cx values) and choose whether the title should be placed to the left (LVCFMT_LEFT) or right (LVCFMT_RIGHT). Here is how the resulting application should appear afterwards if you compile and run: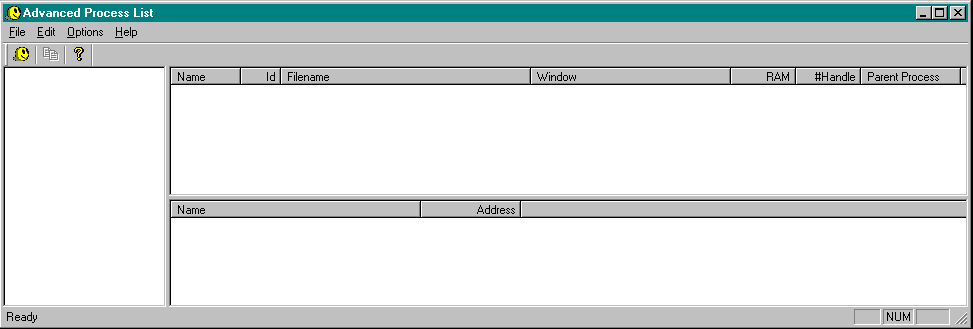
Adding items to the list
First, let's discover how to fill a list view. In fact,
CListCtrl provides four ways to add an item to the list view through four versions of InsertItem():int InsertItem(const LVITEM* pItem);
int InsertItem(int nItem, LPCTSTR lpszItem);
int InsertItem(int nItem, LPCTSTR lpszItem, int nImage);
int InsertItem(UINT nMask, int nItem, LPCTSTR lpszItem, UINT nState, UINT nStateMask, int nImage, LPARAM lParam);
Each ends up filling a
LVITEM structure and sends it to the list view control. That structure has the following layout:typedef struct _LVITEM {
UINT mask; // LVIF_xxx to indicate which following field is meaningful
int iItem; // zero based index of the item (=line)
int iSubItem; // zero based index of the subitem (=column)
UINT state; // LVIS_xxx item states such as selected or focused
UINT stateMask; // mask which refers to state field (image or overlay is not used here)
LPTSTR pszText; // zero terminated string of the item label or LPSTR_TEXTCALLBACK
int cchTextMax; // size of pszText used in a Get…() operation (not used to add an item)
int iImage; // not used here
LPARAM lParam; // 32-bit value associated to this item
#if (_WIN32_IE >= 0x0300)
int iIndent;
#endif
} LVITEM, FAR *LPLVITEM;
You can notice similarities with
LVCOLUMN such as mask or pszText. Note alse we ignore the iIndent parameter.
Store the text into the list view
Independently of these four methods, there are two other ways to insert lines into a list view. First, you can add one item per line, and for each item, add all of its subitems (that is the columns other than the first one which is the item label itself). This can be done with nested loops as illustrated by the following code sample:
#define NB_ITEMS 12
#define NB_SUBITEMS 2
LVITEM lvitem;
int iActualItem;
CListCtrl& m_listctrl = GetListCtrl();
// don't forget to delete the actual content of the list view
GetListCtrl().DeleteAllItems();
// insert each item
for (int iItem = 0; iItem < NB_ITEMS; iItem++)
// insert each subitem for the current iItem
for (
int iSubItem = 0;
iSubItem < NB_SUBITEMS+1;
iSubItem++
)
{
if (iSubItem == 0) // first column -> should insert the line
{
// insert the item and store it in iActualItem
lvitem.mask = LVIF_TEXT;
lvitem.iItem = iItem;
lvitem.iSubItem = 0;
lvitem.pszText = _T("Item label");
iActualItem = m_listctrl.InsertItem(&lvitem);
}
else
{
// set a subitem (=column)
lvitem.mask = LVIF_TEXT;
lvitem.iItem = iActualItem; // current line for this subitem (=column)
lvitem.iSubItem = iSubItem;
lvitem.pszText = _T("Subitem label");
// set each subitem for the current iItem
m_listctrl.SetItem(&lvitem);
}
}
First, the current content of the list view is removed with a call to
DeleteAllItems(). Next, each line (corresponding to iItem) is added using InsertItem(). Its text "Item label" will appear in the first column of the list view. Each additional column is added to the current iItem (known by its iActualItem value returned by InsertItem()) using SetItem() instead of InsertItem(). You can see iItem as the zero-based line number and iSubItem as the zero-based column number.If you add this code into
CAplView::OnInitialUpdate(), this is what you get: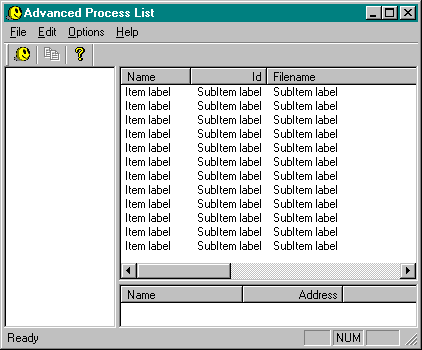
We will see soon how the document provides classes to enumerate processes and modules. Since these classes already contain the text label, the main drawback of this insertion method is that the text is duplicated from the low level classes into the list view.
Let the list view ask for its text labels
The other way to add lines to a list view uses a "callback mechanism" where the view itself asks Windows for the contents of the columns for each item. Instead of giving the text of each item and subitem during insertion, you just have to set
pszText with LPSTR_TEXTCALLBACK. If this parameter is set, the list view will receive a LVN_GETDISPINFO notification message with a LV_DISPINFO structure (renamed as NMLVDISPINFO).typedef struct tagLVDISPINFO
{
NMHDR hdr; // NMHDR structure to describe the notification message
LVITEM item; // LVITEM structure whose mask field indicates which other field is requested
} NMLVDISPINFO, FAR *LPNMLVDISPINFO;
The
item.mask field is used to define what field is needed such as:
LVIF_IMAGE
if you have set iImage with I_IMAGECALLBACK in InsertItem()LVIF_TEXT
if you have set pszText with LPSTR_TEXTCALLBACK in InsertItem()The first field header of
LV_DISPINFO is the following structure:typedef struct tagNMHDR {
HWND hwndFrom;
UINT idFrom;
UINT code;
} NMHDR;
This allows you to determine which control (
hwndFrom or idFrom) is sent the notification code. Here is sample code for such a notification handler:void CAplView::OnGetDispInfo(NMHDR* pNMHDR, LRESULT* pResult)
{
LV_DISPINFO* pDispInfo = (LV_DISPINFO*)pNMHDR;
// notification to get text of the pDispInfo->item.iSubItem column
if (pDispInfo->item.mask & LVIF_TEXT)
{
LPVOID pItem = (LPVOID) pDispInfo->item.lParam;
// ask a virtual method OnNeedText() for the label of the column
CString szDescription;
OnNeedText(pItem, pDispInfo->item.iSubItem, szDescription);
// return the text description
::lstrcpy(pDispInfo->item.pszText, szDescription);
}
*pResult = 0;
}
Once the kind of notification is identified using
pDispInfo->item.mask, a virtual method is called to get the text to be displayed for the column and the next move is to copy it back to thepDispInfo->item.pszText
field.Since the notification only gives the notification code, you may wonder how we could associate a process or a module description to a particular item. The answer lies in the
lParam field of the LVITEM structure which is set when an item is inserted into the list view. We will use this lParam to store a pointer to a process or module description. As you have seen in the previous sample code for the LVN_GETDISPINFO notification handler, this lParam pointer is available to get the description of each column corresponding to the process or module.In order to test this new way of efficiently managing a list view, follow these steps:
Replace the previous source code of
OnInitialUpdate() with the following source code:void CAplView::OnInitialUpdate()
{
// default MFC processing
CListView::OnInitialUpdate();
// "fake" process list
const int NB_ITEMS = 12;
const int NB_SUBITEMS = 2;
// don't forget to delete the actual content of the list view
GetListCtrl().DeleteAllItems();
// insert each item
for (int iItem = 0; iItem < NB_ITEMS; iItem++)
{
// insert the item
InsertItem((LPVOID)iItem, iItem);
}
}
If you compare this version to the former one, you can detect two major differences. First, the subitems have disappeared. In fact, a
LVN_GETDISPINFO notification is sent to get the text for every item and another for each subitem as you will see in the sample code. Also, we are using a helper method named InsertItem() which takes the lParam additional information as first parameter and the index of the item to be inserted. If iItem is set to –1, the item is inserted at the end of the list view.Add a new helper method to append an item to the list:
int CAplView::InsertItem(LPVOID pItem, int nItem)
{
//
// Insert an item into the control. The key here is that the item's
// lParam is actually a pointer to the object that holds the item's
// data. pszText is set to LPSTR_TEXTCALLBACK so our OnGetDispInfo
// function will be called to get the text of an item or subitem.
//
LVITEM item;
item.iItem = (nItem == -1)? GetListCtrl().GetItemCount() : nItem;
item.iSubItem = 0;
item.mask = LVIF_TEXT | LVIF_PARAM;
item.pszText = LPSTR_TEXTCALLBACK;
item.iImage = 0;
item.lParam = (LPARAM) pItem;
return GetListCtrl().InsertItem (&item);
}
This function builds a
LVITEM structure item which describes an item whose text label will be retrieved on getting a LVN_GETDISPINFO notification, since LPSTR_TEXTCALLBACK is given as pszText. In addition to the pszText field, lParam is set with the method’s first parameter which is currently the corresponding item index. (It will later be a pointer to a process object for CAplView and to a module object for CModuleView.) Once item has been set, InsertItem() is called to insert it into the list view control.Add a notification handler for
LVN_GETDISPINFO in and fill it with the sample code given previously. To add such a notification handler, right-click on CAplView in the ClassView pane and select Add Windows Message Handler... to enter the following dialog: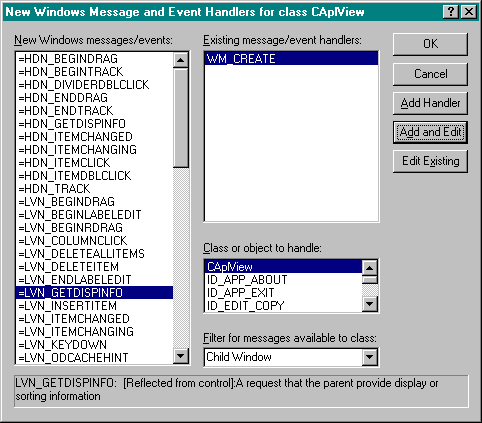
Choose
=LVN_GETDISPINFO in the left list and push Add and Edit button before confirming the name of the handler as OnGetDispInfo: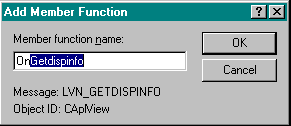
You should note the "=" sign before the notification ID. In the normal Windows world (i.e. using the SDK), the notification is sent by the list view control to its parent window (which is the splitter in our case). This "to parent notification" mechanism binds too much control to the parent since the latter is responsible for writing the code to handle the notification. Therefore, it would be hard to reuse the control without its parent. Fortunately, MFC provides another mechanism called "notification reflection" which allows a control to receive its own notification. Placing an "=" in front of the notification ID activates this mechanism in most Visual Studio Wizards.
If you need additional information about this reflection mechanism, you should take a look at the technical note "
TN062: Message Reflection for Windows Controls" in the Visual C++ online help and the following articles in the MSDN library:"Handling Reflected Messages"
"Defining a Message Handler for a Reflected Message"
This method has almost exactly the same content as in the previous sample:
// this handler is called when the control needs to know what to display
// in each line and for each column
void CAplView::OnGetDispInfo(NMHDR* pNMHDR, LRESULT* pResult)
{
LV_DISPINFO* pDispInfo = (LV_DISPINFO*)pNMHDR;
// call virtual method OnNeedText() to get the text to be displayed in each column
if (pDispInfo->item.mask & LVIF_TEXT)
{
LPVOID pItem = (LPVOID) pDispInfo->item.lParam;
CString szDescription;
OnNeedText (pItem, pDispInfo->item.iSubItem, szDescription);
::lstrcpy(pDispInfo->item.pszText, szDescription);
}
*pResult = 0;
}
Add a new virtual method
OnNeedText():void CAplView::OnNeedText(LPVOID pItem, int nColumn, CString& szContent)
{
szContent = _T("");
// later, pItem will point to a process description
int iItem = (int)pItem;
switch (nColumn)
{
// ID
case COLUMN_PID:
szContent.Format(_T("ID for %u"), iItem);
break;
// name
case COLUMN_NAME:
szContent.Format(_T("Name for %u"), iItem);
break;
default:
szContent.Format(_T("Column %u for %u"), nColumn, iItem);
break;
}
}
This method is used to pull the description of a column content off from the control notification. And here is the resulting application:
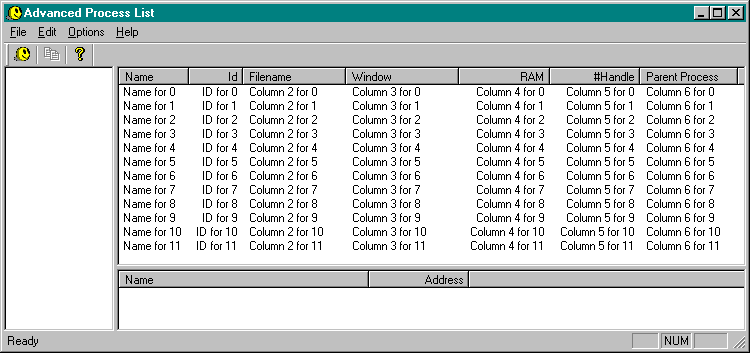
Programming Tips
It may seem strange to implement the
OnNeedText() method instead of directly building the column content in the OnGetDispInfo() notification handler. In fact, it is always a good habit to separate the data from the way it is used or displayed.This solution allows you to change each part of the application (the data provider or the graphical interface) independently from each other. As you'll see later when we describe the clipboard management, this method is also helpful for code reuse.
However, you should take care of the performance drawback introduced by this method:
OnNeedText()has to run quickly if you don't want to slow down your application display.
Playing with a Tree View Control
We have saved the most difficult view for last.
CParentView, which is derived from CTreeView. We want to represent the processes hierarchy within a Windows tree view control. Before digging in the tree hierarchy construction itself, let us see what it is possible to do with such a Windows control.
Presentation of the Windows tree view control
CTreeView
is defined like ClistView — to present a Windows control (a tree view for the former and a list view for the latter) as an MFC view. It gives access to the low level class CTreeCtrl which provides most of the methods to manage a tree view. Even the words are confusing, and so, here are simple definitions to help you:
Tree view: name of the real Windows control which is wrapped by the following C++ classes. The only communication mechanism available to such a control is via predefined Windows messages.
CTreeCtrl
: low level C++ class which gives you access to tree view control features by using C++ methods instead of Windows messages.CTreeView
: high level C++ class which allows you to insert a tree view control into the MFC document/view framework. You can take advantage of its standard C++ mechanism, such as overriding virtual methods like OnInitialUpdate(), when the control is just created.But, what can you expect from such a tree? First, you can insert items with a text label and, optionally, an image. Unlike an item in a list view which is known by an integer index, once inserted, a tree item is defined by a
HTREEITEM handle. Next, when an item is inserted into the tree using InsertItem(), you need to know several additional pieces of information. CTreeCtrl provides four different versions of InsertItem():HTREEITEM InsertItem(LPTVINSERTSTRUCT lpInsertStruct);
HTREEITEM InsertItem(
UINT nMask,
LPCTSTR lpszItem,
int nImage,
int nSelectedImage,
UINT nState,
UINT nStateMask,
LPARAM lParam,
HTREEITEM hParent,
HTREEITEM hInsertAfter);
HTREEITEM InsertItem(
LPCTSTR lpszItem,
HTREEITEM hParent = TVI_ROOT,
HTREEITEM hInsertAfter = TVI_LAST);
HTREEITEM InsertItem(
LPCTSTR lpszItem,
int nImage,
int nSelectedImage,
HTREEITEM hParent = TVI_ROOT,
HTREEITEM hInsertAfter = TVI_LAST);
Each ends up filling a
TVINSERTSTRUCT structure and sends it to the tree control. That structure has the following layout:typedef struct tagTVINSERTSTRUCT {
HTREEITEM hParent;
HTREEITEM hInsertAfter;
#if (_WIN32_IE >= 0x0400)
union
{
TVITEMEX itemex;
TVITEM item;
} DUMMYUNIONNAME;
#else
TVITEM item;
#endif
} TVINSERTSTRUCT, FAR *LPTVINSERTSTRUCT;
As you can see by the test on
_WIN32_IE, once more, features supported by tree controls depend on your Internet Explorer version.Three parameters are important during tree item insertion. First, you need to know the handle of its parent item set in
hParent. If the item has NULL or TVI_ROOT as hParent, it is called a root item. If you insert an item with the HTREEITEM of another tree item as hParent, the former is called the child and the latter, the parent.Windows tree control displays in front of a parent item either a ![]() if its children are hidden or a
if its children are hidden or a ![]() if its children are visible. The user can click on these icons to expand or collapse the item subtree. This default behavior, which is what you have in Windows Explorer, can be modified if you change the styles used for the tree control. Note that you can update tree styles in the
if its children are visible. The user can click on these icons to expand or collapse the item subtree. This default behavior, which is what you have in Windows Explorer, can be modified if you change the styles used for the tree control. Note that you can update tree styles in the
BOOL CParentView::PreCreateWindow(CREATESTRUCT& cs)
{
// default processing
BOOL bReturn = CTreeView::PreCreateWindow(cs);
// the window class must be set here because the splitter creation
// process in CreateView() does not allow us to set the class name
cs.lpszClass = WC_TREEVIEW; // "SysTreeview32"
// set default tree styles
cs.style |=
TVS_HASLINES |
TVS_HASBUTTONS |
TVS_LINESATROOT |
TVS_SHOWSELALWAYS |
TVS_DISABLEDRAGDROP;
return bReturn;
}
As with the
CListView derived classes CAplView and CModuleView, we use PreCreateWindow() to assign the Windows class name WC_TREEVIEW to the new control and to set other styles. TVS_SHOWSELALWAYS ensures that the selected item background will stay highlighted even if the focus changes and TVS_DISABLEDRAGDROP prevents the user from dragging and dropping a tree item. The first three styles deserve to be explained in more details:
TVS_HASLINES
: dotted lines connect parent and children itemsTVS_HASBUTTONS
:TVS_LINESATROOT
: root items may have a rectangle or a dotted line on their leftHere is a group of samples to help you understand these styles:


TVS_HASLINES | TVS_HASLINES |
TVS_HASBUTTONS | TVS_HASBUTTONS
TVS_LINESATROOT TVS_LINESATROOT
is missing 

No lines, buttons or lines at root
TVS_HASLINES |TVS_LINESATROOT
TVS_HASBUTTONS is missing

TVS_HASBUTTONS |
TVS_LINESATROOT
TVS_HASLINES
is missingReturning to the
TVINSERTSTRUCT structure, the hInsertAfter member defines how the tree item will be inserted, in relation to its parent. You can choose among the following three values:
TVI_FIRST
: first child of hParentTVI_LAST
: last child of hParentTVI_SORT
: the item is inserted in alphabetical order.And finally,
item is used to define the visible "presentation" of tree item using a TVITEM structure which has the following layout:typedef struct tagTVITEM {
UINT mask;
HTREEITEM hItem;
UINT state;
UINT stateMask;
LPTSTR pszText;
int cchTextMax;
int iImage;
int iSelectedImage;
int cChildren;
LPARAM lParam;
} TVITEM, FAR *LPTVITEM;
You could find many similarities with the
LVITEM structure used to define a list view item that we have already described. In fact, the main difference lies in the iSelectedImage and cChildren fields. In our case, the cChildren field is not used for insertion and you will soon see why iSelectedImage is needed.As you will have seen with the above previews of
CParentView, for each tree item, an image will be displayed in front of its text label. We did not use images when developing CAplView and CModuleView, but for CParentView we will introduce this feature. A tree allows you to define two different images per tree item — one is displayed if the item is not selected (set with iImage) and the other if the item is selected (set with iSelectedImage).Unlike what we have done for our
CListView derived views, we will set the iImage (and also iSelectedImage) field with a value. The mask fields have a meaning with ORed TVIF_ values. In our case, we will set the pszText, iImage, iSelectedImage and lParam fields. Therefore mask will be have the following value:TVIF_TEXT | TVIF_IMAGE | TVIF_SELECTEDIMAGE | TVIF_PARAM
(Three other
TVIF_ values are defined — TVIF_CHILDREN, TVIF_HANDLE and TVIF_STATE which enable the cChildren, hItem and state/stateMask fields to be set.)So, what is the meaning of the integer value which will be set for
iImage and iSelectedImage fields? Each field is an index to an image list which is associated to the tree using the SetImageList() method.
How to use an image list
Even if an image list is regarded as a Windows common control, it is different from the standard common controls in one major point. There is no window associated with it. In fact, an image list is a memory storage for pictures such as bitmaps or icons of the same size, stored one after the other and referenced by a zero based integer index. Other common controls like tree view and list view use image lists to help them display pictures in addition to text label for items.
MFC provides the
CImageList class which provides many methods for you to play with an image list. An image list can be created using the following five versions of Create() method. The first creates an empty image list:BOOL Create(
int cx, // width of each picture
int cy, // height of each picture
UINT nFlags, // type of list in term of number of colors as ILC_xxx constants
int nInitial, // initial number of pictures inside at creation time
int nGrow) // increment of pictures added each time it is needed
The following two functions both create and initialize the content of an image list with a bitmap resource. The
crMask color defines which color of the bitmap is treated as transparent as you will see soon.BOOL Create(
UINT nBitmapID, // resource ID for the bitmap stored inside the image list
int cx, // width of each picture in the bitmap
int nGrow, // increment of pictures added each time it is needed
COLORREF crMask); // color used to dynamically create a mask for transparency
BOOL Create(
LPCTSTR lpszBitmapID, // resource name for the bitmap stored inside the image list
int cx, // width of each picture in the bitmap
int nGrow, // increment of pictures added each time it is needed
COLORREF crMask); // color used to dynamically create a mask for transparency
The fourth of the five merges
imageList1 starting at its nImage1 picture with imageList2 starting from its nImage2 picture whose width is dx and height is dy.BOOL Create(
CImageList& imagelist1, int nImage1, CImageList& imagelist2, int nImage2, int dx, int dy);
The last function
duplicates the given image list.BOOL Create(CImageList* pImageList);
Once an image list is created, you can add a new image inside with
Add(), delete a picture with Remove(), replace a picture by another with Replace(), and even save/restore it with Read()/Write(). In our case, we are just interested in creating an image list from a bitmap resource and associating it to our CParentView.Let's first create the bitmap resource. Click on the
ResourceView pane in Visual Studio, right click on Apl Resources and choose Insert... in the contextual menu. Ask for a new bitmap resource in the following dialog and push the New button: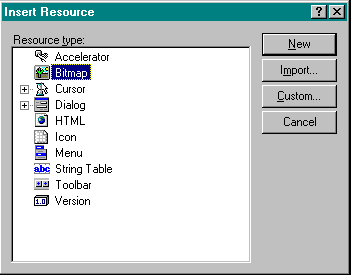
You reach a blank page in Visual Studio and your first task is to set the dimensions of the bitmap before drawing each picture. Double-click anywhere in the page to make the following
Bitmap Properties dialog appear: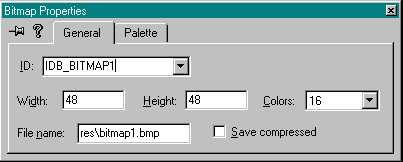
Click on the upper left pin button to let the dialog stay on top of Visual Studio and then change the dialog fields to the following values:
In our tree, we need to make the difference between three kinds of processes — those with children, those which have spawned no other process, and the root of all processes, called NT. That is why 54 = 18*3 is set as the bitmap width. Here are the pictures for each, drawn in the
IDB_PARENT_IMAGE_LIST resource bitmap:![]()
The next step to achieve is to create the image list from the bitmap resource and to associate it to the
CParentView. Right click on CParentView in the Visual Studio ClassView pane, choose Add Windows Message Handler... and select WM_CREATE in the left list before pushing the Add and Edit button. Open ParentView.h and declare the constants below:#define PICTURE_WIDTH 18 // width of each picture
#define STATE_PARENT 0 // picture index for a parent process
#define STATE_CHILD 1 // picture index for a child process
#define STATE_ROOT 2 // picture index for the root
In
ParentView.h implement the OnCreate() method with the following code:int CParentView::OnCreate(LPCREATESTRUCT lpCreateStruct)
{
// default MFC processing
if (CTreeView::OnCreate(lpCreateStruct) == -1)
return -1;
CBitmap bitmap; // DeleteObject() will be called in its destructor
// load image list from resources
if (bitmap.LoadBitmap(IDB_PARENT_IMAGE_LIST))
{
BITMAP bmInfo;
VERIFY(bitmap.GetObject(sizeof(bmInfo), &bmInfo) != 0);
// Create the parent/child image lists.
if (
m_TreeImages.Create(
PICTURE_WIDTH, // each small bitmap width
bmInfo.bmHeight, // bitmap height
ILC_MASK, // transparency mask management
bmInfo.bmWidth / PICTURE_WIDTH, // number of images within the image list
1 // ...
)
)
{
// set the bitmap in the image list with the masking color (= light gray)
if (m_TreeImages.Add(&bitmap, RGB(192, 192, 192)) != -1)
{
// associate the image list to the tree view
GetTreeCtrl().SetImageList(&m_TreeImages, TVSIL_NORMAL);
// if creation is successful
return 0;
}
else
TRACE("Impossible to add the bitmap to the image list\n");
}
else
TRACE("Impossible to create image list\n");
}
else
TRACE("Impossible to load bitmap\n");
// if creation failed
return -1;
}
First, a bitmap is loaded from the application resources using its
LoadBitmap() method. Its dimensions are retrieved using its GetObject() method. Then, its width and height are used as parameters to create the image list using one of its Create() methods. We could have used the Create() method which directly loads the bitmap from the resource into the image list, but the chosen solution allows you to learn how to load a bitmap from a resource using LoadBitmap() and GetObject() to retrieve its dimensions.Once the image list is created, the loaded bitmap is added to the image list using
Add() with the bitmap as first parameter and a mysterious second parameter. The light gray color defined by RGB(192,192,192), and provided as second parameter, must be seen by the image list as transparent. This is the reason why the background of our IDB_PARENT_IMAGE_LIST resource bitmap is light gray.To complete the implementation, we need to associate the image list with
CParentView using SetImageList(). Do not forget to declare the image list as a protected member in ParentView.h:protected:
CImageList m_TreeImages; // image list used for the tree view
You have to remember to clean up the image list before the view disappears. Add a message handler for
WM_DESTROY the same way as for WM_CREATE and write the following code:void CParentView::OnDestroy()
{
// don't forget to delete the associated image list
m_TreeImages.DeleteImageList();
// default MFC processing
CTreeView::OnDestroy();
}
Programming Tips
As you have seen, we created the image list using
WM_CREATE, and not using the class constructor. We have two reasons to do this:
In a
A class constructor could also fail and throw an exception
It is a good habit when working with the MFC to use a class constructor only to set default values for class members. Define another method to create the object, and return a Boolean value indicating whether the creation is successful or not.
Tree item lifetime
Let's go back to the insertion of an item in
CParentView. We have already seen the values needed for most of the TVITEM fields before calling InsertItem(). We will use the same notification mechanism as we have used for CAplView and CModuleView. To achieve this, we will set lpszText field to LPSTR_TEXTCALLBACK before calling InsertItem().Although it is interesting to use the notification mechanism to reduce memory consumption for processing text labels, the same argument is not obvious for tree item images which are stored as integers. Therefore,
iImage and iSelectedImage will be set to one of the predefined constants STATE_PARENT, STATE_CHILD or STATE_ROOT and not I_IMAGECALLBACK.Define a message handler for
TVN_GETDISPINFO and write the code below for its implementation:void CParentView::OnGetDispInfo(NMHDR* pNMHDR, LRESULT* pResult)
{
TV_DISPINFO* pTVDispInfo = (TV_DISPINFO*)pNMHDR;
// call virtual method OnNeedText() to get the text to be displayed in each column
if (pTVDispInfo->item.mask & LVIF_TEXT)
{
CString szLabel;
LPVOID pItem = (LPVOID) pTVDispInfo->item.lParam;
// call the virtual method to get the text to be displayed for a tree item
OnNeedText(pItem, szLabel);
::lstrcpy(pTVDispInfo->item.pszText, szLabel);
}
*pResult = 0;
}
We first check whether
OnGetDispInfo() has been executed to retrieve the text label. Next, we delegate the burden of attaining the text label to virtual method OnNeedText(), as we did for CAplView and CModuleView:// ask for the text of the tree item corresponding to pItem
void CParentView::OnNeedText(LPVOID pItem, CString& szText)
{
// default value
szText = _T("");
// the process ID is associated to each tree item as lParam
DWORD PID = (DWORD)pItem;
// get the text label from the process ID and put it into szText
...
}
So far, we have developed an application with smart tree and list views which are supposed to know how to display pieces of information. However we still don't know how to retrieve process and module descriptions. We will start to address this situation now.
Creating the Process and Module Lists
Up until now, you have learned how to build the application user interface. The following paragraphs will explain how to access process and module descriptions under Windows NT before digging into the MFC document/view architecture. The last part of this section will put things together and reveal the source code to fill
CAplView, CModuleView and CParentView.The Low Level NT Description: Processes and Modules
Let us think about how to implement the classes needed to wrap the process and module descriptions that we want to show to the user. Where does all this process/module information come from?
Process List
In MSDN,
Among the helper functions provided, EnumProcesses() gives access to the running processes:
BOOL EnumProcesses(
DWORD * lpidProcess, // array to receive the process identifiers
DWORD cb, // size of the array
DWORD * cbNeeded); // needed size to hold all process identifiers
Once the list is retrieved, the next task is to get the whole process description from its process ID. Most of Win32 API functions related to processes and modules need a process handle as parameter but we just have an ID. A process ID can easily be transformed into a process handle using
OpenProcess():HANDLE OpenProcess(
DWORD dwDesiredAccess, // access flag
BOOL bInheritHandle, // handle inheritance flag
DWORD dwProcessId); // process identifier or process ID
We don’t need to inherit handles from the process and so
PROCESS_QUERY_INFORMATION | PROCESS_VM_READ will be enough for the access flag. After having used this process handle, we must not forget to give it back to the system. The CloseHandle() Win32 API function is responsible for this clean up task.
Process or module internal name
To get the process’s internal name,
GetModuleBaseName() is the perfect candidate:DWORD GetModuleBaseName(
HANDLE hProcess, // handle to the process
HMODULE hModule, // handle to the module
LPTSTR lpBaseName, // string buffer that receives the base name
DWORD nSize); // size of the buffer
If
hModule is NULL, the process’s internal name is copied into lpBaseName, including the .exe extension, which will be removed when showing the process in the list view.
Process executable filename
GetModuleFileNameEx()
retrieves the process executable’s full pathname, only if hModule is set to NULL. It is stored in the lpFilename buffer:DWORD GetModuleFileNameEx(
HANDLE hProcess, // handle to the process
HMODULE hModule, // handle to the module
LPTSTR lpFilename, // string buffer that receives the path
DWORD nSize); // size of the buffer
Main window handle and title
Retrieving the handle and the title of the main window of a process is a difficult task. There is, as yet, no simple and direct correlation between a process ID and a main window.
Deciding Which Win32 API to Use
However, the Win32 API online help tells us that
GetWindowThreadProcessId() returns the ID of the process which has created a given window, filling lpdwProcessId with the ID of the process responsible for the creation of the given hWnd window:DWORD GetWindowThreadProcessId(
HWND hWnd, // window handle
LPDWORD lpdwProcessId); // address of variable
On the other hand,
EnumWindows() allows you to list all top-level windows and get their handles:BOOL EnumWindows(
WNDENUMPROC lpEnumFunc, // pointer to a callback function to implement
LPARAM lParam); // 32-bit value given by developer
The
lpEnumFunc callback function given as the first parameter has the following prototype:BOOL CALLBACK EnumWindowsProc(
HWND hwnd, // handle to top level window
LPARAM lParam); // application-defined value
This callback will be called with each top level window handle as the first parameter. The
lParam is the same value given as second parameter to EnumWindows(). Once the window‘s handle has been retrieved, GetWindowText() will give us its title.
A process and its main window: putting the pieces together
Since a process is allowed to create more than one top-level window, you are not certain of quickly finding the one that is visible to you, the user. One simple algorithm is to look for each top level window using
EnumWindows() and compare its process ID with the given process. Either the window is visible and has a title, in which case you can stop the search, or else save its handle and keep on searching. It may be useful to store the handles of all the windows even if they don’t have a title, since some applications only create hidden windows.To implement this task, we define a structure which will store the process ID as a search parameter and return handles to active windows:
typedef struct tagENUMINFO
{
// in Parameters
DWORD PId; // we are looking for the main window of this process
// out Parameters
HWND hWnd; // THE visible window we are looking for
HWND hEmptyWnd; // visible window with no title
HWND hInvisibleWnd; // invisible window
HWND hEmptyInvisibleWnd; // invisible window with no title
} ENUMINFO, *PENUMINFO;
Here is the code for the helper function which passes an
ENUMINFO structure to EnumWindows(), and returns the more plausible window, from the visible window with a title to the invisible window without a title:HWND GetMainWindow(DWORD PId)
{
ENUMINFO EnumInfo;
// set the search parameters
EnumInfo.PId = PId;
// set the return parameters to default values
EnumInfo.hWnd = NULL;
EnumInfo.hEmptyWnd = NULL;
EnumInfo.hInvisibleWnd = NULL;
EnumInfo.hEmptyInvisibleWnd = NULL;
// do the search among the top level windows
::EnumWindows((WNDENUMPROC)EnumWindowsProc, (LPARAM)&EnumInfo);
// return the found window if any
if (EnumInfo.hWnd != NULL)
return EnumInfo.hWnd;
else if (EnumInfo.hEmptyWnd != NULL)
return EnumInfo.hEmptyWnd;
else if (EnumInfo.hInvisibleWnd != NULL)
return EnumInfo.hInvisibleWnd;
else
return EnumInfo.hEmptyInvisibleWnd;
}
Finally, we define the callback function which returns
FALSE when a visible titled window of the process is found and TRUE otherwise, to keep the enumeration going:BOOL CALLBACK EnumWindowsProc(HWND hWnd, LPARAM lParam)
{
DWORD pid = 0;
PENUMINFO pInfo = (PENUMINFO)lParam;
TCHAR szTitle[_MAX_PATH+1];
// sanity checks
if (pInfo == NULL)
// stop the enumeration if invalid parameter is given
return FALSE;
// get the process ID for this window
if (!::GetWindowThreadProcessId(hWnd, &pid))
// this should never occur :-)
return TRUE;
// compare the process ID with the one given as search parameter
if (pInfo->PId == pid)
{
// look for the visibility first
if (::IsWindowVisible(hWnd))
{
// next, look for the title next
if (::GetWindowText(hWnd, szTitle, _MAX_PATH) != 0)
{
pInfo->hWnd = hWnd;
// we have found the right window
return FALSE;
}
else // we have found a visible window without title
pInfo->hEmptyWnd = hWnd;
}
else // the window is invisible
{
// next, look for the title
if (::GetWindowText(hWnd, szTitle, _MAX_PATH) != 0)
// invisible window with a title
pInfo->hInvisibleWnd = hWnd;
else
// invisible window with no title
pInfo->hEmptyInvisibleWnd = hWnd;
}
}
// continue the enumeration
return TRUE;
}
Note that
lParam corresponds to the PENUMINFO structure given as a parameter to EnumWindows(). For each window, the identifier of the process which created it is retrieved using GetWindowThreadProcessId(). It is then compared to the process ID passed to lParam as a search parameter, and if there is a match, the hWnd handle is saved in the search structure. Only if the handle corresponds to a visible, titled window does the search end.This method of getting a top-level windows for each process is not very efficient. Instead of enumerating the top-level windows once per process, it would have been better to call
EnumWindows()once and, with each window passed to a callback function, filling up a map with a process ID as a key and an EnumInfo object as a value. At the end of enumeration, you could retrieve one window per process ID using Lookup(). This would be a good exercise left for you to do.
Memory Consumption
When you talk about the memory consumption of a process, several parameters may be presented to the user. Window NT provides an application where you can find many in depth information about memory. If you open Administrative Tools folder from the Start menu, you get access to the
Performance Monitor:
If you select
Process as Object, you can see the counters associated to a process that Windows NT keeps track: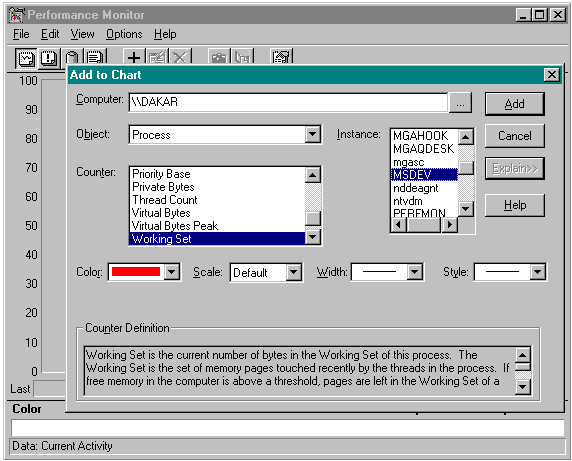
When you push the
Explain>> button, you get an description of each counter. For our project, we are interested in the Working Set size which corresponds to the Mem Usage column in Windows NT Task Manager.The
GetProcessMemoryInfo() function from PSAPI fills the following PROCESS_MEMORY_COUNTERS structure:typedef struct _PROCESS_MEMORY_COUNTERS {
DWORD cb;
DWORD PageFaultCount;
DWORD PeakWorkingSize;
DWORD WorkingSetSize;
DWORD QuotaPeakPagedPoolUsage;
DWORD QuotaPagedPoolUsage;
DWORD QuotaPeakNonPagedPoolUsage;
DWORD QuotaNonPagedPoolUsage;
DWORD PagefileUsage;
DWORD PeakPagefileUsage;
} PROCESS_MEMORY_COUNTERS;
Among these counters,
WorkingSetSize represents the physical memory actually used by a process, which is what we are looking for.
Programming Tips
The source code for the
Performance Monitor is available under the SFL\SDK_SDKTOOLS_WINNT_PERFMON key in MSDN Samples. It is not easy to understand the way the counters are retrieved. However, all that you need to know is accessible through the Registry. Unfortunately, access to the details of these Windows NT components in the Registry is much more complicated than with PSAPI, but if you are patient and feel bold enough to explore the PerfMon sample, you will be able to make great improvements to your Application Process List.Parent Process and Handle Count
For information about the parent process and the handle count, we turn to articles published in the MSJ. In the article: "Under the Hood" by Matt Pietrek (published January 1997), the
NtQueryInformationProcess() function from the DDK is presented. All you need to know here are the parameters to use in order to get the parent process ID and the handle count. To get a broader description of this ntdll.dll function, and its other uses, you should refer to this MSJ article. For our project, you get the parent process ID using this code:PROCESS_BASIC_INFORMATION pbi;
DWORD dwSize;
int iReturn;
// set the default value
pbi.InheritedFromUniqueProcessId = UNKNOWN_PROCESS_ID;
iReturn = ::NtQueryInformationProcess(
hProcess,
ProcessBasicInformation,
&pbi,
sizeof(pbi),
&dwSize
);
// NtQueryInformationProcess returns a negative value if it fails
if (iReturn >= 0)
m_ParentProcessID = pbi.InheritedFromUniqueProcessId;
If you pass
ProcessBasicInformation as the second parameter, you get the ID of the process which spawned hProcess in the InheritedFromUniqueProcessId field of the third parameter. Getting the handle count is even easier:// query for handle count
DWORD dwHandleCount;
iReturn = ::NtQueryInformationProcess(
hProcess,
ProcessHandleCount,
&dwHandleCount,
sizeof(dwHandleCount),
&dwSize
);
if (iReturn >= 0)
m_HandleCount = dwHandleCount;
In order to use this function, we need to include the file
NtQuery.h which sums up the needed declarations from the Windows NT Device Driver Kit (that is the DDK) without redefining anything already declared in Windows.h and the .lib file corresponding to the functions exported by ntdll.dll. From this file, NtQueryInformationProcess() will be called.Create a new header file called
NtQuery.h and add it to the project. Copy the following code to NtQuery.h:#ifdef __cplusplus
extern "C" {
#endif
typedef LONG NTSTATUS;
typedef struct _PEB *PPEB;
typedef ULONG KAFFINITY;
typedef KAFFINITY *PKAFFINITY;
typedef LONG KPRIORITY;
typedef enum _PROCESSINFOCLASS
{
ProcessBasicInformation,
ProcessQuotaLimits,
ProcessIoCounters,
ProcessVmCounters,
ProcessTimes,
ProcessBasePriority,
ProcessRaisePriority,
ProcessDebugPort,
ProcessExceptionPort,
ProcessAccessToken,
ProcessLdtInformation,
ProcessLdtSize,
ProcessDefaultHardErrorMode,
ProcessIoPortHandlers, // Note: this is kernel mode only
ProcessPooledUsageAndLimits,
ProcessWorkingSetWatch,
ProcessUserModeIOPL,
ProcessEnableAlignmentFaultFixup,
ProcessPriorityClass,
ProcessWx86Information,
ProcessHandleCount,
ProcessAffinityMask,
ProcessPriorityBoost,
MaxProcessInfoClass
} PROCESSINFOCLASS;
typedef struct _PROCESS_BASIC_INFORMATION
{
NTSTATUS ExitStatus;
PPEB PebBaseAddress;
KAFFINITY AffinityMask;
KPRIORITY BasePriority;
ULONG UniqueProcessId;
ULONG InheritedFromUniqueProcessId;
} PROCESS_BASIC_INFORMATION;
typedef PROCESS_BASIC_INFORMATION *PPROCESS_BASIC_INFORMATION;
NTSYSAPI NTSTATUS NTAPI NtQueryInformationProcess(
IN HANDLE ProcessHandle,
IN PROCESSINFOCLASS ProcessInformationClass,
OUT PVOID ProcessInformation,
IN ULONG ProcessInformationLength,
OUT PULONG ReturnLength OPTIONAL
);
#ifdef __cplusplus
}
#endif
Module List and Description
Before we set about defining C++ classes to wrap the code we have presented in this section, there is one last area left to discuss, the module list. This is taken care of by the
PSAPI function: EnumProcessModules(). It returns the list of modules loaded by a process through HMODULE. Another function, GetModuleInformation() will give us a more detailed description of the modules in the list. Given a process handle and an HMODULE, it fills the following MODULEINFO structure:typedef struct _MODULEINFO {
LPVOID lpBaseOfDll;
DWORD SizeOfImage;
LPVOID EntryPoint;
} MODULEINFO, *LPMODULEINFO;
lpBaseOfDll
gives the address where the module has been loaded in the process address space, which is just what we want. We don’t really need to call this function since HMODULE has exactly the same value as lpBaseOfDll. GetModuleFilenameEx() returns the DLL or executable filename corresponding to the module.Here is a simplified way to list each module loaded by a process:
#define MAX_MODULES 1024
HMODULE hMods[MAX_MODULES];
DWORD cbNeeded;
if (::EnumProcessModules(hProcess, hMods, sizeof(hMods), &cbNeeded))
{
if (cbNeeded > 0)
{
TCHAR szModName[MAX_PATH];
for (UINT iModule = 0; iModule < (cbNeeded / sizeof(HMODULE)); iModule++)
{
// Get the full path to the module's file
if (::GetModuleFileNameEx(hProcess, hMods[iModule], szModName, sizeof(szModName)))
{
// do what we want with the mapped address in hMods[iModule] and
// the module filename in szModName
}
}
}
}
Building a Higher Level Set of Classes
You have seen how to access Windows NT running processes and loaded modules. Now we will develop a set of classes which will easily fit into the user interface classes we have already defined. Four new classes will be designed:
CProcess, CModule, CProcessList and CModuleList.Right-click on
Apl Classes in Visual Studio ClassView and choose the New Class... menu item. Follow the same steps in creating the calsses as you did for the CWndSaveRestoreHelper class,and then place all the files in the Process & Module folder. We want the declarations and definitons of classes CProcess and CProcessList in the same .h and .cpp files. You have to push the Change... button and select another filename in the case of CProcessList: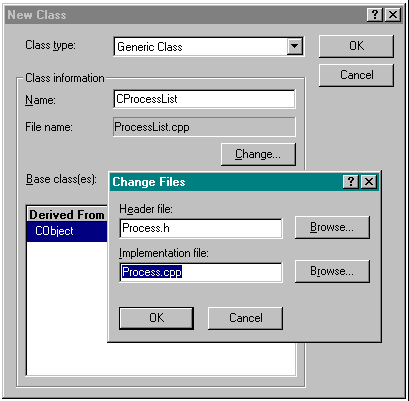
Do the same for
CModuleList. After completing these steps, you should have:
Four new classes ready moved to the ![]() class folder
class folder
Four new files:
In most classes generated this way, ClassWizard adds the line
#include "apl.h" into the.cpp files. To ease a future reuse of your classes, you should remove this directive from both files. Failure to do so will prevent successful compilation, if you reuse these classes in another project.Now we define the data members and methods for each class.
Description of Classes: Process and Module
The
CModule and CProcess classes will have two purposes. First, the description of a process and of a module will be made available to the user through a set of public methods. The data members will be kept hidden and only Get…() methods remain as public. Second, the class should be able to get the description of each field accessed by the Get…() methods, given an ID for a process or an HMODULE for a module. For the CModule class, the constructor will serve this purpose, whereas for CProcess, a special function AttachProcess() will carry out this task.
CModule
classHere is the
CModule class declaration:class CModule : public CObject
{
// constructor/destructor
private:
CModule();
public:
CModule(HMODULE hModule, LPCSTR szFilename);
virtual ~CModule();
// access members
const HMODULE GetModuleHandle() const { return m_hModule; }
const CString& GetModuleName() const { return m_szFilename; }
// internal members
protected:
HMODULE m_hModule;
CString m_szFilename;
// debug helpers
public:
#ifdef _DEBUG
virtual void AssertValid() const;
virtual void Dump(CDumpContext& dc) const;
#endif
};
Note that
CModule is derived from CObject. Even though there is a significant memory overhead in deriving from CObject, keep in mind a significant advantage of doing so: it makes it easier to find and debug memory leaks. When you run the application in Debug mode (F5 key), a memory check is done on your behalf. When the application terminates, if a memory block has been allocated using new but not released using delete, you get a description of this block. To illustrate this, let us see what happens with a simple example. Create a CModule object in the free store but do not add and code to delete it afterwards. Write the following code in CAplApp::InitInstance():CModule* pModule = new CModule(0, _T("Test"));
The trace output is different depending on whether
CModule derives from CObject or not:|
CModule , derived from nothing |
|
Detected memory leaks! |
|
Dumping objects -> |
|
strcore.cpp(116) : {1138} normal block at 0x00447B60, 17 bytes long. |
|
Data: < Test> 01 00 00 00 04 00 00 00 04 00 00 00 54 65 73 74 |
|
F:\WROX\Apl\Apl.cpp(109) : {1137} normal block at 0x00447C70, 12 bytes long. |
|
Data: < A l{D > 18 DC 41 00 00 00 00 00 6C 7B 44 00 |
|
Object dump complete. |
|
CModule , derived from Cobject |
|
Detected memory leaks! |
|
Dumping objects -> |
|
strcore.cpp(116) : {1235} normal block at 0x00448C10, 17 bytes long. |
|
Data: < Test> 01 00 00 00 04 00 00 00 04 00 00 00 54 65 73 74 |
|
F:\WROX\Apl\Apl.cpp(109) : {1234} client block at 0x00448D60, subtype 0, 12 bytes long. |
|
a CObject object at $00448D60, 12 bytes long |
|
Object dump complete. |
In addition to our
The only difference is the way the object is displayed. In the first case, where the
CModule object is not derived from CObject, the memory dump output is not easy to decode. In the second case, the address returned by new is returned, as well as the size of the object (here 12 bytes long) and it's class type, erroneously displayed as CObject.As explained in Beginning VC++6 Chapter 18, it is possible to get
CObject features only if you use certain macros. In our debugging example, we have only forgotten to implement the first feature level with DECLARE_DYNCREATE() in the CModule declaration and IMPLEMENT_DYNCREATE(CModule, CObject) at the beginning of Module.cpp implementation file. If you add these two macros to their repective files and run again, the resulting output is as follows. This time the right class name appears in the dump:|
CModule , derived from CObject with DECLARE_DYNCREATE() / IMPLEMENT_DYNCREATE() |
|
Detected memory leaks! |
|
Dumping objects -> |
|
strcore.cpp(116) : {1233} normal block at 0x00448C10, 17 bytes long. |
|
Data: < Test> 01 00 00 00 04 00 00 00 04 00 00 00 54 65 73 74 |
|
F:\WROX\Apl\Apl.cpp(109) : {1232} client block at 0x00448D60, subtype 0, 12 bytes long. |
|
a CModule object at $00448D60, 12 bytes long |
|
Object dump complete. |
Knowing the class name of a forgotten object is not really that useful, when faced with a memory leak — what we need is a detailed memory dump. This is implemented as follows.
First, in order to ensure a better trace output, you are encouraged to enhance the level of traces in Debug build. To do this, add the following lines to the beginning of your application
#ifdef _DEBUG
afxDump.SetDepth(1);
#endif
And insert this code into
CModule::Dump():#ifdef _DEBUG
void CModule::Dump(CDumpContext& dc) const
{
CObject::Dump(dc);
dc << "\nm_szFilename = " << (LPCTSTR)m_szFilename;
dc << "\nm_hModule = " << m_hModule;
dc << "\n";
}
#endif
For this example, the trace output will be as follows:
|
Enhanced leak description |
|
Detected memory leaks! |
|
Dumping objects -> |
|
strcore.cpp(116) : {1233} normal block at 0x00448C10, 17 bytes long. |
|
Data: < Test> 01 00 00 00 04 00 00 00 04 00 00 00 54 65 73 74 |
|
F:\WROX\Apl\Apl.cpp(109) : {1232} client block at 0x00448D60, subtype 0, 12 bytes long. |
|
a CModule at $448D60 |
|
m_szFilename = Test |
|
m_hModule = $0 |
|
Object dump complete. |
In this case, the internal description of the leaked object is displayed. After calling
Implementation of
CModuleThe implementation of
CModule methods is straighforward. First, you need to add what is missing for the CObject feature level support we need. In Module.h, before the CModule constructor declaration, type:DECLARE_DYNCREATE(CModule)
At the beginning of
Module.cpp type:IMPLEMENT_DYNCREATE(CModule, CObject)
Now we can start implementation in earnest. Note that two
CModule constructors have been declared, a private deafult constructor and a second public constructor with two parameters:public:
CModule(HMODULE hModule, LPCSTR szFilename);
The second constructor stores the given parameters as protected data members:
CModule::CModule(HMODULE hModule, LPCSTR szFilename)
{
m_hModule = hModule;
m_szFilename = szFilename;
}
The destructor has no resource to free, and is thus empty:
CModule::~CModule()
{
}
AssertValid()
checks that the filename is not empty or the loading address is not 0:void CModule::AssertValid() const
{
CObject::AssertValid();
ASSERT((m_szFilename != _T("")) && (m_hModule != 0));
}
Dump()
helps you find memory leaks:void CModule::Dump(CDumpContext& dc) const
{
CObject::Dump(dc);
dc << "\nm_szFilename = " << (LPCTSTR)m_szFilename;
dc << "\nm_hModule = " << m_hModule;
dc << "\n";
}
CProcess
classLet's now develop the
CProcess class:static const int UNKNOWN_PROCESS_ID = ((DWORD)-1);
static const int IDLE_PROCESS_ID = ((DWORD)-2);
static const int MAX_PROCESS = 1024;
class CProcess : public CObject
{
DECLARE_DYNCREATE(CProcess)
// constructor/destructor
public:
CProcess();
virtual ~CProcess();
// public interface
public:
const DWORD GetPID() const;
const CString& GetName() const;
const CString& GetFilename() const;
const CString& GetMainWindowTitle() const;
const HWND GetMainWindowHandle() const;
const DWORD GetParentProcessID() const;
const DWORD GetHandleCount() const;
const DWORD GetWorkingSet() const;
// give access to modules loaded by process through a CModuleList object
const CModuleList& GetModuleList() const { return m_ModuleList; }
// provide methods to enumerate spawned processes
int GetChildrenCount();
// internal helpers
private:
BOOL AttachProcess(DWORD PID);
BOOL DefaultInit();
void AddChild(CProcess* pProcess); // used by CProcessList
// internal members
protected:
DWORD m_dwPId; // process ID
CString m_szName; // name
CString m_szFilename; // filename
HWND m_hMainWnd; // Window title handle
CString m_szMainWndTitle; // Window title
DWORD m_ParentProcessID; // parent process ID
DWORD m_HandleCount; // handles count
DWORD m_WorkingSet; // working set (used physical RAM)
CModuleList m_ModuleList; // module list
CObArray m_ChildProcesses; // child process list
// debug helpers
public:
#ifdef _DEBUG
virtual void AssertValid() const;
virtual void Dump(CDumpContext& dc) const;
#endif
friend class CProcessList;
};
This class is a little bit more complicated than
CModule. Before implementing it, don't forget to insert the following line to the beginning of Process.cpp:IMPLEMENT_DYNCREATE(CProcess, CObject)
First, there are many more members than for
CModule, and we have chosen not to use a special constructor which would have too many parameters. Instead, we let a CProcess know how to describe itself if we pass a process ID. We have already seen which system API is worth using to set each CProcess member knowing its process ID. The AttachProcess() method is responsible for doing this initialization job and returns TRUE if it is possible to get the process description for the given ID. You will discover soon why it is declared as a private member. Here is the source code:BOOL CProcess::AttachProcess(DWORD PID)
{
// check for given parameter
if (PID <= 0)
{
// it should be the "System Idle Process"
m_szName = _T("System Idle Process");
}
// check if we can get information for this process
HANDLE hProcess = ::OpenProcess(PROCESS_QUERY_INFORMATION | PROCESS_VM_READ, FALSE, PID);
if (hProcess != NULL)
{
TCHAR szBuffer[_MAX_PATH+1];
// set the process ID
m_dwPId = PID;
// get the module name and filename
if (::GetModuleBaseName(hProcess, NULL, szBuffer, _MAX_PATH) == 0)
m_szName = _T("System");
else
{
m_szName = szBuffer;
// remove the ".exe" from the module name
m_szName = m_szName.Left(m_szName.ReverseFind(_T('.')));
}
if (::GetModuleFileNameEx(hProcess, NULL, szBuffer, _MAX_PATH) == 0)
m_szFilename = _T("?");
else
m_szFilename = szBuffer;
// search for the main window
m_hMainWnd = GetMainWindow(m_dwPId);
if (::IsWindow(m_hMainWnd))
{
::GetWindowText(m_hMainWnd, m_szMainWndTitle.GetBuffer(_MAX_PATH), _MAX_PATH);
m_szMainWndTitle.ReleaseBuffer(-1);
}
else
m_szMainWndTitle = _T("....no window");
// get the memory info
PROCESS_MEMORY_COUNTERS pmc;
pmc.cb = sizeof(PROCESS_MEMORY_COUNTERS);
if (::GetProcessMemoryInfo(hProcess, &pmc, sizeof(PROCESS_MEMORY_COUNTERS)))
m_WorkingSet = pmc.WorkingSetSize;
else
{
TRACE("Impossible to get process(%u) working set...\n", PID);
}
// get its parent process ID
PROCESS_BASIC_INFORMATION pbi;
DWORD dwSize;
int iReturn;
pbi.InheritedFromUniqueProcessId = UNKNOWN_PROCESS_ID;
iReturn =
::NtQueryInformationProcess(
hProcess,
ProcessBasicInformation,
&pbi,
sizeof(pbi),
&dwSize
);
// NtQueryInformationProcess returns a negative value if it fails
if (iReturn >= 0)
m_ParentProcessID = pbi.InheritedFromUniqueProcessId;
else
{
TRACE("Impossible to get process(%u) parent process ID...\n", PID);
}
// query for handle count
DWORD dwHandleCount;
iReturn =
::NtQueryInformationProcess(
hProcess,
ProcessHandleCount,
&dwHandleCount,
sizeof(dwHandleCount),
&dwSize
);
if (iReturn >= 0)
m_HandleCount = dwHandleCount;
else
{
TRACE("Impossible to get process(%u) handles count...\n", PID);
}
// fill the module list
m_ModuleList.Refresh(hProcess);
// don't forget to release the process handle
::CloseHandle(hProcess);
return TRUE;
}
else
return FALSE;
}
Most of the source code has already been explained except for two parts. First, if the process ID given as the parameter has a negative value, we define3 the process as "System Idle Process", which emulates the Windows NT Task Manager. Second, just before releasing the process handle, we ask the process's module list to fetch each loaded module with
Refresh(). We have already explained how to get such a list using PSAPI functions but you will soon discover its integration within CModuleList.Now cut and paste the source code for the windows enumaration functions which we discussed earlier:
EnumWindowsProc() and GetMainWindow(), in that order. Since these two functions will appear in the Globals folder, insert their declarations in Process.h outside the class definition. Also include Module.h at the top of the header file, as you are declaring a CModuleList data member. In addition you must copy and paste the definiton of our ENUMINFO structure into Process.cpp, and include the header file NtQuery.h. At this point you will also need to include the file Psapi.h, in order to use the EnumProcesses() method, which we introduced right at the beginning of this section. This file is found in the Samples folder on the MSDN library setup disk.We have also added
DefaultInit() to initialize each member with default value:// set members to default values
BOOL CProcess::DefaultInit()
{
m_dwPId = UNKNOWN_PROCESS_ID;
m_szName = _T("");
m_szFilename = _T("");
m_szMainWndTitle = _T("");
m_hMainWnd = NULL;
m_ParentProcessID = 0;
m_HandleCount = 0;
m_WorkingSet = 0;
return TRUE;
}
It is called by the default constructor:
CProcess::CProcess()
{
DefaultInit();
}
Afterwards, a set of
Get…() methods is defined that gives access to each field of a process description. The public side of a declaration also contains four methods which have not been introduced yet. First, GetModuleList() returns a reference to a CModuleList object which will provide several methods to enumerate the modules loaded by a process. We shall discuss the enumeration methods soon, while describing CModuleList and CProcessList classes.Note the last line of the class definition:
friend class CProcessList;
In Chapter 8, you have seen that a function declared as
friend in a class can access any class member even if it is private or protected. The same can be done for a class. Since CProcessList is declared as friend of CProcess, CProcessList is allowed to access the private members of CProcess. CProcessList can create instances of CProcess objects and associate them to a process given its ID (using its private AttachProcess() and AddChild() methods).The major drawback of declaring
CProcessList is a friend of CProcess is that it binds these two classes together, but in doing so, we hide low level tricks needed to get the process ID. The highest level class is therefore CProcessList, from which it is possible to get each running process, and that will be introduced just after the explanation of the management of spawned processes.The list of processes which have been spawned is stored into a
CObArray member called m_ChildProcesses:CObArray m_ChildProcesses;
This kind of array provides the same kind of services as a templated array. It is used to store pointers and that is exactly what we need: storing pointers to the
CProcess object corresponding to each spawned process. Here are the two methods defined by CProcess, to access to its child processes. AddChild() adds a CProcess object as a child into the array. It is called by CProcessList when it takes a snapshot of running processes:void CProcess::AddChild(CProcess* pProcess)
{
// impossible to add a NULL process
ASSERT(pProcess != NULL);
// add it into the children array
if (pProcess != NULL)
m_ChildProcesses.Add(pProcess);
}
GetChildrenCount()
retrieves the number of child processes it has started. It is used by CParentView in order to set a different icon for whether a process has started other processes (int CProcess::GetChildrenCount()
{
return m_ChildProcesses.GetSize();
}
The debug helper methods are implemented as follows:
#ifdef _DEBUG
void CProcess::AssertValid() const
{
CObject::AssertValid();
ASSERT(m_dwPId > 0);
}
void CProcess::Dump(CDumpContext& dc) const
{
CObject::Dump(dc);
dc << "\nm_szName = " << (LPCTSTR)m_szName;
dc << "\nm_dwPId = " << m_dwPId;
dc << "\nm_szFilename = " << (LPCTSTR)m_szFilename;
dc << "\nm_hMainWnd = " << m_hMainWnd;
dc << "\nm_szMainWndTitle = " << (LPCTSTR)m_szMainWndTitle;
dc << "\nm_ParentProcessID = " << m_ParentProcessID;
dc << "\nm_HandleCount = " << m_HandleCount;
dc << "\nm_WorkingSet = " << m_WorkingSet;
dc << "\n";
}
#endif //_DEBUG
Finally, implement each
Get…() method to return the corresponding member. Insert the code after the defninitions in Process.h to make the methods inline. For example the following method returns the process name.const CString& CProcess::GetName() const { return m_szName; }
Enumerator Classes : Process and Module Lists
The next stage in our project is to get the process and module lists. It is the responsability of enumeration classes to let you access running process and, for each, give you the list of loaded modules with
CProcess::GetModuleList().Process Enumerator Class:
CProcessListThe three main goals of enumarator class
CProcessList are:
Retrieve the process list
Let you enumerate each process, one after the other
Allow you to retrieve a process description given its process ID
Here is the declaration of
CProcessList:#include <AfxTempl.h> // needed for template m_ProcessMap
class CProcessList : public CObject
{
DECLARE_DYNCREATE(CProcessList)
// constructor/destructor
public:
CProcessList();
virtual ~CProcessList();
// public interface
public:
void Refresh();
CProcess* GetProcess(DWORD PID);
int GetCount();
CProcess* GetFirst(POSITION& pos);
CProcess* GetNext(POSITION& pos);
// debug helpers
public:
#ifdef _DEBUG
virtual void AssertValid() const;
virtual void Dump(CDumpContext& dc) const;
#endif
// internal helpers
protected:
void DefaultReset();
void SetChildrenList();
// internal members
protected:
// store each process description (Ptr = 32 bits --> ID)
// indexed by its process ID (Ptr = 32 bits --> CProcess*)
CTypedPtrMap<CMapPtrToPtr, DWORD, CProcess*> m_ProcessMap;
};
The three main features of
CProcessList are carried out by the following public methods:
Refresh()
, which stores the running processesGetFirst()/GetNext()
, which enumerate processesGetProcess()
, which returns a process description from its IDYou have been introduced to
CTypedPtr… data structures in Chapter 16, and we are using a CTypedPtrMap to store each process description (a CProcess object). The key is the process ID and the value is a pointer to the object.In order to use templates, you need to include
<AfxTempl.h> in your header file. Before exploring the implementation of the main CProcessList methods, don't forget to add the following line before the constructor:IMPLEMENT_DYNCREATE(CProcessList, CObject)
Take a snapshot of running processes
As it has been explained earlier,
PSAPI functions are used to retrieve the process list in Refresh():// retrieve and fill the processes list from the system
void CProcessList::Refresh()
{
// 1) don't forget to reset and free the current list
DefaultReset();
// store the current process list
DWORD aProcesses[MAX_PROCESS];
DWORD cbNeeded = 0;
// get a snapshot of the processes
if (!EnumProcesses(aProcesses, sizeof(aProcesses), &cbNeeded))
return;
// calculate how many process IDs were returned
DWORD cProcesses = cbNeeded / sizeof(DWORD);
// attach a CProcess object to each process ID
DWORD dwProcessID;
CProcess* pProcess;
for (DWORD dwCurrentProcess = 0; dwCurrentProcess < cProcesses; dwCurrentProcess++)
{
dwProcessID = aProcesses[dwCurrentProcess];
// 2) add the process definition into the map
pProcess = new CProcess;
if (pProcess != NULL)
{
// retrieve process information for the current process ID
if (!pProcess->AttachProcess(aProcesses[dwCurrentProcess]))
delete pProcess;
else
// store into the map
m_ProcessMap[(LPVOID)dwProcessID] = pProcess;
}
}
// 3) a second iteration is needed to fill the children process information
SetChildrenList();
}
As most of the source code has already been explained, we will only focus on three steps numbered 1, 2 and 3.
1) Since
Refresh() will be called several times, we must empty the map and delete each process description before filling it up again. This is the role of DefaultReset():void CProcessList::DefaultReset()
{
// do nothing if the map is empty
if (m_ProcessMap.IsEmpty())
return;
// get each element of the map and delete it
POSITION pos;
DWORD key;
// delete one process after the other
CProcess* pProcess;
for (pos = m_ProcessMap.GetStartPosition(); pos != NULL; )
{
m_ProcessMap.GetNextAssoc(pos, key, pProcess);
delete pProcess;
}
// delete the map itself
m_ProcessMap.RemoveAll();
}
If the map is not empty, each element of the map (which is a pointer to a process description) is retrieved and deleted (using a
GetStartPosition()/GetNextPosition() loop). Finally, the map is emptied by calling RemoveAll().Since we don't want to generate any memory leaks, we must not forget to call
DefaultReset() from the CProcessList destructor as well:CProcessList::~CProcessList()
{
// empty the map and free each of its element
DefaultReset();
}
2) A
CProcess object is created using new; and initializes itself with AttachProcess(). If its initialization has been successful, the pointer to the CProcess object is stored into m_ProcessMap, and associated to its ID via the m_ProcessMap’s [] operator:m_ProcessMap[(LPVOID)dwProcessID] = pProcess;
If it is not possible to get the description for the given process ID, the
CProcess object is deleted and therefore, not inserted into the map. This should never happen.3) For each process already in the map, the list of processes that it has spawned must be built. Here is the source code for the
SetChildrenList() helper method:void CProcessList::SetChildrenList()
{
CProcess* pParent = NULL;
CProcess* pProcess = NULL;
POSITION Pos = 0;
DWORD PID = 0;
for (pProcess = GetFirst(Pos); (pProcess != NULL); pProcess = GetNext(Pos))
{
// get a process pointer to its parent and
// add itself into this parent process child list
if (pProcess != NULL)
{
PID = pProcess->GetParentProcessID();
if (m_ProcessMap.Lookup((LPVOID)PID, pParent))
pParent->AddChild(pProcess);
}
}
}
The idea is simple. Since we know the parent of each process, we just have to list every process in the map, and for each, get its parent description and add itself as a child of its parent. Each
CProcess keeps track of its children in a CObArray member called m_ChildProcesses. AddChild() helps us to do this easily.
Mapping between a process ID and its description
Our
CParentView and CAplView will need to get a process description knowing only its ID. CProcessList provides GetProcess() which does this kind of job:// return the process info associated to the given process ID
CProcess* CProcessList::GetProcess(DWORD PID)
{
CProcess* pProcess = NULL;
if (m_ProcessMap.Lookup((LPVOID)PID, pProcess))
return pProcess;
else
return NULL;
}
This method relies on the
Lookup() method which returns the value associated to a key. In our case, the "key" is the process ID and the "value" is a pointer to the process description.
Process enumeration
In several parts of our APL application, we will need information about the list of running processes. The
CProcessList class is dedicated to providing the required methods. First, GetCount() returns the number of running processes:// return number of processes in the list
int CProcessList::GetCount()
{
return m_ProcessMap.GetCount();
}
You will see in the clipboard management section why this value is important.
The following methods give an easy way to get each running process managed by
CProcessList, but hide the way they are stored:// return the first process in the list
CProcess* CProcessList::GetFirst(POSITION& pos)
{
pos = m_ProcessMap.GetStartPosition();
return GetNext(pos);
}
// next iteration step
CProcess* CProcessList::GetNext(POSITION& pos)
{
if (pos != NULL)
{
DWORD PID = 0;
CProcess* pProcess = NULL;
m_ProcessMap.GetNextAssoc(pos, PID, pProcess);
return pProcess;
}
else
return NULL;
}
Each method returns
NULL if the given position is not valid or if there are no more processes in the list. Later you will see the source code to populate CParentView and CAplView using these two methods.Once again the debug helper methods are defined as follows:
#ifdef _DEBUG
void CProcessList::AssertValid() const
{
CObject::AssertValid();
}
void CProcessList::Dump(CDumpContext& dc) const
{
CObject::Dump(dc);
dc << "\n# of modules= " << m_ProcessMap.GetCount();
dc << "\n";
}
#endif //_DEBUG
Module Enumerator Class:
CModuleListEach process contains the modules it has loaded inside a
CModuleList object. Here is the class declaration:class CModuleList : public CObject
{
DECLARE_DYNCREATE(CModuleList)
// constructor/destructor
public:
CModuleList();
virtual ~CModuleList();
// public interface
public:
void Refresh(HANDLE hProcess);
int GetCount();
CModule* GetFirst(int& pos);
CModule* GetNext(int& pos);
// internal helpers
protected:
void FreeModuleArray();
// internal members
protected:
CObArray m_ModuleArray;
};
Taking a snapshot of modules loaded by a process:
Refresh()The class provides in its public interface
Refresh() to store modules loaded by the given hProcess:
IMPLEMENT_DYNCREATE(CModuleList, CObject)
#define MAX_MODULES 1024
// fill the list with the given process
void CModuleList::Refresh(HANDLE hProcess)
{
HMODULE hMods[MAX_MODULES];
DWORD cbNeeded;
if (::EnumProcessModules(hProcess, hMods, sizeof(hMods), &cbNeeded))
{
if (cbNeeded > 0)
{
// free the module array current content
FreeModuleArray();
// set its new size
m_ModuleArray.SetSize((cbNeeded / sizeof(HMODULE)) + 1);
TCHAR szModName[MAX_PATH];
for (UINT iModule = 0; iModule < (cbNeeded / sizeof(HMODULE)); iModule++)
{
// Get the full path to the module's file
if (::GetModuleFileNameEx(hProcess, hMods[iModule], szModName, sizeof(szModName)))
{
// create a CModule object to store the module info
CModule* pModule = new CModule(hMods[iModule], szModName);
// insert it into the internal module array
if (pModule != NULL)
m_ModuleArray.InsertAt(iModule, pModule);
}
}
}
}
}
The pseudo-code for this method has already been introduced in the description of
PSAPI functions. Insert the following line at the top of Module.cpp:#include "Psapi.h"
The main idea of
Refresh() is to create one CModule object per module returned by EnumProcessModules() and to store the pointer to it in a CObArray. Why do we use a CObArray and not a map collection class? Unlike CProcessList which needs to be able to retrieve a process description for a given process ID, we just need to enumerate each module, one after another. An array collection class is perfect for this kind of job.You can see from the
Refresh() source code how the low level module data is wrapped by our C++ classes. Since Refresh() may be called several times, we need to empty m_ModuleArray before filling it up again. FreeModuleArray() retrieves each CModule pointer stored in m_ModuleArray and deletes it:// free each object stored into the array and empty the array itself
void CModuleList::FreeModuleArray()
{
if (m_ModuleArray.GetSize() > 0)
{
// free each element
for (int iModule = 0; iModule <= m_ModuleArray.GetUpperBound(); iModule++)
delete (CModule*) m_ModuleArray[iModule];
// delete the array itself
m_ModuleArray.RemoveAll();
}
}
Even though each
CModule object has been deleted, we must also empty the array itself by calling the RemoveAll() method. Once a module description (loading address and corresponding filename) is known, a CModule object is created:CModule* pModule = new CModule(hMods[iModule], szModName);
Finally, the new
CModule pointer is stored into m_ModuleArray:m_ModuleArray.InsertAt(iModule, pModule);
Access methods to modules snapshot
Once a snapshot has been taken,
GetCount() returns the number of loaded modules and returns the number of CModule pointers stored in m_ModuleArray:// return number of modules in the list
int CModuleList::GetCount()
{
return m_ModuleArray.GetSize();
}
Finally,
GetFirst() and GetNext() offer an easy way to iterate through each module in sequence.// get the first module to start an enumeration
CModule* CModuleList::GetFirst(int& pos)
{
pos = 0;
return GetNext(pos);
}
// get the next module of an enumeration
CModule* CModuleList::GetNext(int& pos)
{
CModule* pModule = NULL;
if (pos <= m_ModuleArray.GetUpperBound())
pModule = (CModule*) m_ModuleArray[pos++];
return pModule;
}
We follow exactly the same principle as for the
GetFirst() and GetNext() methods of CProcessList, by completely hiding how the snapshot is stored internally. They return NULL if the given position is invalid or if there are no more modules in the snapshot. You will see the details of how they are used when we explain the filling of CModuleView.
Programming Tips
It is now time to introduce you to compiler features which are usually hidden from novice developers: the pragma. The Visual C++ online help defines
#pragma directives as the following:Each implementation of C and C++ supports some features unique to its host machine or operating system. Some programs, for instance, need to exercise precise control over the memory areas where data is placed or to control the way certain functions receive parameters. The #pragma directives offer a way for each compiler to offer machine- and operating-system-specific features while retaining overall compatibility with the C and C++ languages. Pragmas are machine- or operating-system-specific by definition, and are usually different for every compiler.
Among the strange and powerful pragmas provided by Visual C++, one is heavily used by the MFC framework to ensure that the right MFC runtime DLL is linked. You can define which DLL you want statically linked within the project workspace through the project settings or directly in the Visual Studio
FileView pane: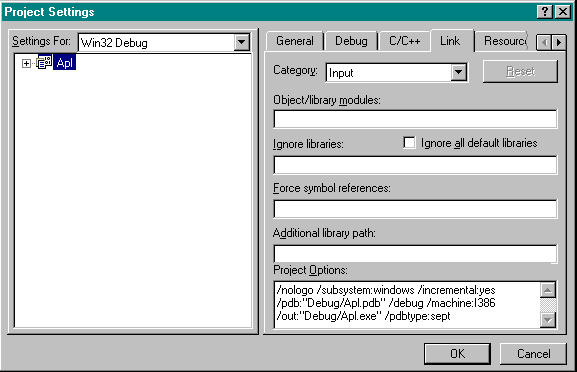
Alternatively, you can add a pragma in your source code to do it yourself using the pragma
comment. MFC uses it, for example, to ensure that wsock32 will be linked when you need to use Windows Sockets. The Sockcore.cpp source file contains the following statement:#pragma comment(lib, "wsock32.lib")
Since it is mandatory for
CProcess and CProcessList to link with psapi.lib and ntdll.lib, instead of adding these files to the project workspace, we can tell the linker to do it via a #pragma directive:#pragma comment(lib, "psapi.lib")
#pragma comment(lib, "ntdll.lib")
Since we work in a robust and documented way, it would be good to say, during compilation, that our class needs these files. Therefore, if someone else wants to reuse our code, he will not forget to get the corresponding
.lib files. In order to tell the compiler to display a nice message during code building, you use another pragma called message:#pragma message(" CProcess and CProcessList require psapi.lib and ntdll.lib to link")
The file
psapi.lib can be found in the Samples folder on the MSDN library setup disk. However the file ntdll.lib is not provided by Visual C++, nor is it on the MSDN library disks, but it can be loaded from the Wrox web site. If you do not load these files into your project folder, you will get linker errors: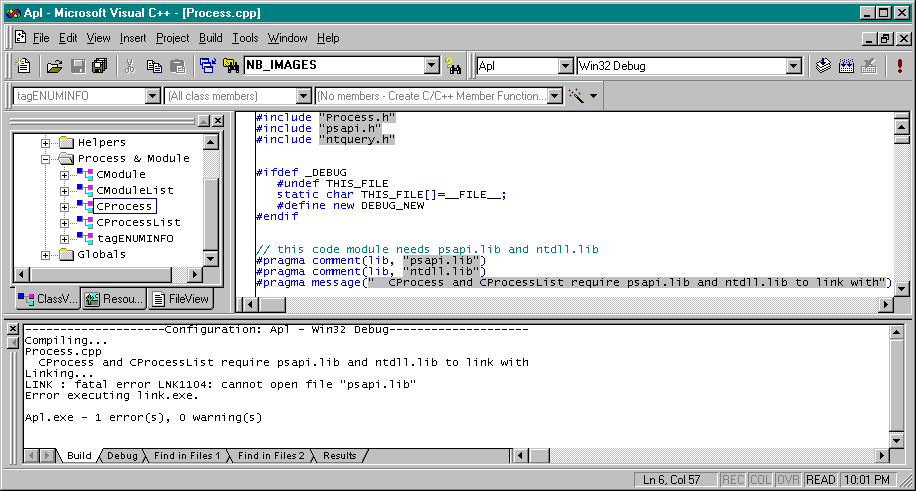
You note on this snapshot that the message is displayed at compile time and therefore before the link process even if you have written the
#pragma message() after the #pragma comment(lib) in your code. It is a good habit to give the name of the file where the pragma message has been written, or else if you fail to do so, when error occurs later on, you are doomed to search your source code for the pragma string.
Integration to the MFC Document/View Framework
We have reached the point where both the user interface and the low level data access classes have been implemented. It is now time to make them work together. The MFC Document/View architecture helps us fulfill this task.
Giving Access to Low Level Data Classes for Document Views
As we have stated earlier, a
CProcessList object is responsible for taking a snapshot of running processes via Refresh(). Once the snapshot is taken, we can get each process description with GetFirst()/GetNext() which returns a CProcess object. Finally, for a given CProcess, it is easy to list each module it has loaded with GetFirst()/GetNext(), both of which return a CModule.Our
CAplView and CParentView classes both need to enumerate the running processes and the CModuleView class will need to know how to list every module loaded by the current process selected in CParentView or CAplView.As we have seen in Chapters 13 and 16, the application data are stored by the document which provides its associated view with a simple programming interface of public methods. The document keeps for itself a protected
CProcessList object and offers a GetProcessList() method to its views in order to access the low level system data. CProcessList has the responsibility to provide a high level access to the process list. Add this Get…() method and its associated protected data member to AplDoc.h:public:
const CProcessList& GetProcessList() const { return m_ProcessList; }
protected:
CProcessList m_ProcessList;
Include this directive in
AplDoc.h to let CAplDoc know of the CProcessList class.#include "Process.h"
In this way, if a view needs to enumerate the process list, it just needs to retrieve a
CProcessList reference using its document GetProcessList() method, and get each process back in a GetFirst()/GetNext() loop:CProcessList& ProcessList = pDoc->GetProcessList();
CProcess* pProcess = NULL;
POSITION Pos = 0;
for (
pProcess = ProcessList.GetFirst(Pos);
(pProcess != NULL);
pProcess = ProcessList.GetNext(Pos)
)
{
// do what you want with pProcess
}
Once a process object has been created, its description is available through its
Get…() access methods. In order to list the loaded modules, a CModuleList object is retrieved by GetModuleList(). Again, you can use a GetFirst()/GetNext() sequence to get a CModule object for every loaded module, whose own Get…() access methods provide access to its description.Another solution would be to let the document hide both process and module list objects behind a set of enumerator methods, which only provide
CProcess and CModule lists. The main benefit of this is to hide the CProcessList and CModuleList from the views, since the document will provide the same kind of enumerator interface via GetFirstProcess()/GetNextProcess() and GetFirstModule()/GetNextModule().The major drawback of such a relationship is to bind the view classes to a particular document class. If you wish to reuse your process and module views, you are forced into copying and pasting the
GetFirst…()/GetNext…() code from the CAplDoc class into your new document class. With the chosen solution, shown below, your views only need to know the high level wrapper classes CProcessList, CProcess and CModuleList.A good rule of thumb is always to separate the user interface classes from the data by enclosing the latter in a wrapper class. The result will always be more reusable. Also, create a separate data provider class to give access to other low level classes, which is exactly what the document does for its views. It provides a set of methods to create an instance of the process list wrapper class, which in turn provides access to an instance of a module list wrapper class, and so on.
To illustrate, here is a graphical view of the relationship between the user interface, the data provider and the data wrapper classes:
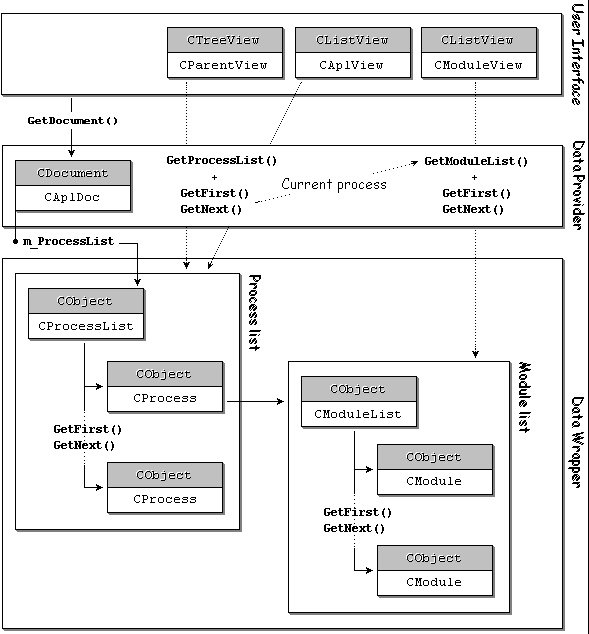
Note that
User Interface and Data Wrapper layers have been introduced. We are now ready to describe, in detail, how the three views are filled. Finally, we will use the UpdateAllViews() method of our document to synchronize each view content and selection with their OnUpdate()methods.Before leaving the document, we will answer a question that might have occured to you by now: when is the process list initialized? The answer is in the
OnNewDocument() method which is called by the MFC framework by ProcessShellCommand(), from within InitInstance().Delete the default AppWizard implementation of
OnNewDocument():BOOL CAplDoc::OnNewDocument()
{
if (!CDocument::OnNewDocument())
return FALSE;
// TODO: add reinitialization code here
// (SDI documents will reuse this document)
return TRUE;
}
Replace it with the following code:
BOOL CAplDoc::OnNewDocument()
{
// default MFC processing
if (!CDocument::OnNewDocument())
return FALSE;
// fill the process list
m_ProcessList.Refresh();
// if initialization is successful
return TRUE;
}
Another interesting feature of MFC framework is its call of
OnNewDocument() when an ID_FILE_NEW command is received. This is the reason why we have renamed the File New menu item and toolbar button as Refresh.Therefore, if you try to refresh APL using the menu
File | Refresh, the toolbar button or the F5 shortcut, you may be surprised to discover that a refresh occurs, and we have done nothing to achieve this behavior — the MFC framework has done the job for us. We have thus achieved one of our project objectives (#5, refreshing the screen output). We should now begin to think about filling our APL views using the process list.
CAplView: Enumerating Running Processes
Filling the list
We have already used
OnInitialUpdate() to insert some test code to fill CAplView (during our development of the CListView class). It is now time to insert real code:void CAplView::OnInitialUpdate()
{
// fill the list view with the processes
FillList();
}
We will call the protected helper
FillList(). Add it just under OnNeedText():protected:
virtual void OnNeedText(LPVOID pItem, int nColumn, CString& szContent);
int FillList();
Next, write the following code in
AplView.cpp for its implementation:// fill the list and return the number of inserted processes
int CAplView::FillList()
{
// 1. don't forget to delete the actual content of the list view
m_ProcessIndex.RemoveAll();
GetListCtrl().DeleteAllItems();
// count the number of process to be returned
int iCount = 0;
// get the process list from the document
CAplDoc* pDoc = GetDocument();
ASSERT(pDoc != NULL);
if (pDoc != NULL)
{
// 2. get process list stored into the document
CProcessList& ProcessList = pDoc->GetProcessList();
CProcess* pProcess = NULL;
// 3. get one process after the other
POSITION Pos = 0;
for (
pProcess = ProcessList.GetFirst(Pos);
(pProcess != NULL);
pProcess = ProcessList.GetNext(Pos)
)
{
// add each process in the list
if (pProcess != NULL)
{
// 4. insert the process into the list view
InsertItem(pProcess, iCount);
// 5. build the cross reference index PID --> row in the list view
m_ProcessIndex[(LPVOID)pProcess->GetPID()] = iCount;
// next...
iCount++;
}
}
// 6. set the selection on the first process
if (iCount > 0)
GetListCtrl().SetItemState(
0,
LVIS_SELECTED | LVIS_FOCUSED,
LVIS_SELECTED | LVIS_FOCUSED
);
}
return iCount;
}
Before adding any item to the list, we have to empty it. In addition to
DeleteAllItems(), note the insertion of the following line:m_ProcessIndex.RemoveAll();
We now add
m_ProcessIndex as a CTypedPtrMap<CMapPtrToPtr, DWORD, int> protected member:protected:
// process/list view cross reference map
CTypedPtrMap<CMapPtrToPtr, DWORD, int> m_ProcessIndex;
Don't be afraid — its role will be explained very soon. Next, we get a reference to the process list stored in the document. It is now possible to enumerate the processes. We are using the
GetFirst()/GetNext() methods of CProcessList to get each process. As you can see, a for loop is perfect for this kind of enumeration.As we have explained earlier, we are using
InsertItem() as add an item to the list view. We don't set each part of a process description to define every subitem for each item. Instead, we ask the list to call us whenever it needs to display the content of each column. In order to be sure to have the description of the process associated to a line, we pass the process pointer pProcess as lParam to the inserted item:InsertItem(pProcess, iCount);
Since
lParam will be given back to the notification handler OnGetDispInfo(), we just have to cast it into a CProcess* to retrieve the content for each column in OnNeedText().Even if an item has been inserted, we still have cross-reference work to do. By associating a
CProcess* to an item, it is easy to get the process description for a given line. However, the opposite is not true. Why would this be so important? We have already talked about the need to synchronize CParentView with CAplView and vice versa. When the user selects a process in the left pane tree view, we want the corresponding line in CAplView to auto-select. Similarly, when a process gets selected in the right pane CAplView, the same process should be visible and selected in the left CParentView pane.The exact mechanism used to synchronize both views will be explained soon but bear in mind that we have to find out which line represents a given process. We have chosen to associate a line with the process ID. A map is ideal for storing this kind of cross-reference index:
m_ProcessIndex[(LPVOID)pProcess->GetPID()] = iCount;
Finally, we select the first item in the list view. We will go back later to the mechanism needed to synchronize the selection between
CAplView and CParentView without looping forever.How to get the column content for a whole line :
OnNeedText()As we are using the notification mechanism introduced earlier, so we have to implement
OnNeedText(). Here is the source code:void CAplView::OnNeedText(LPVOID pItem, int nColumn, CString& szContent)
{
// set default value
szContent = _T("");
// retrieve the CProcess* inserted with the item as lParam
CProcess* pObject = (CProcess*)pItem;
if (pObject != NULL)
switch (nColumn)
{
// ID
case COLUMN_PID:
{
DWORD dwPID = pObject->GetPID();
if (dwPID != (DWORD)-1)
szContent.Format(_T("%u"), dwPID);
else
szContent = _T("?");
}
break;
// name
case COLUMN_NAME:
szContent = pObject->GetName();
break;
// filename
case COLUMN_FILENAME:
szContent = pObject->GetFilename();
break;
// window title
case COLUMN_WINDOW:
{
szContent = pObject->GetMainWindowTitle();
// if there is no title, display the window handle in hex
if (szContent.GetLength() == 0)
szContent.Format(_T("....no title for 0x%x"), pObject->GetMainWindowHandle());
}
break;
// parent process ID
case COLUMN_PARENTPROCESS:
{
DWORD dwPID = pObject->GetParentProcessID();
if (dwPID != (DWORD)-1)
{
// get the process list from the document
CAplDoc* pDoc = GetDocument();
// get the process name from the process list
CProcessList& ProcessList = pDoc->GetProcessList();
CProcess* pProcess = (CProcess*)ProcessList.GetProcess(dwPID);
if (pProcess != NULL)
szContent.Format(_T("%s %u"), (LPCTSTR)pProcess->GetName(), dwPID);
else
szContent.Format(_T("....process %u"), dwPID);
}
else
szContent = _T("?");
}
break;
// handle count
case COLUMN_WORKINGSET:
{
DWORD dw = pObject->GetWorkingSet();
if (dw != (DWORD)-1)
szContent.Format(_T("%u K"), dw/1024);
else
szContent = _T("?");
}
break;
}
}
We rely on the
Get…() methods provided by CProcess to build the string which will be displayed in each column. However, the user interface layer may decide to represent information in a different way than the raw data returned by the data layer, for example, the content of the window column depends on whether the window has a title or not. The memory consumption is another good example — raw data is given in bytes and we want to the user to see the output kilobytes instead. (You can also offer the user to define his or her own choice through options: in bytes or in kilobytes.)
CParentView: building the tree
The filling of
CParentView is the most complicated algorithm in our APL application. The reason is simple: Windows NT does not give us the tree of spawned processes. We have to rebuild it from the list of processes and their parents.
Find a way to transform a list into a tree: take an example
Let's take an example to help you understand the problem. Imagine you have launched Visual Studio by clicking its icon on the Desktop. After having loaded APL, you decide to debug Advanced Process List and you start it using
F5. In CAplView, you would get the following list:
But how do you transform the list into the following tree?

To solve this problem, let us first list the running processes and for each one, enter its ID and its parent process’s ID:
|
Process Name |
Process ID |
Parent ID |
|
MSDEV |
148 |
95 |
|
Explorer |
95 |
76 |
|
Apl |
179 |
148 |
Apply the following steps to each process.
Check if its parent process is running, i.e. its process ID is listed.
If so, insert the process under its parent.
If its parent is not running, i.e. its process ID is not listed, then its parent is the root process.
You need to keep track of the position of each process within the tree. If you remember what we did for
Now let us apply the steps to our example above, to illustrate:
Process 148 is MSDEV — its parent is 95, so insert it under 95:
![]()
Process 95 is running as Explorer — its parent is 76 so insert it under 76:

Process 76 is no longer running — it's parent is unknown, it is the root:

Having inserted MSDEV, Explorer and process 76 in their correct places, we can complete the task by inserting the Apl process. This gives the tree as shown below:

Maybe you have recognized from Chapter 5 that you are looking at a recursive algorithm.
First implementation: creating the tree
Like
CAplView, we set the CParentView content in OnInitialUpdate():// called when the view will be displayed for the first time
void CParentView::OnInitialUpdate()
{
// default MFC processing
CTreeView::OnInitialUpdate();
// fill the tree
FillParentTree();
}
We just call a method named
FillParentTree(). This helper enumerates running processes and tries to insert them into the tree one after the other. First we have to add the following declarations in ParentView.h:public:
void FillParentTree();
HTREEITEM CParentView::InsertProcess(
DWORD PID,
CProcessList& ProcessList,
CTypedPtrMap<CMapPtrToPtr, DWORD, HTREEITEM>& InsertedProcesses
);
protected:
// given a PID, return a HTREEITEM
CTypedPtrMap<CMapPtrToPtr, DWORD, HTREEITEM> m_ProcessItems;
// root of all processes
HTREEITEM m_hRoot;
We will explain the
FillParentTree() and InsertProcess() methods in just a moment.m_ProcessItems
has the same role in CParentView as m_ProcessIndex has in CAplView. Given a process ID, it returns the HTREEITEM of the position in the tree view where this process has been inserted. Finally, m_hRoot stores a HTREEITEM corresponding to the tree rootHere is the helper method which cycles through running processes:
void CParentView::FillParentTree()
{
// don't forget to delete the actual content of the tree view
GetTreeCtrl().DeleteAllItems();
m_ProcessItems.RemoveAll();
// add a fake process called "Process Tree" as common root
TV_INSERTSTRUCT tvInsert;
tvInsert.hParent = TVI_ROOT;
tvInsert.hInsertAfter = TVI_LAST;
tvInsert.item.mask = TVIF_TEXT | TVIF_IMAGE | TVIF_SELECTEDIMAGE | TVIF_PARAM;
tvInsert.item.iImage = STATE_ROOT;
tvInsert.item.iSelectedImage = STATE_ROOT;
tvInsert.item.pszText = (LPTSTR)_T("Process Tree");
tvInsert.item.lParam = (LPARAM)-1;
m_hRoot = GetTreeCtrl().InsertItem(&tvInsert);
// get the process list from the document
CAplDoc* pDoc = GetDocument();
ASSERT(pDoc != NULL);
if (pDoc != NULL)
{
CProcessList& ProcessList = pDoc->GetProcessList();
CProcess* pProcess;
POSITION Pos;
// enumerate processes and try to add each to the tree
for (
pProcess = ProcessList.GetFirst(Pos);
(pProcess != NULL);
pProcess = ProcessList.GetNext(Pos)
)
{
if (pProcess != NULL)
{
// add the process into the tree view
InsertProcess(
pProcess->GetPID(),
ProcessList,
m_ProcessItems
);
}
}
}
}
This method has three objectives:
It empties the tree and its cross-index map
It insert a root ![]() into the tree and save its
into the tree and save its
It tries to insert each running process with
InsertProcess()The power behind process insertion is the recursive
InsertProcess() method, which takes three parameters:
PID
: the process ID to be insertedProcessList
: a reference to the running process listInsertedProcesses
: a reference to m_ProcessItems — given a process ID, it returns the HTREEITEM of where it was insertedHere is the implementation of
InsertProcess():HTREEITEM CParentView::InsertProcess(
DWORD PID,
CProcessList& ProcessList,
CTypedPtrMap<CMapPtrToPtr, DWORD, HTREEITEM>& InsertedProcesses
)
{
// check if the process ID has not been already inserted into the tree
HTREEITEM hNode = NULL;
if (InsertedProcesses.Lookup((LPVOID)PID, hNode))
{
// if already inserted
return hNode;
}
else
{// not already inserted
TV_INSERTSTRUCT tvInsert;
tvInsert.hInsertAfter = TVI_LAST;
tvInsert.item.mask = TVIF_TEXT | TVIF_IMAGE | TVIF_SELECTEDIMAGE | TVIF_PARAM;
// the OnNeedText() virtual method will be responsible
// for giving the text label for a dead or running process
tvInsert.item.pszText = LPSTR_TEXTCALLBACK;
tvInsert.item.lParam = (LPARAM) PID;
// determine which image to display
CProcess* pProcess = ProcessList.GetProcess(PID);
if (pProcess != NULL)
{// the process is running
// set its image
if (pProcess->GetChildrenCount() > 0)
{
// -> it is a parent process
tvInsert.item.iImage = STATE_PARENT;
tvInsert.item.iSelectedImage = STATE_PARENT;
}
else
{
// -> it is a child process
tvInsert.item.iImage = STATE_CHILD;
tvInsert.item.iSelectedImage = STATE_CHILD;
}
}
else
{// the process is no longer running
// -> it is a parent process
tvInsert.item.iImage = STATE_PARENT;
tvInsert.item.iSelectedImage = STATE_PARENT;
}
// is it a dead process?
if (pProcess == NULL)
{// the process is no longer running
// --> impossible to know its parent so it is a root
// and we insert it under the tree root
tvInsert.hParent = m_hRoot;
}
else
{// it is running
// therefore, we have to know first where its parent is inserted
DWORD ParentPID = pProcess->GetParentProcessID();
// is its parent already inserted?
HTREEITEM hParentNode = NULL;
if (InsertedProcesses.Lookup((LPVOID)ParentPID, hParentNode))
tvInsert.hParent = hParentNode;
else
{
// insert its parent before itself
// --> recursive call
tvInsert.hParent =
InsertProcess(
ParentPID,
ProcessList,
InsertedProcesses
);
}
}
// insert it into the tree and the cross-reference map
// if not already done during the parent insertion
if (!InsertedProcesses.Lookup((LPVOID)PID, hNode))
{
hNode = GetTreeCtrl().InsertItem(&tvInsert);
InsertedProcesses[(LPVOID)PID] = hNode;
}
return hNode;
}
}
Even if this method seems long, it is not too difficult to understand. First, if the given process ID has been already inserted, i.e. it is referenced in the
InsertedProcesses map, the method returns the corresponding HTREEITEM.Now we insert processes into the tree, using their process ID's, preparing the
TV_INSERTSTRUCT structure needed to call CTreeCtrl::InsertItem(). Therefore, we need to know how to set each relevant member indicated by tvInsert.item.mask, which is carried out whether the process is running or not:|
Meaning |
Mask |
Member |
Running Process |
Dead Process |
|
Label |
TVIF_TEXT |
pszText |
handled by callback |
handled by callback |
|
Image collapsed |
TVIF_IMAGE |
iImage |
either parent or child |
STATE_PARENT |
|
Image expanded |
TVIF_SELECTEDIMAGE |
iSelectedImage |
either parent or child |
STATE_PARENT |
|
Associated data |
TVIF_PARAM |
lParam |
Process ID |
Process ID |
For a running process, the images are set according to its number of children.
Finally, the insertion step occurs — if it is not a running process, we add it under the root. Otherwise, we call the same
#include "Process.h"
Setting the item text labels:
OnGetDispInfo() and OnNeedText()We have already implemented
OnGetDispInfo() as a notification handler for TVN_GETDISPINFO. This method calls OnNeedText() in order to obtain the text label for a given tree item. Here is the method’s final implementation:void CParentView::OnNeedText(LPVOID pItem, CString& szText)
{
// default value
szText = _T("");
// the process ID is associated to each tree item as lParam
DWORD PID = (DWORD)pItem;
// get the process list from the document
CAplDoc* pDoc = GetDocument();
ASSERT(pDoc != NULL);
if (pDoc != NULL)
{
CProcessList& ProcessList = pDoc->GetProcessList();
// build the tree item text label
CString szBuffer;
CProcess* pProcess = ProcessList.GetProcess(PID);
if (pProcess != NULL)
{
// the process is running
szBuffer = pProcess->GetName();
szText.Format(_T("%s %u"), (LPCTSTR)szBuffer, PID);
}
else
{
// the process is no longer running
szText.Format(_T("process %u"), PID);
}
}
}
The running processes list provided by
CAplDoc allows us to find out if the process ID passed as pItem is running or not. The text label is given as the process’s name if it is running, or its ID if it is not running.
Final implementation: dealing with recursion
So there we have it! We have a tree of spawned processes in the left pane of APL.
However, one day you may run APL and get the following application error:

If you click the
Cancel button, the Visual C++ debugger is activated which greets you with the following message:
This is what has happened: our recursive
InsertProcess() method has been called so many times that the call stack has overflowed. Type Alt+7 to view the the call stack in Visual Studio: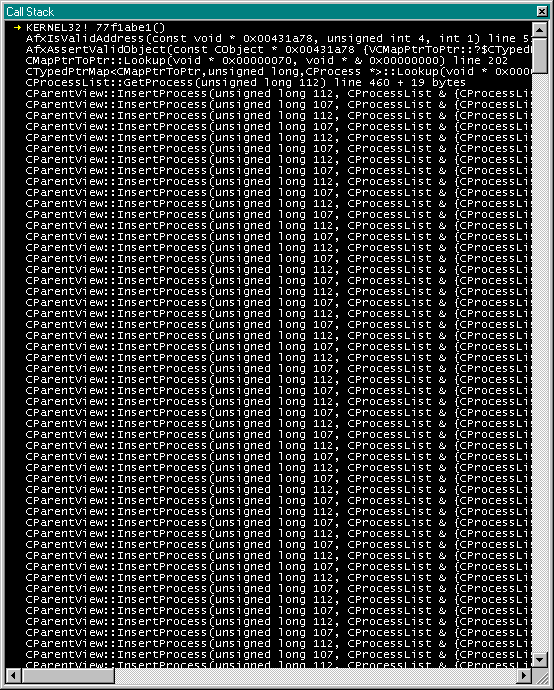
As you can see,
InsertProcess() is called with 112 as its process ID which in turn, calls InsertProcess() with 107 as its process ID and an infinite loop begins: process 107 calling process 112, which then calls 107!. After having consumed about one megabyte of memory, a stack overflow exception is thrown and our application terminates. If you take a look at the source code, there can only be one reason which explains this erratic behavior: process 107 is the parent of process 112 and process 112 is the parent of process 107.A peculiarity of Windows NT lies at the root of this problem: there is no golden rule which states that a process ID may not be reused by Windows NT. There is no documented way of knowing how and under what conditions this process ID reuse mechanism is implemented. However, we must bear in mind that the following situation can occur:
Process 107 spawned process 112
Process 107 then died
Process 112 then launched another process to which Windows NT assigned an ID of 107.
Does this mean that we will not be able to complete the implementation of our APL feature #2? Not at all! We have to adapt our
CParentView class to keep track of child processes which are waiting for their parents to be inserted. Child processes have to be stored in a list before the recursive call to insert their parents into the tree is completed. This list is passed as a parameter to InsertProcess(), and after the call has returned, the child processes are filtered from the list.Let's turn this idea into code. First, you need to change the
InsertProcess()to take an additional Children parameterHTREEITEM CParentView::InsertProcess(
DWORD PID,
CProcessList& ProcessList,
CTypedPtrMap<CMapPtrToPtr, DWORD, HTREEITEM>& InsertedProcesses,
CMapPtrToPtr& Children
);
This
Children map is used in InsertProcess() to recall which child process is waiting for its parent to be inserted Update FillParentTree() with the following code:CMapPtrToPtr Children;
// enumerate processes and try to add each into the tree
for (
pProcess = ProcessList.GetFirst(Pos);
(pProcess != NULL);
pProcess = ProcessList.GetNext(Pos)
)
{
if (pProcess != NULL)
{
// clear the children map
Children.RemoveAll();
InsertProcess(
pProcess->GetPID(),
ProcessList,
m_ProcessItems,
Children);
}
}
The map used to remember the waiting processes is declared and emptied just before inserting a process inside the running processes enumeration loop.
The purpose of
Children in InsertProcess() is to detect an infinite loop. To imlement this, change a section near the end of InsertProcess(), at the point where the function calls itself recursively:// is it a dead process?
CString szName;
if (pProcess == NULL)
{
// the process is no more running
// --> impossible to know its parent so it is a root
tvInsert.hParent = m_hRoot;
}
else
{
DWORD ParentPID = pProcess->GetParentProcessID();
DWORD PIDStored;
// detect loops
if (Children.Lookup((LPVOID)PID, (LPVOID&)PIDStored))
{
// there is a loop: this process is dead and its ID has been reused
// --> add it as a special root
tvInsert.hParent = m_hRoot;
szName.Format(_T("%s or Dead process %u"), (LPCTSTR)pProcess->GetName(), PID);
tvInsert.item.pszText = (LPTSTR)szName.GetBuffer(_MAX_PATH);
szName.ReleaseBuffer(-1);
}
else
{
// is its parent already inserted
HTREEITEM hParentNode = NULL;
if (InsertedProcesses.Lookup((LPVOID)ParentPID, hParentNode))
tvInsert.hParent = hParentNode;
else
{
// first insert its parent before itself
Children[(LPVOID)PID] = (LPVOID)PID;
tvInsert.hParent =
InsertProcess(
ParentPID,
ProcessList,
InsertedProcesses,
Children);
Children.RemoveKey((LPVOID)PID);
}
}
}
// insert it into the tree and the cross-reference map
// if not already done during the parent insertion
if (!InsertedProcesses.Lookup((LPVOID)PID, hNode))
{
hNode = GetTreeCtrl().InsertItem(&tvInsert);
InsertedProcesses[(LPVOID)PID] = hNode;
}
You should take a close look at this section of this function. Before
InsertProcess() is called on its parent, a process adds itself to the Children map, and once InsertProcess() returns, it removes itself from the map. It is therefore easy to detect an infinite loop in the case of a process whose child has the same ID as its parent: if a process that is to be inserted already has an entry in the Children map, that means that an infinite loop has been detected. The passed ID is then treated as a special dead process with a different text label, and the process is inserted into the tree as a special root. If the process is absent from Children, InsertProcess() is called with Children as an additional parameter.
Now, instead of crashing, APL displays the following text label when an infinite loop has been detected:
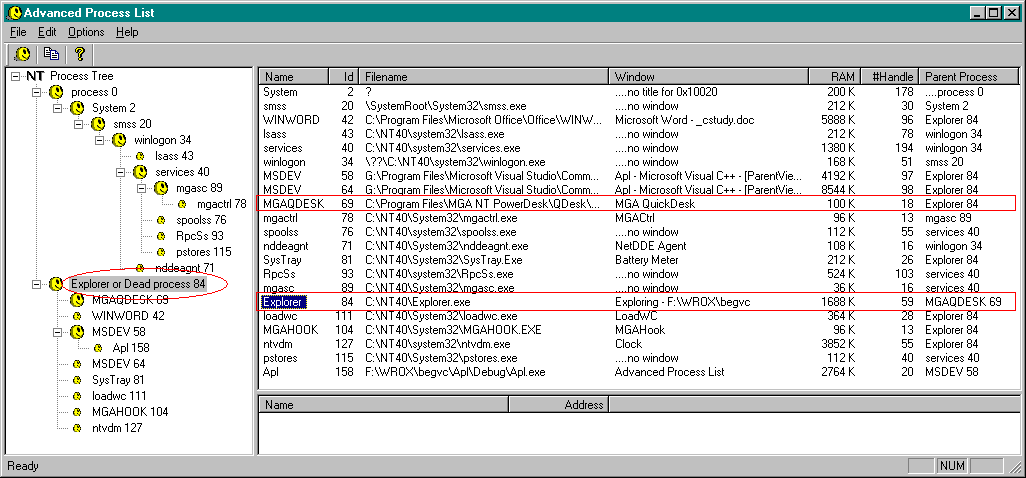
As you can see from the right
AplView pane, MGAQDESK (process 69) has Explorer (process 84) has its parent process. Further down the same list Explorer has MGAQDESK as its parent! APL detects this infinite loop at this point and in the left ParentView pane, process 84 receives "Explorer or Dead process 84" as its text label.So there we are!
CParentView displays the parent tree (including the dead processes) and CAplView lists all running processes.Helping Document Views to Stay Synchronized
Our next task is to synchronize
CParentView and CAplView. When a user selects a process in the tree view, the selection in the list view should also change to reflect this choice and vice versa. Second, if a process is selected, CModuleView must be updated to display the modules loaded by this selected process.
Synchronizing
CParentView and CaplViewBoth
CParentView and CAplView need a way of notifying every view in response to a specific event such as: "a process has been selected". Now you will find out how just how helpful CAplDoc will become.
Detecting a user selection
First, APL should be notified wheever a user selects a tree item from
CParentView or a list item from CAplView. In fact, Windows tells a tree view or a list view of a user selection in what is known as an item selected notification. For a tree view, a TVN_SELCHANGED notification is sent and a LVN_ITEMCHANGED notification for a list view. Each notification informs the APL which item (tree or list) has been selected and provides the associated lParam. For a CParentView, lParam stores a process ID, and for CAplView it stores a pointer to a CProcess object.Let's begin with
CParentView. Add a message handler for TVN_SELCHANGED called OnSelchanged():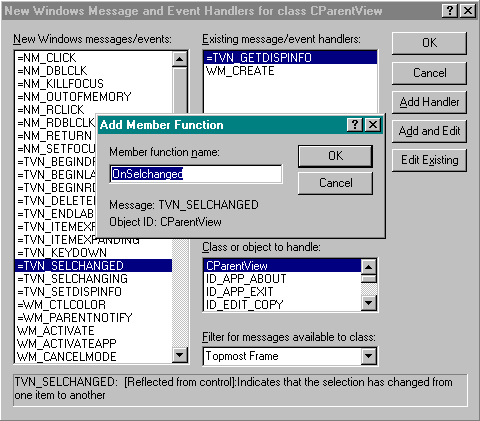
Define it in
ParentView.cpp as follows:void CParentView::OnSelchanged(NMHDR* pNMHDR, LRESULT* pResult)
{
// check if selection is enabled
if (!m_bNoSelection)
{
NM_TREEVIEW* pNMTreeview = (NM_TREEVIEW*)pNMHDR;
ASSERT(pNMTreeview != NULL);
DWORD PID = (DWORD)pNMTreeview->itemNew.lParam;
CAplDoc* pDoc = GetDocument();
ASSERT(pDoc != NULL);
if (pDoc != NULL)
{
CProcessList& ProcessList = pDoc->GetProcessList();
CProcess* pProcess = ProcessList.GetProcess(PID);
// notify other views
}
}
*pResult = 0;
}
With the list of running processes accessible to the document, the process ID stored in
itemNew.lParam. can be used to get the corresponding CProcess object. Note that pProcess may be NULL if PID is the ID of a dead process.For
CAplView: add a message handler for LVN_ITEMCHANGED called OnItemchanged():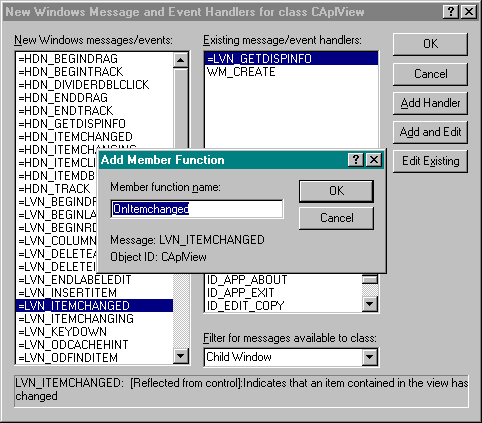
Write the following code in
AplView.cpp:void CAplView::OnItemchanged(NMHDR* pNMHDR, LRESULT* pResult)
{
// check if selection is enabled
if (!m_bNoSelection)
{
NM_LISTVIEW* pNMListview = (NM_LISTVIEW*)pNMHDR;
if (pNMListview->uNewState == (LVIS_FOCUSED | LVIS_SELECTED)) // value of 3
{
CProcess* pProcess = (CProcess*)pNMListview->lParam;
CAplDoc* pDoc = GetDocument();
// notify other views
}
}
*pResult = 0;
}
Unlike the tree view,
OnItemchanged() is called for a raw notification which encompasses a simple selection change. That's why we have to check pNMListview->uNewState with a value of 3 in order to be sure that it is what we want to detect. This member has a value resulting from combining LVIS_xxx values (LVIS stands for List View Item State):
LVIS_FOCUSED 0x0001
LVIS_SELECTED 0x0002
LVIS_CUT 0x0004
LVIS_DROPHILITED 0x0008
In our case,
LVIS_FOCUSED | LVIS_SELECTED = 3.In both functions,
m_bNoSelection does nothing if its value is TRUE. Later on, you will find out what the exact purpose of m_bNoSelection is. For the moment, declare it as a protected member in AplView.h and ParentView.h and set it to FALSE in each view constructor:protected:
BOOL m_bNoSelection;
Synchronizing the views: ask the document
Once the newly selected process is known, both
CParentView and CAplView will need to notify their siblings' views.As described in Chapter 16, MFC provides a simple way to achieve that task. All views are attached to their document and if you call
CDocument::UpdateAllViews(), MFC calls the OnUpdate() method of every view associated with the document. This mechanism is used by MFC to synchronize the display of its views since the CView default implementation of OnUpdate() invalidates the view rectangle and triggers OnPaint() to call OnDraw().The last two parameters of
CDocument::UpdateAllViews() are not used by MFC:void CDocument::UpdateAllViews(CView* pSender, LPARAM lHint, CObject* pHint);
pSender
: Points to the view that modified the document, or NULL if all views are to be updatedlHint
: set to 0pHint
: a pointer to a CObject, set to NULLTherefore, it is easy to extend the default MFC use of
UpdateAllViews() and implement a general synchronizing mechanism between all views. We will use lHint as a view message and pHint as a parameter, so each time a view wants to notify the other views, it will get a pointer to its document using GetDocument(), and call UpdateAllViews() with this as first parameter, a VM_xxx (stands for View Message) constant as lHint and an additional parameter as pHint.The only prerequisite is to reserve the view message value
0 since this is the only lHint value used by MFC to refresh the views content. Let's write some code to implement this. First, define two new constants in AplDoc.h:// lHint pHint Event meaning
//-------------------------------- ------------ -----------------------------------
#define VM_REDRAW 0 // 0 standard MFC redrawing notification
#define VM_SET_CURRENT_PROCESS 1 // CProcess* current process has changed (or NULL)
Each time we need to synchronize our views on a specific event, we define a new
VM_ constant. We will also do this later on when we describe how to implement APL feature #4 — to change the font for every view. For the moment, we need to make the document aware of the current selected process. In order to achieve this, you have to declare a protected member which stores a pointer to this particular process in AplDoc.h:protected:
CProcessList m_ProcessList;
CProcess* m_pSelectProcess;
Initialize it to
NULL in CAplDoc constructor:CAplDoc::CAplDoc()
{
m_pSelectProcess = NULL;
}
You should now provide one public method to retrieve it and another to change it:
public:
CProcess* GetSelectedProcess() { return m_pSelectProcess; }
void SetCurrentProcess(CView* pView, CProcess* pProcess);
The former obviously returns the saved process. The latter is a little bit more complicated since it is responsible for forwarding the process selection to every views:
void CAplDoc::SetCurrentProcess(CView* pView, CProcess* pProcess)
{
// store it
m_pSelectProcess = pProcess;
// notify all views except pView
UpdateAllViews(pView, VM_SET_CURRENT_PROCESS, pProcess);
}
First, the process passed as the second parameter is saved in
m_pSelectedProcess. Second, UpdateAllViews() is called to ask every view to execute its OnUpdate() method with VM_SET_CURRENT_PROCESS as the second parameter and pProcess as the third parameter. Since the pView view given as the first parameter is supposed to have generated the process selection change, its OnUpdate() method will not be called by UpdateAllViews().A call to this method will replace the comment ‘
// notify other views‘ in each view selection change notification handler:pDoc->SetCurrentProcess(this, pProcess);
Do this replacement in
ParentView.cpp and AplView.cpp.
Synchronizing the views: let each view do its the job
The next step is to override the
OnUpdate() method for both CParentView and CAplView. Right-click on a class in Visual Studio ClassView pane, select Add Virtual Function... and choose OnUpdate: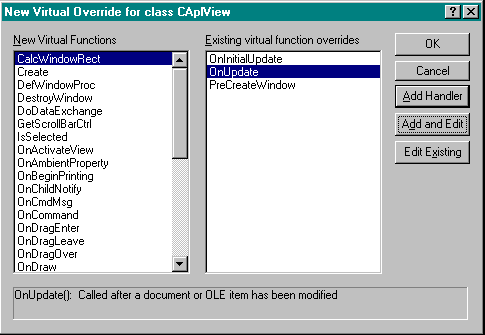
Once the
OnUpdate() skeleton has been created, insert the following code in order to react for each view message:void CAplView::OnUpdate(CView* pSender, LPARAM lHint, CObject* pHint)
{
// lHint = View Message
switch(lHint)
{
// default MFC redrawing process
case VM_REDRAW :
CListView::OnUpdate(pSender, lHint, pHint);
break;
// the user has selected a new process (through the tree view)
case VM_SET_CURRENT_PROCESS :
{
// set the selection for the list view
CProcess* pProcess = (CProcess*)pHint;
if (pProcess != NULL)
{
// change the selection in the list view
DWORD PID = pProcess->GetPID();
int iRow = 0;
if (m_ProcessIndex.Lookup((LPVOID)PID, iRow))
{
// disable selection notification
m_bNoSelection = TRUE;
// select the list item which corresponds to the process
GetListCtrl().SetItemState(
iRow,
LVIS_SELECTED | LVIS_FOCUSED,
LVIS_SELECTED | LVIS_FOCUSED
);
GetListCtrl().EnsureVisible(iRow, FALSE);
// enable selection notification again
m_bNoSelection = FALSE;
}
}
}
break;
}
}
If
lHint has the value of VM_REDRAW, then this results in default CListView processing. When VM_SET_CURRENT_PROCESS is passed as the second parameter, pHint is cast to a CProcess* pointer and the list view is preocessed. If pHint is NULL, nothing further happens, which is the case when a dead process is selected in CParentView — such processes are not listed in CAplView.We then use
m_ProcessIndex to find the item responsible for displaying the process description. Once this is known, we use SetItemState() to select it. In addition, we make sure this item is visible using EnsureVisible(). This method is useful in the case of an item which has been put at the end of the list.The
CParentView implementation is a little bit simpler since we don't have to deal with item states for a tree view:void CParentView::OnUpdate(CView* pSender, LPARAM lHint, CObject* pHint)
{
// lHint = View Message
switch(lHint)
{
// default MFC redrawing process
case VM_REDRAW :
CTreeView::OnUpdate(pSender, lHint, pHint);
break;
// the user has selected a new process
case VM_SET_CURRENT_PROCESS :
{
CProcess* pProcess = (CProcess*)pHint;
if (pProcess != NULL)
{
// change the selection in the tree view
DWORD PID = pProcess->GetPID();
HTREEITEM hNode = NULL;
if (m_ProcessItems.Lookup((LPVOID)PID, hNode))
{
// disable selection notification
m_bNoSelection = TRUE;
// select the tree item which corresponds to the process
if (GetTreeCtrl().SelectItem(hNode))
GetTreeCtrl().EnsureVisible(hNode);
// enable selection notification again
m_bNoSelection = FALSE;
}
}
}
break;
}
}
First, we use
m_ProcessItems to find the tree item where the received process is displayed. Next, this item is selected with SelectItem() and brought to view using EnsureVisible().
Programming Tips
This solution may seem complex and you may have found a simpler solution to solve the problem of keeping views synchronized. For example, it is possible to add members to each view which point to all the other views, and include a public method called (say)
OnCurrentProcessHasChanged(CProcess* pProcess). Here would have been the declaration for CAplView:class CAplView : public CListView
{
...
public:
void OnCurrentProcessHasChanged(CProcess* pProcess);
protected:
CParentView* m_pParentView;
CModuleView* m_pModuleView;
}
And this is the corresponding declaration for
CParentView:class CParentView : public CTreeView
{
...
public:
void OnCurrentProcessHasChanged(CProcess* pProcess);
protected:
CAplView* m_pAplView;
CModuleView* m_pModuleView;
}
In the selection change notification handler of either view, it is now easy to call
OnCurrentProcessHasChanged() on the m_pXXXView members:void CAplView::OnItemchanged(NMHDR* pNMHDR, LRESULT* pResult)
{
...
// update the module list corresponding to the selected process
CProcess* pProcess = (CProcess*)pNMList view->lParam;
// notify other views
m_pParentView->OnCurrentProcessHasChanged(pProcess)
m_pModuleView->OnCurrentProcessHasChanged(pProcess)
}
The main drawback of this kind of mechanism is that you bind many classes together, such that to reuse one, you have to reuse the others. In addition, if you want to extend your application in adding a new view such as to display the threads of a process, you have to modify all the classes. With our document oriented mechanism, if we need to synchronize one additional view (such as a thread view), we just have to override
OnUpdate() for this class and deal with any view message we are interested in. There is no need to change any existing class.The extension cost also appears if you want to add a new synchronization event such as the font change we need implement for feature #4. In this case, you have to declare a new
OnXXX() handler like OnCurrentProcessHasChanged() or create kind of generic handler similar to OnUpdate(). And you have to do so for each view, even if a view is not affected by the event. The evolution of such a mechanism seems to be very difficult to predict.Another drawback appears when it is time to initialize pointers to the associated views. In our application framework,
CMainFrame::OnCreateClient() would seem to be the right place since all views are created there. So, the frame must also be linked to the views classes. We also have to define some methods to set the view pointers since the m_pXXXView members are declared as protected.You should always try to keep your classes independent from one another. This is exactly the strategy we have followed to develop our data wrappers classes. Don’t hesitate to create a class whose purpose is to make other classes communicate more independently. In this particular case, we don't have to define this class: MFC already provides
CDocument/CView with all the methods we need.
How to take care of selection boomerang:
m_bNoSelectionIf you look closely at the
OnUpdate() methods listed above, you will notice that the value of m_bNoSelection changed to TRUE halfway through and reverted to FALSE at athe end. It is now time to explain why we need this Boolean member.To illustrate using
CAplView::OnUpdate(), when SetItemState() gets called, the current selection in CAplView changes and Windows sends a LVN_ITEMCHANGED notification to warn the control of the change. What happens next is this — an infinite loop begins: SetCurrentProcess() is called with a CAplView object as first parameter. In this case, CParentView::OnUpdate() gets executed and in turn changes its own selection. It calls SetCurrentProcess() with CParentView object as first, and CAplView::OnUpdate() is executed next and so on.To prevent this infinite selection loop between
CAplView and CParentView, we need to hide a selection change when we are making the change ourselves. This is the reason why m_bNoSelection is set to TRUE before SetItemState() is called and reset to FALSE once it has returned.
Synchronize the Content of
CModuleViewWe have one last view to synchronize, that of
CModuleView. Unlike, CParentView and CAplView, its content depends on the selected process.Deciding when it is time to fill
CModuleViewSince its content depends on the process selected either in
CParentView or in CAplView, we fill CModuleView in OnUpdate(), when a VM_SET_CURRENT_PROCESS view message is received. Right-click on CModuleView in Visual Studio ClassView pane, select Add Virtual Function...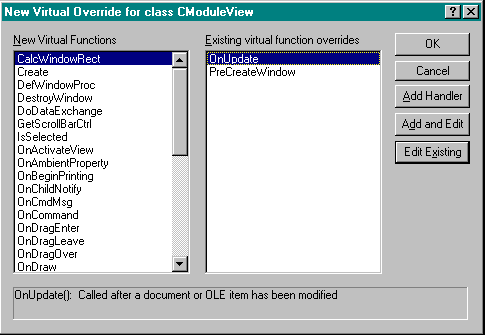
Override
OnUpdate() with the code below:void CModuleView::OnUpdate(CView* pSender, LPARAM lHint, CObject* pHint)
{
// lHint = View Message
switch(lHint)
{
// default MFC redrawing process
case VM_REDRAW :
CListView::OnUpdate(pSender, lHint, pHint);
break;
// the user has selected a new process
case VM_SET_CURRENT_PROCESS :
{
CProcess* pProcess = (CProcess*)pHint;
FillModuleList(pProcess);
}
break;
}
}
Filling up
CModuleView with loaded modulesInstead of directly writing the code to fill in the view inside
OnUpdate(), we define a method FillModuleList() to do the job:// fill the list view with the modules associated to the given process
void CModuleView::FillModuleList(CProcess* pProcess)
{
// don't forget to delete the actual content of the list view
GetListCtrl().DeleteAllItems();
// fill it according to the given process module list
if (pProcess != NULL)
{
CModuleList& ModuleList = pProcess->GetModuleList();
int iCount = 0;
int Pos = 0;
CModule* pModule = NULL;
for (
pModule = ModuleList.GetFirst(Pos);
(pModule != NULL);
pModule = ModuleList.GetNext(Pos)
)
{
// add each module into the list
if (pModule != NULL)
InsertItem(pModule, iCount++);
}
// set the selection on the first module
if (iCount > 0)
GetListCtrl().SetItemState(
0,
LVIS_SELECTED | LVIS_FOCUSED,
LVIS_SELECTED | LVIS_FOCUSED
);
}
else
{
// "no module info"
LVITEM item;
item.iItem = 0;
item.iSubItem = 0;
item.mask = LVIF_TEXT;
item.pszText = _T("No Module Info...");
GetListCtrl().InsertItem (&item);
}
}
The implementation of
FillModuleList() relies on the module list being retrieved from the given process using GetModuleList(). Therefore, if there is no selected process (or a dead process in CParentView), "No Module Info..." is displayed as its one and only line.Otherwise, we enumerate the loaded modules with the
CModuleList methods GetFirst()and GetNext(). Each module is then added to the list view using an insertion helper called InsertItem():int CModuleView::InsertItem(LPVOID pItem, int nItem)
{
LVITEM item;
item.iItem = (nItem == -1)? GetListCtrl().GetItemCount() : nItem;
item.iSubItem = 0;
item.mask = LVIF_TEXT | LVIF_PARAM;
item.pszText = LPSTR_TEXTCALLBACK;
item.lParam = (LPARAM) pItem;
return GetListCtrl().InsertItem(&item);
}
Like
CAplView, this method builds a LVITEM whose text label will be queried later through a OnGetDispInfo() notification handler. Therefore, pszText is set to LPSTR_TEXTCALLBACK and the passed CModule* is stored into lParam. Finally, the first loaded module is selected using SetItemState().If you want all this code to compile, you should not forget to include the process declarations:
#include "Process.h"
Delayed text label handling:
OnGetDispInfo() and OnNeedText()To finish implementing
CModuleView, two more methods are required. Since we are using a callback mechanism to set the text labels in CModuleView, we need to define a OnGetDispInfo()handler to deal with LVN_GETDISPINFO notifications:void CModuleView::OnGetDispInfo(NMHDR* pNMHDR, LRESULT* pResult)
{
LV_DISPINFO* pDispInfo = (LV_DISPINFO*)pNMHDR;
// call virtual method OnNeedText() to get the text to be displayed in each column
if (pDispInfo->item.mask & LVIF_TEXT)
{
LPVOID pItem = (LPVOID) pDispInfo->item.lParam;
CString szLabel;
OnNeedText (pItem, pDispInfo->item.iSubItem, szLabel);
::lstrcpy(pDispInfo->item.pszText, szLabel);
}
*pResult = 0;
}
The method relies on another helper called
OnNeedText() to build the content of the column defined by pDispInfo->item.iSubItem, for the module pointed to by pItem):void CModuleView::OnNeedText(LPVOID pItem, int nColumn, CString& szText)
{
szText = _T("");
CModule* pObject = (CModule*)pItem;
if (pObject != NULL)
switch (nColumn)
{
// address
case COLUMN_ADDRESS:
szText.Format(_T("%x"), pObject->GetModuleHandle());
break;
// name
case COLUMN_MODULENAME:
szText = pObject->GetModuleName();
break;
}
}
The string label is set according to the
nColumn column for the module received as pItem.At this point, from our original list of objectives for our Advanced Process List, we have fulfilled features #1, #2 and #6, and feature #5 has been achieved, with little effort, in associating
File/Refresh behavior to ID_FILE_NEW.
Further Development of the Advanced Process List
We have now completed the implementation of our Advanced Process List. However, we have not even touched two of the six items of our feature list, namely clipboard management (#3) and the ability to change the font of our three views (#4).
Clipboard Management
What would the user expect APL to do when copying material to the clipboard? If you want a graphical representation of the process tree view, it is much easier to take a snapshot of the APL screen (using
Alt+PrintScreen) and to use MS Paint to view the resulting bitmap. (You should have a look at Chapter 14 "Writing OLE Containers" of Professional MFC with Visual C++ by Mike Blaszczak published by Wrox Press to get a broader description of clipboard manipulations.)For our project we will focus on copying text to the clipboard. The
Edit | Copy menu command depends on whether a view is selected:
CParentView
: nothing to copy, so the toolbar button and the menu item will be grayedCAplView
: copy a list of the running processes, the column separated by a Tab characterCModuleView
: copy a list of the loaded modules, the column separated by a Tab character
General Clipboard Management
You are encouraged to look for clipboard samples in the MSDN library.
CLIPTEXT provides a perfect example of clipboard handling, which is much more detailed than what we propose to do here.When you want to copy a string to the clipboard, you have to follow the following steps:
Open the clipboard and associate a window to it
Empty the clipboard of its previous contents
Put a zero-terminated string onto the clipboard as text formatted data
Close the clipboard
Since both
CAplView and CModuleView need to copy text to the clipboard, we will write a public method in CAplApp which will take the string to copy as a parameter. Add the following function declaration to Apl.h:public:
BOOL CopyTextToClipboard(LPCTSTR szText);
Here is the function definition in
Apl.cpp:BOOL CAplApp::CopyTextToClipboard(LPCTSTR szText)
{
// defensive programming
ASSERT(szText != NULL);
// open the clipboard for the application main window
// --> impossible to work if there is no such a window...
ASSERT(::IsWindow(m_pMainWnd->m_hWnd));
if (!::OpenClipboard(m_pMainWnd->m_hWnd))
return FALSE;
// return value
BOOL bReturn = FALSE;
// empty the clipboard
::EmptyClipboard();
// create a memory block to be sent to the clipboard
DWORD dwTextSize = _tcslen(szText) + 1;
HGLOBAL hText = ::GlobalAlloc(GHND, dwTextSize * sizeof(TCHAR));
if (hText != NULL)
{
LPTSTR lpText = (LPTSTR)::GlobalLock(hText);
if (lpText != NULL)
{
// copy the given string into the memory block
_tcscpy(lpText, szText);
// don't forget to unlock the memory block
::GlobalUnlock(hText);
// send it to the clipboard
::SetClipboardData(CF_TEXT, hText);
// everything is under control
bReturn = TRUE;
}
}
// don't forget to close the clipboard
::CloseClipboard();
return bReturn;
}
We call
OpenClipboard() with the application main window as parameter. If another application has clipboard access, the function returns FALSE. Just after having emptied the clipboard of its former content, a memory block is allocated.Even if we have already employed
TCHAR to handle characters, all string manipulations have been done using CString. Since the clipboard knows nothing about MFC string classes, we have to handle directly zero-terminated strings. TCHAR is a wrapper type for characters. Windows NT internally handles strings in UNICODE format. A UNICODE character is stored in 16 bits instead of the well known ANSI/ASCII character which is stored in an 8 bit char. MFC and the C runtime library provide some tricks to allow you to easily compile your application either for UNICODE or for ANSI. The first trick is to use TCHAR type instead of char. If you are using UNICODE, a TCHAR is translated into a 16 bit wide character. Otherwise, you end up with a char.For constant strings, you have most probably noticed the strange
_T() scheme around our strings. This is another aspect of general text management. If you use TCHAR instead of char and if you surround each constant string with _T(), your code will compile without any problem either for UNICODE or ANSI. For string manipulations, we should now use the general _tcs…() functions instead of the ANSI-only str…() functions. Some of the string manipulation routines are listed below:|
ANSI |
ANSI / UNICODE |
Description |
|
strcpy |
_tcscpy |
copy a string |
|
strlen |
_ tcslen |
return the length of a string |
|
strcat |
_tcscat |
append a string at the end of another |
|
strchr |
_tcschr |
find the first occurence of a char in a string |
|
strcmp |
_tcscmp |
compare two strings |
|
strrchr |
_tcsrchr |
find the last occurrence of a char in a string |
|
strupr |
_tcsupr |
convert a string to uppercase |
Among the many articles in MSDN that cover character sets, you should have a look at: Strings — Unicode and Multibyte Character Set (MBCS) Support.
As you can see in our
The memory handle is unlocked and passed to the clipboard using
SetClipboardData(). Since we provide CF_TEXT as the first parameter, the clipboard knows we want to copy text and hText is a handle to the memory filled with a zero-terminated string. You notice that we don't free the memory allocated with GlobalAlloc(): this will be done by the clipboard on our behalf. Finally the methoed ends with the call to CloseClipboard().
Updating the Interface: Automatic UI Grayness
We have seen in Chapter 14 how
UPDATE_COMMAND_UI handlers may help us dynamically customize the state (checked or grayed) of toolbar buttons and menu items. We will use this technique to handle the Edit | Copy command for CAplView and CModuleView. By default, if you don't write a command handler for a command, its command access (menu item or toolbar button) is grayed, which is what we want for CParentView. We will just have to write command handlers for CAplView and CModuleView and an UPDATE_COMMAND_UI handler for CModuleView.
The upper pane:
CAplViewLet's begin with
CAplView. Summon ClassWizard using Ctrl+W and define the OnEditCopy() method as the command handler for ID_EDIT_COPY: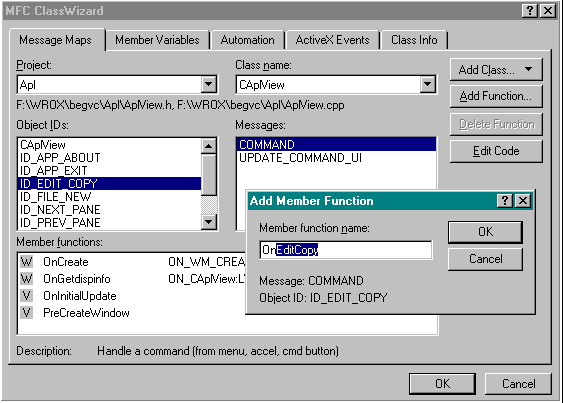
Its implementation is straightforward:
void CAplView::OnEditCopy()
{
// get the string to be sent to the clipboard
LPTSTR pText = GetClipboardString();
if (pText != NULL)
{
CAplApp* pApp = (CAplApp*)AfxGetApp();
if (!pApp->CopyTextToClipboard(pText))
::MessageBox(
::GetActiveWindow(),
_T("Impossible to copy the process list to clipboard !"),
_T("Advanced Process List"),
MB_OK | MB_ICONHAND
);
// don't forget to delete the string
delete [] pText;
}
else
::MessageBox(
::GetActiveWindow(),
_T("Nothing to copy to clipboard..."),
_T("Advanced Process List"),
MB_OK | MB_ICONINFORMATION
);
}
The view calls
GetClipboardString(), to build the string it wants to send and the application copies it to the clipboard with CopyTextToClipboard(), a helper we have already described. Notice that we first free the string buffer returned by GetClipboardString(). You will see in a moment how this method constructs the string. First, we declare it in AplView.h:LPTSTR GetClipboardString();
Now add an empty definition to
AplView.cpp:LPTSTR CAplView::GetClipboardString()
{
return NULL;
}
The lower pane:
CModuleViewAs previously stated, the content of
CModuleView will not be copied to the clipboard if there is no selected process, or if the selected process in CParentView is no longer running. We should be able to disable both the menu item and the toolbar button relating to clipboard access in these particular cases.First, after adding the command handler
OnEditCopy()as we did for CAplView, add an update handler OnUpdateEditCopy() to CModuleView by right-clicking on the class name in the ClassView pane: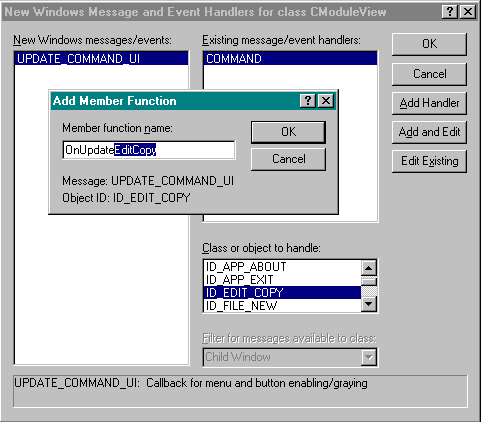
Copy the following code into
ModuleView.cpp:void CModuleView::OnUpdateEditCopy(CCmdUI* pCmdUI)
{
// possible only if there is a process selected or something to copy
CAplDoc* pDoc = GetDocument();
ASSERT(pDoc != NULL);
if (pDoc != NULL)
pCmdUI->Enable(
(pDoc->GetSelectedProcess() != NULL) &&
(GetListCtrl().GetItemCount() > 0)
);
}
After retrieving the attached document, the command is enabled only if there is a selected process (either in
CParentView or CAplView) and there is something to copy to the list. This verification is not essential, but a situation could occur where we are unable to get the loaded module list for a particular process, such as the System process. It is better to prevent access to the clipboard than copy nothing.For the
CModuleView implementation of OnEditCopy(), you can copy and paste the code already presented for CAplView. The mechanism is identical and you only have to change the error message. Both implementations rely on GetClipboardString() to build the string that should be sent to the clipboard.
Implementing
GetClipboardString()Both views call
GetClipboardString() to get the string to copy to clipboard. The main idea behind this method can be summed up in this way:For each line stored in view:
Build a "line string" with each column value separated from the other by a
Add "\
r\n" (a trailing separator) to the end of the lineAppend this line at the end of the string to be returned
Since we have already defined a method called
OnNeedText() which retrieves the content of a column for a line, given the process or module description corresponding to that line, it is easy to write some code implementing this simple algorithm:LPTSTR CAplView::GetClipboardString()
{
TCHAR* pText = NULL;
CAplDoc* pDoc = GetDocument();
ASSERT(pDoc != NULL);
if (pDoc != NULL)
{
// get the process list from document
CProcessList& ProcessList = pDoc->GetProcessList();
// allocate the returned buffer according to the maximum length of each column:
// 3rd & 4th v—- maximum length of other columns
pText = new TCHAR[ProcessList.GetCount() * (2*_MAX_PATH + 80)];
if (pText != NULL)
{
CString szLine;
CString szBuffer;
TCHAR* pNext = pText;
int iCount = 0;
POSITION Pos = 0;
CProcess* pProcess = NULL;
pText[0] = _T('\0');
// title first
int len;
_stprintf(pNext, _T("Name\tID\tFilename\tWindow\tRAM\t#Handles\tParent\r\n%n"),&len);
pNext += len;
// concatenate each process description
CString szDescription;
const TCHAR* pTAB =_T("\t");
for (
pProcess = ProcessList.GetFirst(Pos);
(pProcess != NULL);
pProcess = ProcessList.GetNext(Pos)
)
{
// add each process into the buffer
if (pProcess != NULL)
{
for (
DWORD dwColumn = COLUMN_NAME;
(dwColumn <= COLUMN_PARENTPROCESS);
dwColumn++
)
{
OnNeedText(pProcess, dwColumn, szDescription);
_tcscpy(pNext, szDescription);
pNext += szDescription.GetLength();
if (dwColumn != COLUMN_PARENTPROCESS)
{
_tcscpy(pNext, pTAB);
pNext += _tcslen(pTAB);
}
}
// end of line
_tcscpy(pNext, _T("\r\n"));
pNext += _tcslen(_T("\r\n"));
}
}
}
}
return pText;
}
First, we get the process list from the document. Next, the memory block needed for the text string is allocated using
new TCHAR[]. Its approximate size is calculated by multiplying the number of processes by the maximum length of a line. Before adding the information for the selected processes, each column title is added, one separated from the other by a Tab character. The header is built using _stprintf() function with a strange last parameter &len. In fact, when you finish a line with a %n, the corresponding &len receives the length of the line (not counting the %n).Each running process is retrieved and is pointed to by
pProcess. The string corresponding to this process is built, column by column (separated by a Tab character) using OnNeedText(). You should remember this method has been defined in order to give the content of a column for a given line — which is exactly what we need. Finally, the line separator \r\n is appended.
Long loop and string manipulation
As a final comment, we should mention
pText and pNext. You may be confused by the way we build the text string but our goal is only to avoid unnecessary string manipulation. Let's see, step by step, what happens if we want to copy "column1" to the clipboard followed by "column2". As you may have noticed, pText never changes — it always points to the memory returned by GetClipboardString(). On the other hand, pNext will move, always pointing to the byte after the pText string. At the beginning pNext points to the same character as pText since no text has been copied:
Here is what occurs when we copy "column1":
As we know,
pText does not move but pNext now points to the first byte after "column1", that is it has been shifted right by 7 characters, which is the length of "column1". Moreover, _tcscpy() adds a trailing '\0' character to the end of the string. When it is time to append another string to pText, we call _tcscpy() from pNext and not _tcscat() from pText. The same mechanism is used to add the '\t' Tab character:
After the
Tab has been copied, pNext is shifted right by 1 character, the length of the Tab character. And we keep on doing the same "copy and shift" pattern for "column2":
Note that after the copy has been complete,
pNext is shifted right by the length of "column2":
So why do we need to do all this arithmetic? As you are aware,
_tcscpy() copies one string into another and _tcscat() allows you to append one string to the end of another. But, as much as the destination string grows, this function takes more and more time to find the trailing '\0' before appending the given string. Our pointer trick avoids wasting time. And if you were thinking of using CString concatenation instead of _tcscat(), you will get even worse results.In order to make you clearly understand this efficiency problem, this sample code has been written to assess the difference between the three solutions:
CString, _tcscat() and pointer arithmetic. It is included just for illustration — it is not part of our project://#define MAX_LEN 8096
//#define MAX_LEN 16384
//#define MAX_LEN 32768
//#define MAX_LEN 65536
//#define MAX_LEN 131072
#define MAX_LEN 262144
#define SMALL_LEN 8
CString szLine;
TCHAR szBuffer[] = _T("12345678");
TCHAR* pBuffer = new TCHAR[MAX_LEN+1];
if (pBuffer != NULL)
{
DWORD dwTime;
DWORD dwElapsedTime;
CString Info;
int iCount;
// pointer tricks
dwTime = GetTickCount();
pBuffer[0] = _T('\0');
TCHAR* pNext = pBuffer;
for (iCount=1; iCount <= MAX_LEN/SMALL_LEN; iCount++)
{
_tcscpy(pNext, szBuffer);
pNext += _tcslen(szBuffer);
}
dwElapsedTime = GetTickCount() - dwTime;
Info.Format(
_T("len = %u and running for %u milliseconds"),
_tcslen(pBuffer), dwElapsedTime
);
AfxMessageBox(Info);
// _tcscat()
dwTime = GetTickCount();
pBuffer[0] = _T('\0');
for (iCount=1; iCount <= MAX_LEN/SMALL_LEN; iCount++)
{
_tcscat(pBuffer, szBuffer);
}
dwElapsedTime = GetTickCount() - dwTime;
Info.Format(
_T("len = %u and running for %u milliseconds"),
_tcslen(pBuffer), dwElapsedTime
);
AfxMessageBox(Info);
delete [] pBuffer;
// CString
dwTime = GetTickCount();
for (iCount=1; iCount <= MAX_LEN/SMALL_LEN; iCount++)
{
szLine += szBuffer;
}
dwElapsedTime = GetTickCount() - dwTime;
Info.Format(
_T("len = %u and running for %u milliseconds"),
szLine.GetLength(), dwElapsedTime
);
AfxMessageBox(Info);
}
This sample code appends a string to another a certain number of times. Three different ways to achieve the copy are tested:
Our
Standard
_tcscat()CString
append solutionFor each operation, we work out the time needed to complete the copy procedure. We use
GetTickCount() which returns the number of milliseconds elapsed since the copy procedure was started: (This code was run on a PII 233 with 96 MB of RAM.)|
# of append |
Pointers |
_tcscat() |
CString |
|
1024 |
0 |
20 |
45 |
|
2048 |
0 |
90 |
200 |
|
4096 |
0 |
370 |
1100 |
|
8192 |
0 |
1470 |
5400 |
|
16384 |
0 |
5900 |
23950 (23.95s) |
|
32768 |
10 |
23500 |
111530 (1.86 mins) |
From this result, you might deduce that
If you want to use
CString efficiently, you should always try to allocate its internal buffer before adding characters. The following lines of code allows you how to get a faster CString procedure:szLine.GetBuffer(MAX_LEN+1);
dwTime = GetTickCount();
for (iCount=1; iCount <= MAX_LEN/SMALL_LEN; iCount++)
{
szLine += szBuffer;
}
dwElapsedTime = GetTickCount() - dwTime;
szLine.ReleaseBuffer(-1);
Info.Format(
_T("len = %u and running for %u milliseconds"),
szLine.GetLength(), dwElapsedTime
);
AfxMessageBox(Info);
CString::GetBuffer()
allocates the needed memory (therefore, no additional expensive allocation is required during the loop) and CString::ReleaseBuffer(-1) lets the CString object compute its new length. Here are the resulting times, again in milliseconds:|
# of append |
old CString method |
new CString method |
|
1024 |
45 |
0 |
|
2048 |
200 |
0 |
|
4096 |
1100 |
10 |
|
8192 |
5400 |
20 |
|
16384 |
23950 (23.95s) |
30 |
|
32768 |
111530 (1m 86s) |
60 |
CModuleView
and code duplicationExcept for the title content and module list enumeration, the implementation of the
CModuleView version of GetClipboardString() is identical to that of CAplView:LPTSTR CModuleView::GetClipboardString()
{
TCHAR* pText = NULL;
// fail if there is no selected process
CAplDoc* pDoc = GetDocument();
ASSERT(pDoc != NULL);
if (pDoc != NULL)
{
CProcess* pProcess = pDoc->GetSelectedProcess();
if (pProcess != NULL)
{
// concatenate each module description
CModuleList& ModuleList = pProcess->GetModuleList();
// allocate the returned buffer max len of last column
// according to the max length of each column
pText = new TCHAR[(ModuleList.GetCount() + 1) * (_MAX_PATH + 16)];
if (pText != NULL)
{
CString szLine;
CString szBuffer;
TCHAR* pNext = pText;
int iCount = 0;
int Pos = 0;
CModule* pModule = NULL;
// title
szLine.Format("Module\tAddress\r\n");
_tcscpy(pNext, szLine);
pNext += szLine.GetLength();
// each module description
for (
pModule = ModuleList.GetFirst(Pos);
(pModule != NULL);
pModule = ModuleList.GetNext(Pos)
)
{
if (pModule != NULL)
{
// add each module into the buffer
szBuffer = pModule->GetModuleName();
szLine.Format("%s\t%x\r\n", szBuffer, pModule->GetModuleHandle());
_tcscpy(pNext, szLine);
pNext += szLine.GetLength();
}
}
}
}
}
return pText;
}
Since every line has only two columns, we don't use a loop to add the text for each column as we did for
CAplView, but rebuild the line content ourselves, using the module description pointed to by pModule.Font management
We have almost completed our Advanced Process List. Now, it is time to implement the final feature of our application specifications. We will adapt APL so that a user can select a font from a standard Windows dialog box, which will automatically update the contents of every APL with the new font.
MFC Framework: Determining where Font Selection should be Handled
First, we have to define a command handler for the
ID_SELECTFONT menu item we added at the very beginning of this case study. But what part of the MFC framework should be responsible for handling this command? As a rule of thumb, you should consider what to do for each class, and choose the method which has the least work to do.Here are four choices, sorted from worst to best:
Application: it seems hard to be able to "touch" each view:
Frame window:
GetActiveView() allows you to get a pointer to the active view onlyView: each view must duplicate the same code and, in addition, notify the other views
Document: easy to synchronize each view with
UpdateAllViews().As you can see,
CAplDoc is the best candidate for this task. Once the command is received, the document will notify each attached view through the same mechanism we have already used to synchronize our views, that is UpdateAllViews(). So, add a OnSelectFont() command handler to CAplDoc: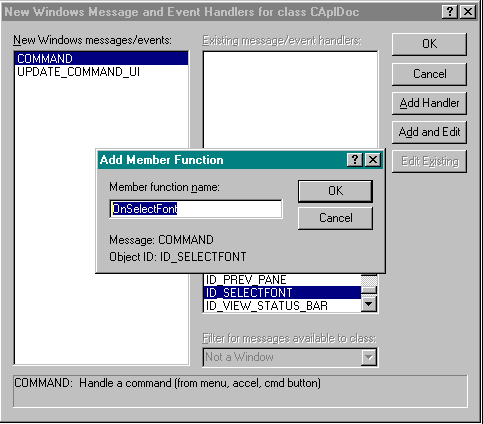
How to set Windows Fonts
Use
WM_SETFONT and HFONTAs you are well aware, a font is a window attribute. When you want a window to change its display to a new font, you send a
WM_SETFONT message to it with an HFONT as parameter. This works for every Windows common control, such as an edit field, a list view or a tree view.Now that you know how to change a window font, we have to learn how to get a font, or to be more precise, an
HFONT. MFC provides a CFont class which wraps an HFONT, but we will manipulate HFONT directly, since this will be easier for us. When you want a font, you need to declare it logically through a logical font, described in Windows as a LOGFONT structure:typedef struct tagLOGFONT {
LONG lfHeight;
LONG lfWidth;
LONG lfEscapement;
LONG lfOrientation;
LONG lfWeight;
BYTE lfItalic;
BYTE lfUnderline;
BYTE lfStrikeOut;
BYTE lfCharSet;
BYTE lfOutPrecision;
BYTE lfClipPrecision;
BYTE lfQuality;
BYTE lfPitchAndFamily;
TCHAR lfFaceName[LF_FACESIZE];
} LOGFONT;
Don't fret, you will not have to guess which value to set in each
LOGFONT member, Windows provides several Win32 API functions to help you. Once a font is logicaly defined, you ask Windows to give you back an HFONT handle to a physical font which can be really used through the CreateFontIndirect() Win32 function.
Standard Windows dialog for common font selection
Now we know how to transform a logical font into a real font that can be sent to a window, the question is how do we get the logical font? Among the set of common dialog boxes provided by Windows, you will find a "font picker" dialog. If you call the Win32 API function
ChooseFont(), you get a logical font filled with the description of the font which is selected by user, as in the following dialog:
Here is its declaration:
BOOL ChooseFont(LPCHOOSEFONT lpcf);
If a font has been selected, it returns
TRUE and FALSE otherwise. You have to define a CHOOSEFONT structure before calling it:typedef struct {
DWORD lStructSize;// must be sizeof(CHOOSEFONT)
HWND hwndOwner; // parent window of the displayed dialog box
HDC hDC;
LPLOGFONT lpLogFont;
INT iPointSize;
DWORD Flags; // CF_XXX flags to customize the dialog behavior
DWORD rgbColors;
LPARAM lCustData;
LPCFHOOKPROC lpfnHook;
LPCTSTR lpTemplateName;
HINSTANCE hInstance;
LPTSTR lpszStyle;
WORD nFontType; // font type (XXX_FONTTYPE) such as screen or printer font
WORD ___MISSING_ALIGNMENT__;
INT nSizeMin; // only fonts larger than nSizeMin are selected
INT nSizeMax; // only fonts smaller than nSizeMax are selected
// CF_LIMITSIZE must be set to take nSizeMin/nSizeMax into account
} CHOOSEFONT;
We are just interested in the
lpLogFont member which points to a LOGFONT structure used to set the current selected font when the dialog box is opened. (Flags must be set to the value CF_INITTOLOGFONTSTRUCT). Once ChooseFont() returns TRUE, lpLogFont contains the font’s logical description.
If you want to dig deeper into font manipulation, you should refer to the following Visual C++ samples:
Code Reusability: Writing a Font Helper Class
We will follow the same philosophy as for the problem of setting and resetting the frame position: create a helper class. First, we need to list each feature needed. Next, we will try to find out which parameter is required to initialize it. Finally, we will write a class on its own, to be integrated with
CAplDoc.
Definition of CFontHelper
This class will wrap a font in order to help us handle logical and physical fonts. Here is what we would expect from such a class:
Give access to its logical description and its corresponding font handle
Save and load itself like
Display the Windows common font picker dialog and store the corresponding font
Create a default font
To implement theses features, some parameters are required. A section and several entry strings are needed to save and restore its font description. Also, we should allow different ways to create such an object:
From scratch, and in this case a default font is created
From a description already saved under a section and entry (c.f.
Class creation
Now we have to turn the features listed above into code. Create a new class with the following declaration:
class CFontHelper : public CObject
{
// construction/destruction
public:
CFontHelper();
CFontHelper(LPCTSTR szSection, LPCTSTR szEntry);
~CFontHelper();
// public interface
public:
// 1. data access
HFONT CreateFont();
LOGFONT GetLogFont(LOGFONT& LogFont);
HFONT GetFontHandle();
// 2. save/restore
void Save();
void Restore();
void SetSectionName(LPCTSTR szSection);
void SetEntryName(LPCTSTR szEntry);
// 3. Windows common font picker dialog
BOOL ChooseFont();
// internal helpers
protected:
// 4. default font
void DefaultFontInit();
void DefaultInit();
// internal members
protected:
HFONT m_hFont;
LOGFONT m_LogFont;
CString m_szSection;
CString m_szEntry;
};
We store both logical and physical definitions of a font with
m_LogFont and m_hFont members. One of the tasks of the class is to keep both parameters consistent within its methods. The font is saved and restored using the same mechanism as for CWndSaveRestoreHelper: section and entry names are required.
Implementation of
CFontHelperThe
CFontHelper implementation is divided into four different parts: initialization; font picker dialog; save/restore definition, and logical/physical font management. Our class defines two constructors. The first in shown in this code sample:// this constructor will automatically try to load the font description
// from the INI/Registry
CFontHelper::CFontHelper(LPCTSTR szSection, LPCTSTR szEntry)
{
// defensive programming
ASSERT((szSection != NULL) && (_tcslen(szSection) > 0));
ASSERT((szEntry != NULL) && (_tcslen(szEntry) > 0));
m_szSection = szSection;
m_szEntry = szEntry;
// set default values
DefaultFontInit();
// try to load the saved description
Restore();
}
This constructor loads the font from a saved description under
szSection and szEntry. It relies on an both DefaultFontInit() and Restore() methods to retrieve the font description. Since save/restore parameters are provided, we only need to create a default font:// set the logical font information as "Lucida Sans Unicode" size 8
void CFontHelper::DefaultFontInit()
{
// define the logical parameters for the default font
m_LogFont.lfHeight = -11; // size 8
m_LogFont.lfWidth = 0;
m_LogFont.lfEscapement = 0;
m_LogFont.lfOrientation = 0;
m_LogFont.lfWeight = FW_NORMAL;
m_LogFont.lfItalic = 0;
m_LogFont.lfUnderline = 0;
m_LogFont.lfStrikeOut = 0;
m_LogFont.lfCharSet = 0;
m_LogFont.lfOutPrecision = OUT_STRING_PRECIS;
m_LogFont.lfClipPrecision = CLIP_STROKE_PRECIS;
m_LogFont.lfQuality = DEFAULT_QUALITY;
m_LogFont.lfPitchAndFamily = FF_SWISS | VARIABLE_PITCH;
_tcscpy(m_LogFont.lfFaceName, _T("Lucida Sans Unicode"));
// create the associated font
CreateFont();
}
You might wonder why we are creating a default font with
CreateFont(), since Restore() will create a new one just a few milliseconds later. The reason is simple — error handling. If the given szSection/szEntry does not provide access to a valid font description, the CFontHelper object would nevertheless be valid: it will contain a font, not the one expected but a default font.The second constructor relies on
DefaultInit() to initialize its members with default values:CFontHelper::CFontHelper()
{
// initialize with default values for INI/Registry and font description
DefaultInit();
}
And here is its helper function’s implementation:
// set the logical font information and INI/Registry access to default values
void CFontHelper::DefaultInit()
{
// set default font settings as "Lucida Sans Unicode" size 8
DefaultFontInit();
// default saving section/entry
m_szSection = _T("Settings");
m_szEntry = _T("Font");
}
It creates the default font and sets save/restore keys with default values.
Windows common font dialog picker
Once a
CFontHelper is initialized, you can ask it to display the Windows Font picker dialog:BOOL CFontHelper::ChooseFont()
{
CHOOSEFONT choosefont;
LOGFONT LogFont = m_LogFont;
// fill in the data needed for the Windows common font dialog
choosefont.lStructSize = sizeof(CHOOSEFONT);
choosefont.hwndOwner = ::GetActiveWindow();
choosefont.hDC = 0;
choosefont.lpLogFont = &LogFont;
choosefont.iPointSize = 0;
choosefont.Flags = CF_SCREENFONTS|CF_INITTOLOGFONTSTRUCT;
choosefont.rgbColors = 0;
choosefont.lCustData = 0;
choosefont.lpfnHook = 0;
choosefont.lpTemplateName = NULL;
choosefont.hInstance = 0;
choosefont.lpszStyle = 0;
choosefont.nFontType = SCREEN_FONTTYPE;
choosefont.nSizeMin = 0;
choosefont.nSizeMax = 0;
// use COMMDLG function to get new font selection from user
if (::ChooseFont(&choosefont) != FALSE)
{
// keep track of the current font
m_LogFont = LogFont;
// create a Windows font according to the logical information
CreateFont();
return TRUE;
}
else
return FALSE;
}
This method prepares a call to the Win32 API
ChooseFont() function. The CHOOSEFONT structure is therefore initialized to set the behavior we want:
The font picker dialog will be modal for the current active window (main frame in our case)
The currently selected font will be the one described by
The logical font description is copied back into a temporary variable
LogFontOnly screen fonts are presented by the dialog
If a font is selected, its logical description is saved in
m_LogFont and CreateFont() is called to create and save the corresponding font handle.
Programming Tips
If you want to change the font created by default in
DefaultFontInit(), here is a trick you can use. A logical font is quite complex and it would be fine to have an already filled LOGFONT corresponding to the font you are interested in. You can use Visual Studio’s debugger to help you.Add source code which calls
ChooseFont():CFontHelper FontHelper;
if (FontHelper.ChooseFont())
{
// insert code here
}
Then set a breakpoint ![]() on it with
on it with
m_LogFont = LogFont;
Use
F5 to let the dialog appear, choose the font you want; such as "Comic Sans MS" with Size 12:
The new breakpoint is reached once you have validated your choice using the
OK button. This is what you get in Visual Studio:
Now click on
LogFont in the left lower Variable pane:
You have access to its members’ values:
The default values in
DefaultFontInit() can easily be changed.
Management and lifetime of font description
The helper method used to transform a logical font into a real Windows font is called
CreateFont():// create the associated font
HFONT CFontHelper::CreateFont()
{
HFONT hFont = ::CreateFontIndirect(&m_LogFont);
if (hFont == NULL)
{
// GetLastError(); can be used to understand why the font was not created
TRACE("Impossible to create font\n");
}
// don't forget to delete the current font
if (m_hFont != NULL)
::DeleteObject(m_hFont);
// store the font (event if the creation has failed)
m_hFont = hFont;
return hFont;
}
The implementation is straightforward and relies on the Win32 API
CreateFontIndirect() function. Once a logical font has been converted into a font handle, it is saved in m_hFont. A font created by CreateFontIndirect() must be freed in order to avoid a resource leak. Therefore, the previously stored font handle is deleted using DeleteObject() before saving the new one.Once
CFontHelper contains a valid font, you will want to use it. Two methods allow you to retrieve either a logical font or a font handle. Their implementation is obvious. They both return the member's value.// return the logical font description for the wrapped font
LOGFONT CFontHelper::GetLogFont(LOGFONT& LogFont)
{
LogFont = m_LogFont;
}
// return the wrapped font
HFONT CFontHelper::GetFontHandle()
{
return m_hFont;
}
When it is time to destruct,
CFontHelper does not forget to release its resources:CFontHelper::~CFontHelper()
{
// don't forget to delete the current font
if (m_hFont != NULL)
::DeleteObject(m_hFont);
}
Therefore, you should take care of deleting
CFontHelper only when you are sure the font you could have retrieved from it (with GetFontHandle() for example) is no longer in use.
Saving and restoring CFontHelper descriptions
Like
CWndSaveRestoreHelper, a CFontHelper object is able to save itself into an INI file or into the Registry. Four methods are responsible for doing this special serialization.First, the object must know where its description will be saved and two methods offer the means to set these backup parameters:
void CFontHelper::SetSectionName(LPCTSTR szSection)
{
// defensive programming
ASSERT((szSection != NULL) && (_tcslen(szSection) > 0));
m_szSection = szSection;
}
void CFontHelper::SetEntryName(LPCTSTR szEntry)
{
// defensive programming
ASSERT((szEntry != NULL) && (_tcslen(szEntry) > 0));
m_szEntry = szEntry;
}
They both store section and entry values into their associated protected members
m_szSection and m_szEntry.Since a handle value has no meaning once saved, it is better to copy the font’s logical description. We are using the same mechanism to save and retrieve a font as for
CWndSaveRestoreHelper:void CFontHelper::Save()
{
// SetSectionName() must be called before this method is used
// SetEntryName() must be called before this method is used
ASSERT(m_szSection.GetLength() > 0);
ASSERT(m_szEntry.GetLength() > 0);
// save the logical font description
CString strBuffer;
strBuffer.Format(
"%d:%d:%d:%d:%d:%d:%d:%d:%d:%d:%d:%d:%d",
m_LogFont.lfHeight,
m_LogFont.lfWidth,
m_LogFont.lfEscapement,
m_LogFont.lfOrientation,
m_LogFont.lfWeight,
m_LogFont.lfItalic,
m_LogFont.lfUnderline,
m_LogFont.lfStrikeOut,
m_LogFont.lfCharSet,
m_LogFont.lfOutPrecision,
m_LogFont.lfClipPrecision,
m_LogFont.lfQuality,
m_LogFont.lfPitchAndFamily
);
AfxGetApp()->WriteProfileString (m_szSection, m_szEntry + _T("_Desc"), strBuffer);
// save the font name
AfxGetApp()->WriteProfileString (
m_szSection, m_szEntry + _T("_Name"), m_LogFont.lfFaceName
);
}
Each
m_LogFont numerical member is concatenated into a long string which is saved under a different entry than the font name. For example, here is the INI file layout where a font is stored by default:[Setting]
Font_Desc=-11:0:0:0:400:0:0:0:0:3:2:1:66
Font _Name=Comic Sans MS
Here is the implementation of what happens when a font needs to be reloaded:
// get the logical font from the INI/Registry
void CFontHelper::Restore()
{
// SetSectionName() must be called before this method is used
// SetEntryName() must be called before this method is used
ASSERT(m_szSection.GetLength() > 0);
ASSERT(m_szEntry.GetLength() > 0);
// get font description from INI/Registry
CString strBuffer = AfxGetApp()->GetProfileString(m_szSection, m_szEntry + _T("_Desc"));
// nothing is saved
// --> keep the current font
if (strBuffer.IsEmpty())
return;
LOGFONT LogFont;
int cRead =
_stscanf (
strBuffer,
"%d:%d:%d:%d:%d:%d:%d:%d:%d:%d:%d:%d:%d",
&LogFont.lfHeight,
&LogFont.lfWidth,
&LogFont.lfEscapement,
&LogFont.lfOrientation,
&LogFont.lfWeight,
&LogFont.lfItalic,
&LogFont.lfUnderline,
&LogFont.lfStrikeOut,
&LogFont.lfCharSet,
&LogFont.lfOutPrecision,
&LogFont.lfClipPrecision,
&LogFont.lfQuality,
&LogFont.lfPitchAndFamily
);
if (cRead != 13)
{
TRACE("Restore(): Invalid Registry/INI file entry\n");
return;
}
// get the font name
strBuffer = AfxGetApp()->GetProfileString(m_szSection, m_szEntry + _T("_Name"));
if (strBuffer.GetLength() <= 0)
return;
_tcscpy(LogFont.lfFaceName, strBuffer);
// take into account the loaded logical font description
m_LogFont = LogFont;
// create the associated font
CreateFont();
}
The logical font description is retrieved in two steps: the numerical values first and then font name. Finally, a real font is created using
CreateFont() which sets m_hFont to this new font handle.
How to use
CFontHelperEven if the helper class has been defined and explained, it is always easier to understand it using an example. Let’s see how to integrate
CFontHelper into our Advanced Process List application.First include the following header file to
AplDoc.h:#include "FontHelper.h"
Creation and saving in
CAplDocA
CFontHelper object is stored by CAplDoc as a protected member:protected:
CFontHelper* m_pFontHelper;
It is created in the document’s constructor:
CAplDoc::CAplDoc()
{
...
// create an instance of the font helper
m_pFontHelper = new CFontHelper(_T("Settings"), _T("Font"));
}
It is deleted in the document’s destructor as follows:
CAplDoc::~CAplDoc()
{
// get rid of the font helper after having saved it
if (m_pFontHelper != NULL)
{
m_pFontHelper->Save();
delete m_pFontHelper;
}
}
As usual, we don't forget to save it before its deletion.
The role of the frame
It is the role of the frame to ask
CAplDoc to set the font for its views, before it creates them. We saw earlier that OnCreateClient() (which you may recall is a CMainFrame method) is called to embed all views in the document, which is how we created our CParentView, CAplView and CModuleView as nested splitters.After adding the line:
#include "AplDoc.h" to the top of MainFrm.cpp, copy the following code just before OnCreateClient() returns:// Once views are created, it is time to set their font
if (pContext != NULL)
{
CAplDoc* pDocument = (CAplDoc*)pContext->m_pCurrentDoc;
pDocument->NotifyDefaultFont();
}
else
TRACE("Impossible to get frame creation parameters");
// don't call the default MFC processing since the views are already created
// return CFrameWnd::OnCreateClient(lpcs, pContext);
return TRUE;
}
In
AplDoc.h, declare this method as public:public:
// font management
void NotifyDefaultFont();
Add the following source code to
AplDoc.cpp:void CAplDoc::NotifyDefaultFont()
{
// defensive programming
ASSERT(m_pFontHelper != NULL);
// use the font helper to get the font
if (m_pFontHelper != NULL)
{
// dispatch new font to each view
SetCurrentFont();
}
}
This is a wrapper around a synchronizing helper method called
SetCurrentFont() which will be introduced later.
Selecting a new font:
OnSelectFont()You may recall that the objective of this exercise was to allow the user to select a font, and we created a handler for the
WM_SELFONT message at the beginning of this section. We can now implement this function OnSelectFont():void CAplDoc::OnSelectFont()
{
// defensive programming
ASSERT(m_pFontHelper != NULL);
// use the font helper to ask the user for a new font
if (m_pFontHelper != NULL)
{
if (m_pFontHelper->ChooseFont())
// dispatch new font to every views
SetCurrentFont();
}
}
Our document asks
m_pFontHelper to present a Windows common font dialog picker to the user. Once a font has been selected, it needs to be sent to every associated view.
Synchronizing a font among views:
UpdateAllViews() and OnUpdate()Our document knows that its views must use a new font, but how do we tell them? Once again, we will use
UpdateAllViews() with a new custom lHint:// lHint pHint Event meaning
//-------------------------------- ------------ -----------------------------------
#define VM_REDRAW 0 // 0 standard MFC redrawing notification
#define VM_SET_CURRENT_PROCESS 1 // CProcess* current process has changed (or NULL)
#define VM_CHANGEFONT 2 // hFont font has changed
Therefore,
SetCurrentFont() relies on UpdateAllViews() to dispatch the new font to all attached views:// change the current font for all views
void CAplDoc::SetCurrentFont()
{
// defensive programming
ASSERT(m_pFontHelper != NULL);
// send the font to every views
if (m_pFontHelper != NULL)
UpdateAllViews(NULL, VM_CHANGEFONT, (CObject*)m_pFontHelper->GetFontHandle());
}
The parameter received by each view in their
OnUpdate() method will be the font handle provided by our font helper.You have now to add a new view message to
OnUpdate() for each view, with exactly the same code:void CXXXView::OnUpdate(CView* pSender, LPARAM lHint, CObject* pHint)
{
// lHint = View Message
switch(lHint)
{
case VM_REDRAW :
...
break;
case VM_SET_CURRENT_PROCESS :
...
break;
// the current font has been changed by the user
case VM_CHANGEFONT:
{
// change list control font
SendMessage(WM_SETFONT, (WPARAM)(HFONT)pHint, 0L);
// redraw all
Invalidate(TRUE);
}
break;
}
}
The view sends a
WM_SETFONT message to itself and sets the input font handle as wParam.
Summary
In this case study, in addition to learning how to handle a list view, a tree view and fonts, we have mainly focused on two main areas of expertise:
We have used the much of the knowledge contained in Ivor Horton’s Beginning Visual C++ 6 to implement the features of our Advanced Process List
We have taken the time to think about how to reuse code by developing stand-alone classes.
You should now be ready for new challenges such as allowing the user to select a row by clicking on any column of the line instead of its first item, or highlighting whole row, not just the first item. These modifications are not that hard to achieve. If your first thought was to take a look at samples provided by Visual C++ and MFC, you have both gotten the solution and started a good habit!J Read "